Tag

v15

Navegando


Simple VHD manager
A VHD is a large container file that simulates the file structure of a hard drive. Think of it as a fancy ZIP file, but without the compression. VHDs are single files and are most commonly used as
hard drives for virtual machines, but they can also be mounted so they act like real hard drives. When mounted, they appear to Windows as a real physical hard drive. You can add, remove, and edit files on them, or create a fresh installation of Windows to a new, bootable VHD. If you need to use more than one operating system, often the best choice is installing secondary (or more) operating systems to a VHD. But there can arise minor difficulties, for example:

1. A virtual hard drive can disappear after a restart (the most common problem)
2. Sometimes you need to add an entry to the boot menu
3. The process of of attaching and detaching, etc

Simple VHD Manager is portable freeware which helps VHD users simplify some of these operations:

– You can attach and detach VHD/VHDX/ISO files via drag and drop
– You can permanently attach a virtual hard disk in Windows 11 – 10 – 8,1 – 8 and Windows 7
– You can easily add and/or remove VHD/VHDX/ISO files to the boot menu

What is new on version 1.5  (Thursday, 21 September 2023)

1. [FIXED] – VHDX added to boot menu in UEFI/GPT fails to start automatically
2. [FIXED] – Options/Boot Menu Policy section doesn’t allow to choose Legacy
3. [FIXED] – The text and icons on the interface are too small
6. [ADDED] – Many improvements in coding

How to use :

After downloading, extract Simple VHD Manager to your desired location, then run it. To add VHD, VHDX, or ISO files, you have two choices – using the ‘Add’ button, or via drag and drop (recommended)
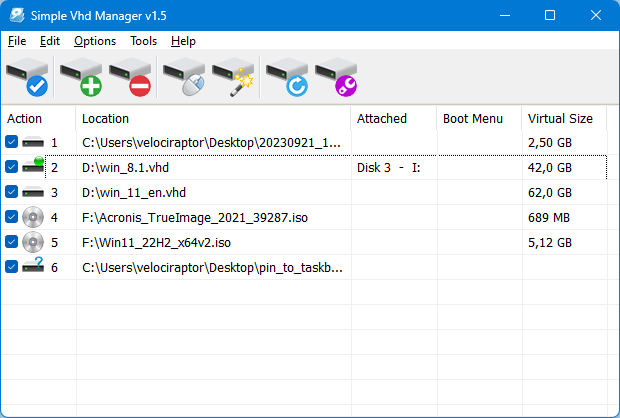


Simple VHD manager Add a file

To Attach a VHD file, you can right-click, or use the Edit menu
Simple VHD manager Attach a file

The right-click menu also offers other choices, such as Attach, Detach, and Add to Boot Menu. After attaching a VHD file, that entry will turn green, and the Detach choice will appear.

Permanently Attach a Virtual Hard Disk

To create a permanent attachment, inside Simple VHD Manager, select the virtual hard drive file, and click ‘Options’, then “Attach Marked to System Startup”. Simple VHD Manager will then add a service to keep that VHD file attached on every startup.
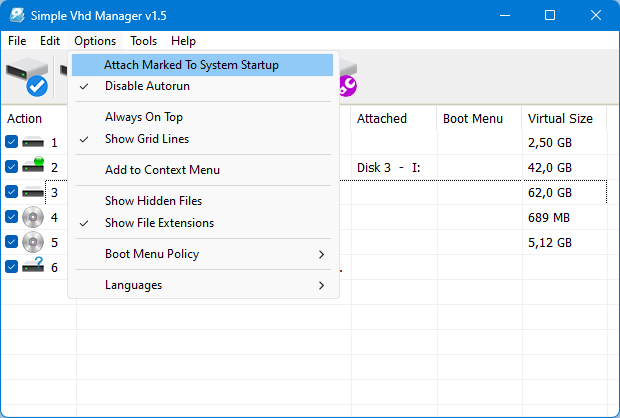
Attach a vhd permanently

How to create a VHD or VHDX

To create a VHD or VHDX ; choose the Wizard icon (Create and Attach VHD), select Virtual Hard Drive size , Format and Typ that is all
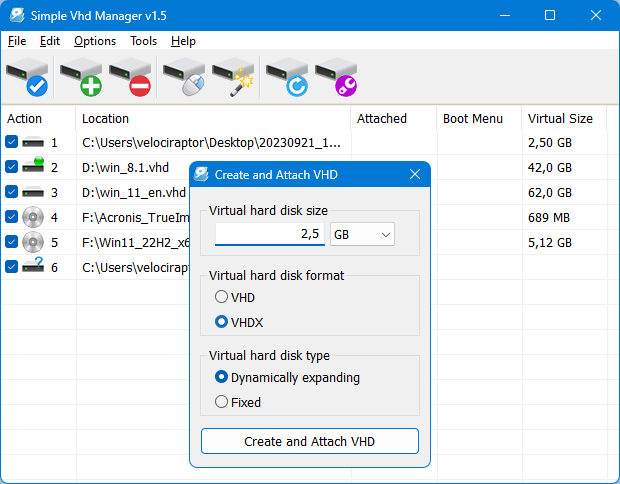
Simple vhd manager create a vhd

Add VHD/VHDX/ISO Options to your Context menu

Click the “Add to Context Menu” icon and select desired option , there are 3 options , a) Attach- Detach to right click menu b) Attach- Detach to sendto menu c) Attach with double click function.
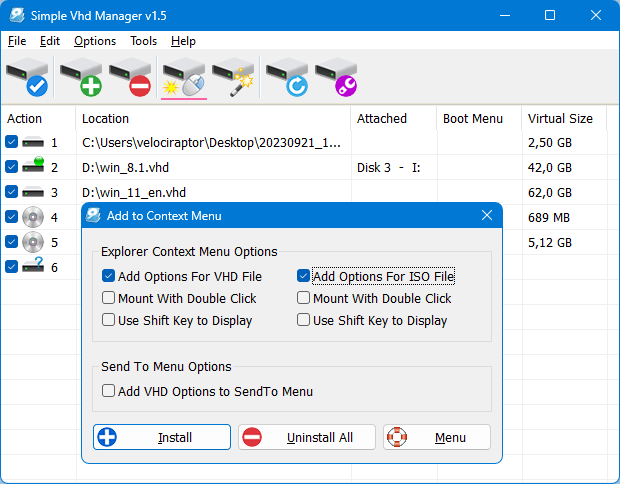
Simple vhd manager add context menu

Add a Bootable VHD or ISO File to the Boot Menu

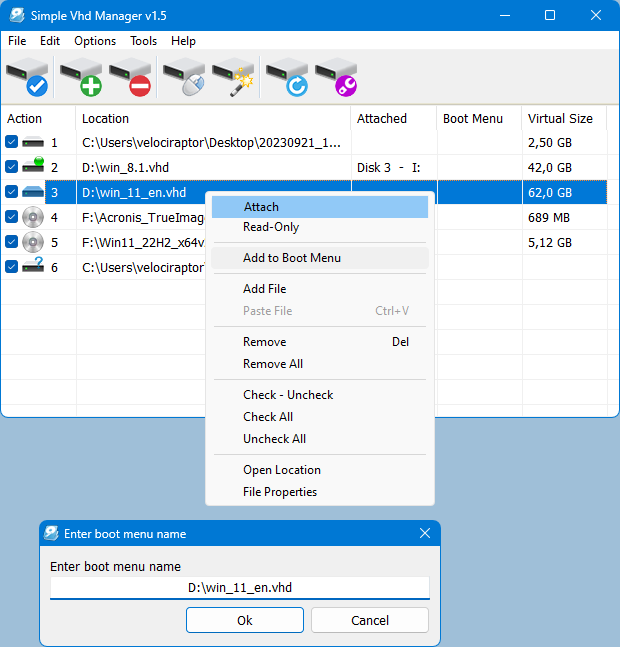
To add a file to the boot menu, right-click it and select “Add to Boot Menu”. A dialog will appear allowing you to enter your desired name for the boot entry.
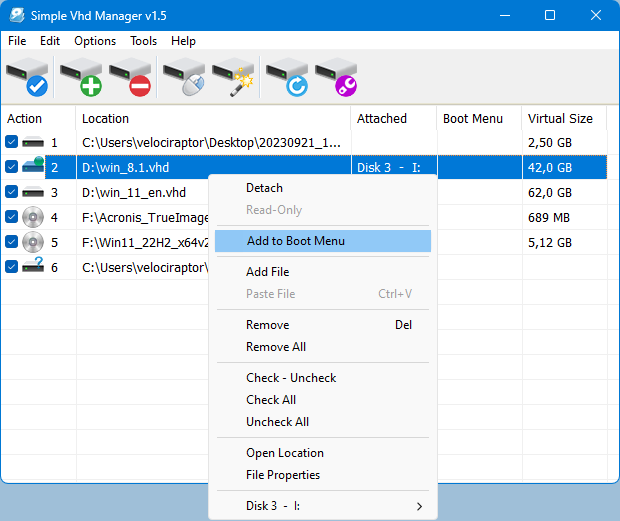
add a vhd to boot menu with Simple VHD manager

NOTE 1 : Simple VHD Manager can only read its own boot menu entries, not all of them
NOTE 2 : If you add a bootable ISO image to the boot menu, be aware that it can only boot from the MBR partition, but not from a GTP partition
NOTE 3 : You cannot add a VHD/VHDX which contained within another VHD/VHDX to the boot menu.

You can also change the mounted VHD file’s drive letter by using the right-click menu (the file must be selected), but please be careful; if you use a VHD image as a main system or you have booted from a VHD, do not change the (C:) partition’s drive letter. “C:” will be the windows partition currently in use, and changing it to a different drive letter will very likely cause Windows to become unstable.
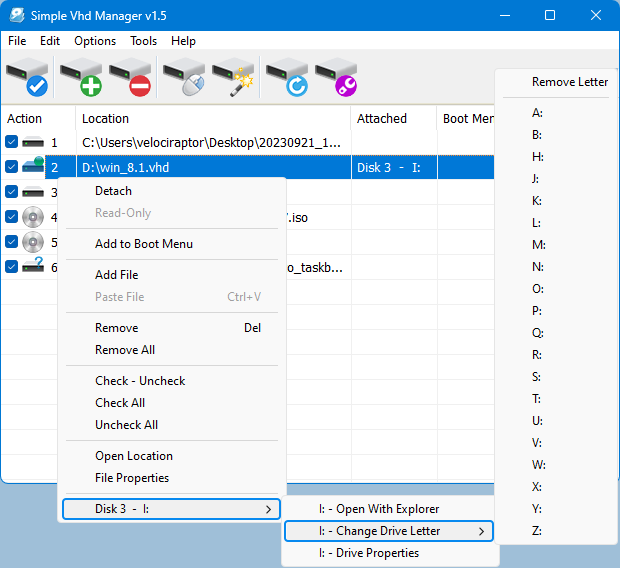
change vhd letter by simple vhd manager

Simple VHD Manager has CMD support, as shown below:
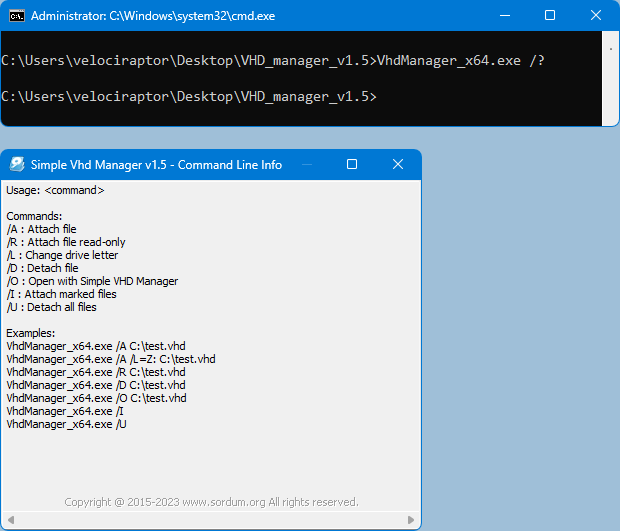
simple vhd manager cmd support

After adding VHD or ISO files to the boot menu, you might later delete the VHD/ISO file (intentionally or by mistake) and wish to remove Simple VHD Manager entries from the boot menu. To do so, click “File”, then “Remove Entries in Boot Menu”.
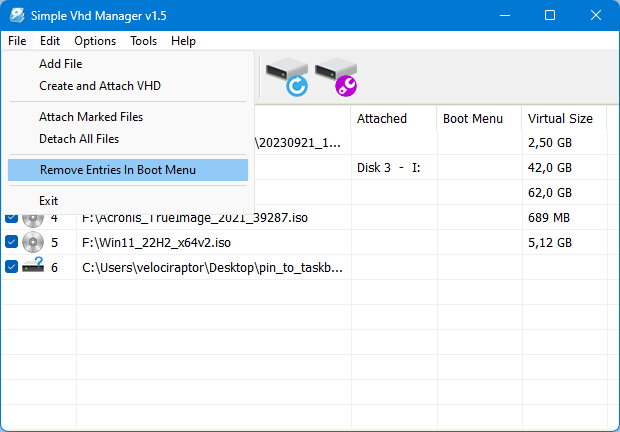
Remove all boot entries from boot menu

Feel free to make suggestions or comments. We use this feedback to further improve Simple VHD Manager

Supported operating systems: Windows 11 , Windows 10 , Windows 8.1 ,Windows 8 , Windows 7

Supported languages: English , Turkish , German , Português-Brasil , Greek , French , Hungarian , Korean , Persian , Polish , Russian , Chinese , Italian , Japanese ,Finnish , Spanish , Bulgarian , Slovenian , Indonesian , Hebrew , Romanian , Arabic

Eula license for our freware

File: VhdManager_x64.exeVirustotal
MD5: baec66b076d2a6a476ebe81a955c2610
SHA1: 96d936af34bfb18821a189be73a7f457c18d1e2d

File: VhdManager.exeVirustotal
MD5: 9ffcf45ce65219a59cb4213eb73a9eaa
SHA1: 0a11a2307c13b19e0a028531c1496b8b1e952ad1

Download


Source link


Bluelife hostst editor is a Portable freeware
when you type a domain name in your browser that you wish to connect to, your application must first convert it to an IP address that it will use to connect to.The way these hostnames are resolved to their mapped IP address is called Domain Name Resolution. On almost all operating systems whether they be Apple, Linux, Unix, Netware, or Windows the majority of resolutions from domain names to IP addresses are done through a procedure called DNS. DNS stands for Domain Name System and is the standard domain name resolution service used on the Internet , There is another way to resolve domain names without using the Domain Name System, and that is by using your HOSTS file. Almost every operating system that communicates via TCP/IP, the standard of communication on the Internet, has a file called the HOSTS file. This file allows you to create mappings between domain names and IP addresses Another way to think of a hosts file is as an address translator and redirector.

What is New (Freitag, 26. Mai 2023)

1. [ Fixed ] – The mouse cursor appears incorrectly on the scroll bar in the text view feature
2. [ Fixed ] – Add exclusions to Windows Defender feature doesn’t work
3. [ Added ] – Some code Improvements

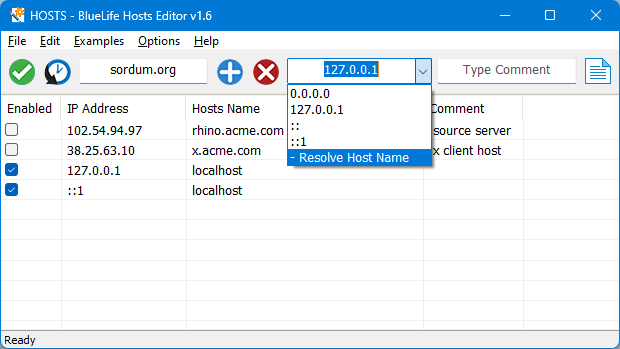
Bluelife hosts editör is a Portable Freeware hosts-file editor and Allows you to easily add/delete , Block , Update domain names to your hosts file , Simply type the hostname you wish to add in the first box and Select resolve domain names from the drop down menu then add in to the list with plus button


bluelife hosts editor main gui

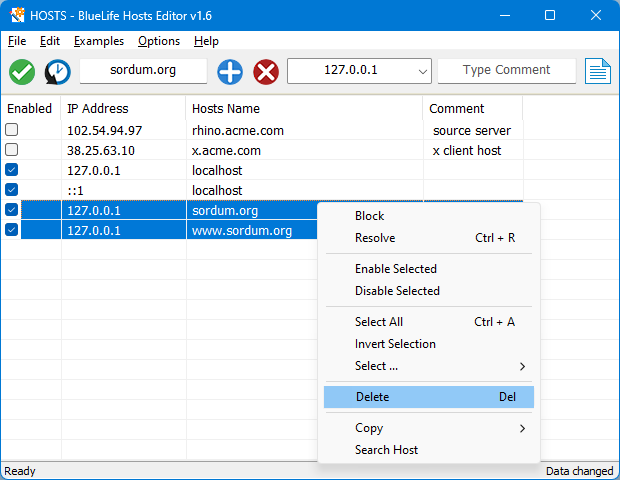
Finally use Save button (green button), if you want to Block a domain name you must select the appropriate option from the drop-down menu then use Save button , you can also use the right click menu to block , unblock … domain names on the list.

Bluelife hostst editor right click menu

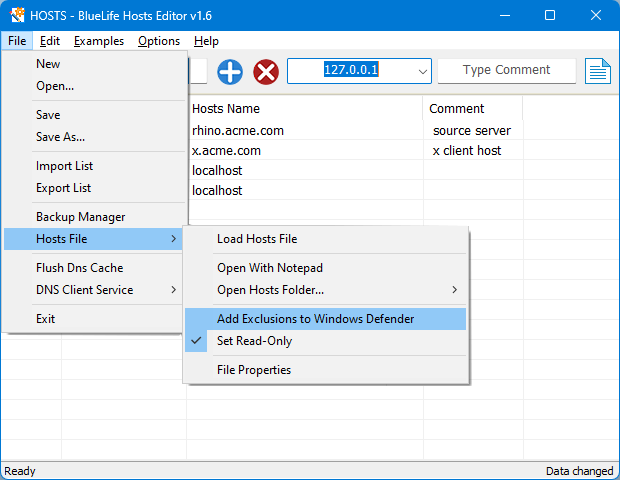
In some cases, windows can reset “Hosts” file to default state because of the Protection, you may need to use File – Hosts File – Add Exclusions to Windows Defender feature to avoid it. If you want to add a different “hosts” file to your system, you can use the File – Import List feature.

Add hosts file to the defender exclusion list

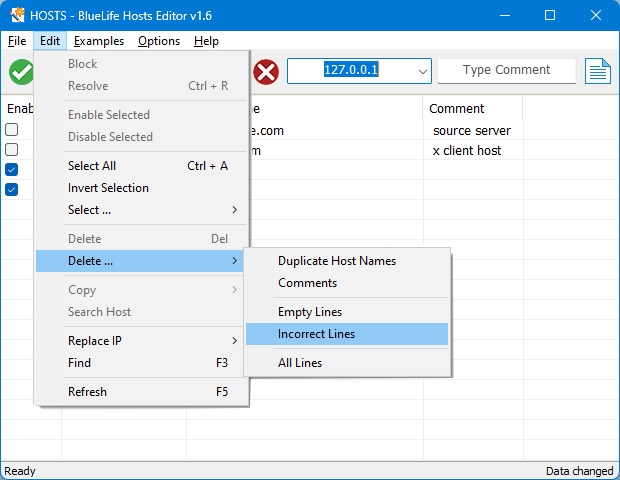
You can use the “Examples” menu to easily block some of the social media Web Pages like Facebook,Twitter or Youtube, Under the edit menu, you will find ; Delete dublicate hosts names, Delete comments,Delete Emty Lines,Incorrect Lines and replace IP with 0.0.0.0 – 127.0.0.1 or vice versa features.

bluelife hosts editor edit menu

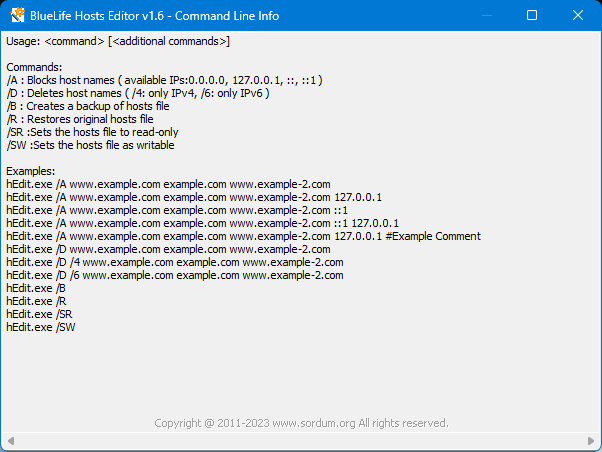
BlueLife Hosts editor has also Command Line Parameters support

bluelife hosts editor cmd parameter support

Compatibility: Windows 11 , Windows 10 , Windows 8.1 , Windows 8 , Windows 7 , Windows Vista , Winsows Xp – (both x86 and x64)

Supported Languages: English , Turkish , German , French , Russian , Chinese (Simplified) , Chinese (Traditional) , Italian , Dutch (Nederlands) , Greek , Persian , Portuguese , Polish , Hebrew , Romanian , Hungarian , Spanish , Korean , Vietnamese

Eula license for our freware

File: hEdit_x64.exeVirustotal
MD5: 64d16681ea5d53045b69d3fc92c3cee4
SHA1: b874d6ab2bdf7fe25fcc8fa69759aebee6eda4bf

File: hEdit.exeVirustotal
MD5: f9a7f043be9127c42989823cc871c0cb
SHA1: 9ddbf00c4151ac02fe2ebd59ba6803f1ecf17dd2

Download


Source link


Dns lock
If you have an issue connecting to the internet and getting error like ‘DNS servers not responding’ please check your ipv4/6 preferred DNS server , sometimes IPV4 preferred DNS server kept changing . No matter how many times you change it to ‘Obtain DNS server automatically’ or the preferred and alternate DNS servers to what they actually are they can revert back . “DNS Server issue” is generally occured due to harsh VIRUS attack , auto DNS changing software or an Antivirüs software’s Secure DNS settings but sometimes None of the solutions works (even Formatting) in such situation Dns Lock can help you to keep ipv4/6 preferred DNS servers constant, it can prevent them to changing automatically , it is a portable freeware tool which prevents malware (or anything else) changing your IPv4/6 DNS addresses

What is New (Monday, January 9, 2023)

1. [Fixed] The program interface and icons are too small
2. [Fixed] The software can be closed from the task manager.
3. [Added] Refresh option
4 .[Added] High contrast support
5. [Added] Some codes have been Improved

How to use

After downloading, extract Dns Lock to your desired location, then run it , write your desired DNS ips into the box (separate with comma) and use “install service” button


Dns Lock main

You can Protect your Ipv4 DNS ip , IPv6 DNS ip or both of them , Once you’ve chosen or entered your details, the program applies them to your system and installs a Windows service to keep them safe

DNS lock IPv4 Locked

DNS Lock offers you a choice of Open DNS and Google DNS Servers, too , Program will start automatically with Windows , if you want to stop it , use “Uninstall service” button

Dns lock locked Dns Adresses

There is a small Lock icon (indicator) on the left side of the DNS combo and it shows us the DNS status (Locked or not locked)

Dns Lock ’s Cmd parameters

Dns Lock Cmd Parameters

Supported operating systems: Windows 11 , Windows 10 , Windows 8.1 , Windows 8 , Windows 7 , Windows Vista , Windows Xp – (x86 & x64)

Eula license for our freware

File: DNS-Lock_x64.exeVirustotal
MD5: 03ec3fd0fa2e5534f6fbfee35991032f
SHA1: 415f171238855a2cc7a593be4933dfaa1d13877a

File: DNS-Lock.exeVirustotal
MD5: 39c4c3cfdad2b7d4c2e0fb3d705d3bd8
SHA1: 1e63604c0dfe637e4ea784bc8cb64ac38148fb59

Download


Source link


Runastool
Windows’ built-in “Run-As” command allows you to launch a program as a different user account than the one currently active, However, runas.exe cannot be fully automated as it requires that the user typein the password for the alternate account. RunAsTool is portable freeware which allows standard users to run a specific program with administrator privileges without the need to enter the administrator password. This allows you to provide standard (non-admin) users with access to programs that require admin rights.

Under a restricted account, some programs may not run correctly due to missing administrator rights, therefore many users are given administrator accounts, making the system more vulnerable to malware, viruses and other security risks. With RunAsTool, you can correct this.

To run Properly RunAsTool need to install on a windows system which has an Administrator account with password.The login information for the application like username and password are read from an encrypted file – You don’t have to worry about your Admin Password.

RunAsTool v1.5 – What’s New – (Freitag, 2. September 2022)

1. [Added] – ability to attach a file in network location (\BlueLifeExampleFolder)
2. [Added] – option to reset previous list (/R) for import Cmd parameter
3. [Added] – parameter to uninstall program (RunAsTool.exe /Uninstall)
4. [Fixed] – The text in the program interface is tiny
5. [Fixed] – Improvements in the code of the program
6. [Fixed] – A small Bug in parameter and a character corruption in import parameter information

How to use

With RunAsTool there is no need to use a CMD prompt or any parameter in order to allow a standard user to run a program with admin rights. Just download, extract, and launch RunAsTool.

1) Administrators In standard user account:

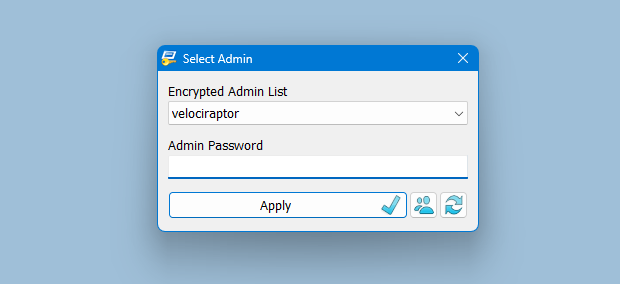
Launch RunAsTool and choose an admin account (if there are more than one) and type in the associated admin password.


Runastool password screen

RunAsTool has two user interfaces (UI). One for administrator accounts and one for standard users. (Standard users aren’t able to use the admin UI). In the admin UI, you can easily drag and drop any program(s) into the UI in order to give it admin privileges. Standard users can also create application shortcuts.

Runastool admin interface

To change the places of the icons in the interface, simply drag them on each other. RunAsTool has several useful options. For example, “Run with default rights”, “Run as limited user”, as well as the ability to show, hide, minimize, or maximize the launched window(s). As a security check, administrators can use “check the file size before run” feature. If a restricted user attempts to rename another program in order to run it with admin rights (a.k.a. “spoofing”), this option will prevent the user from doing so.

2) Administrators In Administrator user account:

Admins can easily add program(s), then right click it/them and create a shortcut on the standard user’s desktop.

Runastool right click and create a shortcut

Administrators can also easily import and export program lists. Just click File–>Menu and choose Import or Export. This is useful to create a list once and use it again later.

Runastool export - import feature

Standard users have two options to use an allowed program(s) with admin privileges.

1) In the RunAsTool restricted UI, double-click any program to run it with admin rights.

Runastool Restricted user interface

2) If the administrator has allowed it, a standard user may click any program and create their own shortcuts, so that there is no need to launch RunAsTool every time. They can also use any shortcut which the admin has already created for them.

How to import a backup file to multiple computers

runastool import feature

To backup your settings please use “File – Export List” Feature , you will get a .rnt file like this “20180426_173736_RunAsTool.rnt” the first numbers Indicates the current date , to import the backup file silently run the Cmd with Administrator privileges and use the following command
RunAsTool.exe “/U=Admin” “/P=PassWord” “/I=Import.rnt

RunAsTool.exe /R “/U=Admin” “/P=PassWord” “/I=Import.rnt

/R : Reset previous list
Admin : Account Name
PassWord : Account Password
Import.rnt : Backup file name

To simplify the whole process you can use a cmd or Bat file and use an Account credentials temporarily in it.

Supported operating systems: Windows 11 , Windows 10 , Windows 8.1 ,Windows 8 , Windows 7 , Windows Vista , Windows Xp

Supported languages: English , Turkish , German , French , Spanish, Vietnamese, Greek , Indonesian , Russian , Japanase , Persian , Arabic , Polish , Chinese (Simplified and Traditional) , Hungarian , Korean , Slovenian , Hebrew , Italian , Brazilian Portuguese ,Dutch (Nederlands) , Romanian

Eula license for our freware

File: RunAsTool_x64.exeVirustotal
MD5: 38fcaa6fb65ce15c777132caf6e1056b
SHA1: c62ca48c1995cc657acac7c33705d9e0dc1c3997

File: RunAsTool.exeVirustotal
MD5: 899198029f9adc45094652dc9a629a99
SHA1: 60d5169c227500a56dd5555abaf951d996d4203c

Download


Source link


Backup Start Menu Layout
The Windows 11 And Windows 10 Start Menus lets you pin apps so that they are easier to access. You can group them together and manage the size of the tiles as well as the width of the Start Menu. Whether you love tiles or not, you can find ways to customize and work them so it’s easier to access your favorite apps. You can resize your tiles, pin and unpin them on the Start menu or Start screen. After devoting so much time arranging tiles on the Start menu, it would be annoying if something were to happen to it , a registry corruption , a new application installation or a bad update can rearrange or delete the tiles on the Start menu. To avoid such a situation you can Back Up And Restore The Start Menu Layout In Windows 10. This can be also handy if you do not want to have to setup your Start menu layout from scratch again. Say after a clean install of Windows 10.

Backup Start Menu Layout v1.5 – (Thursday, 07 October 2021)

[Added] – Windows 11 Support
[Added] – Confirmation message to Reset Start Menu option
[Added] – Some code Improvements
[Fixed] – Some Minor BUGS

Windows 11 Start Menu


Default windows 11 start menu layout

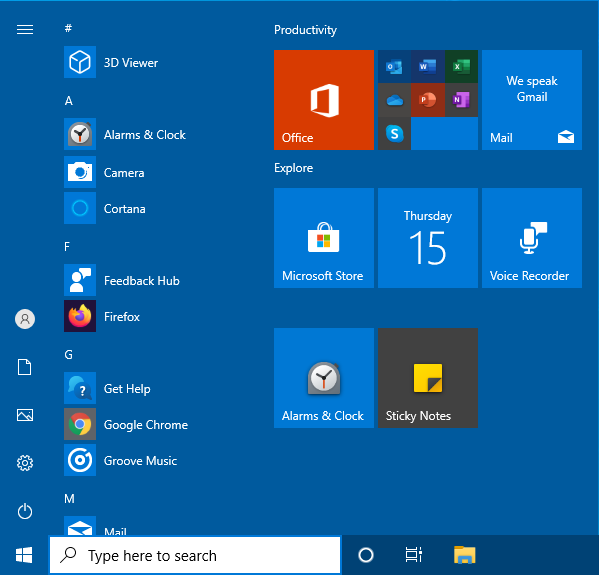
Windows 10 start Menu

Default Windows 10 start menu layout

Backup and Restore Start Menu Layout in Windows 11 and Windows 10

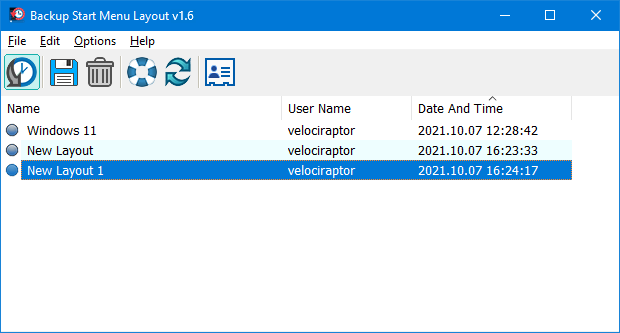
Backup Start menu layout is a very simple portable freeware Application to backup and restore Windows 10 start menu layout. Extract the downloaded ZIP file and run Appropriate .exe file (x64 or x86)

Backup start menu layout

1. To backup Windows 10 start menu layout use the second icon (Diskette Icon) , an input will appear in the Program interface.

2. If you select the backup entry and use the first icon You can restore the saved windows 10 start menu layout. you can also double click on it

Restore start menu layout

How to reset Start Menu Layout in Windows 11 and Windows 10

If your Start Menu has gotten overly cluttered, or want to restore the tiles that you’ve unpinned from Start Menu just use Backup Start menu layout v1.1 Reset start menu layout feture. It will reset your start menu layout back to it’s default configuration. To do that Just click the Lifesaver icon or Use File – Reset Star Menu Layout

How to reset start menu layout

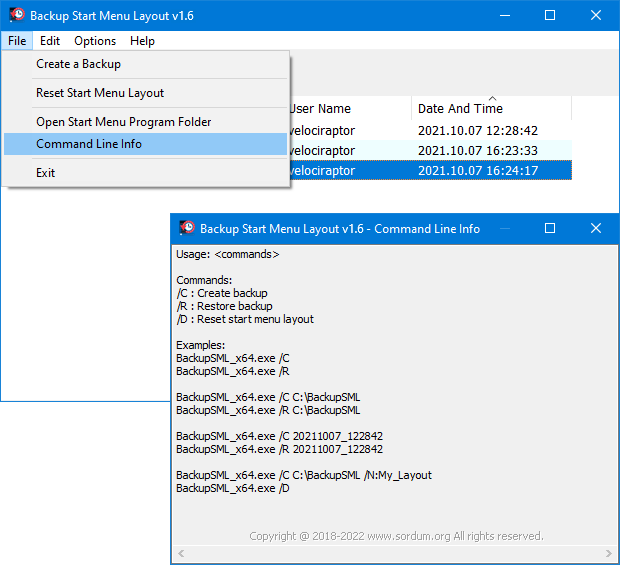
You can delete any backup with Trash can button. To see all the supported command line parameters , use the File – Command Line Info feature

backup start menu layout cmd support

Supported operating systems: Windows 11 and Windows 10 (x64 – x86)

Supported languages: English, Turkish, German, Italian, French , Korean , Portuguese (Brasil) , Chinese (Simplified) , Polish , Spanish , Greek , Dutch (Nederlands), Russian , Hungarian , Swedish

Eula license for our freware

File: BackupSML_x64.exe │ Virustotal
MD5: f64b66d943f915a2746efb4f093d5b39
SHA1: 7a635aca8b5520f256eb1866e0133b3c5512fe9f

File: BackupSML.exe │ Virustotal
MD5: a350315317d22e968f0a5fbf13689216
SHA1: e13f1b1be304d3f7736172601be2cff2ebc6e0b9

Download


Source link


Backup Start Menu Layout
The Windows 11 And Windows 10 Start Menus lets you pin apps so that they are easier to access. You can group them together and manage the size of the tiles as well as the width of the Start Menu. Whether you love tiles or not, you can find ways to customize and work them so it’s easier to access your favorite apps. You can resize your tiles, pin and unpin them on the Start menu or Start screen. After devoting so much time arranging tiles on the Start menu, it would be annoying if something were to happen to it , a registry corruption , a new application installation or a bad update can rearrange or delete the tiles on the Start menu. To avoid such a situation you can Back Up And Restore The Start Menu Layout In Windows 10. This can be also handy if you do not want to have to setup your Start menu layout from scratch again. Say after a clean install of Windows 10.

Backup Start Menu Layout v1.5 – (Thursday, 07 October 2021)

[Added] – Windows 11 Support
[Added] – Confirmation message to Reset Start Menu option
[Added] – Some code Improvements
[Fixed] – Some Minor BUGS

Windows 11 Start Menu


Default windows 11 start menu layout

Windows 10 start Menu

Default Windows 10 start menu layout

Backup and Restore Start Menu Layout in Windows 11 and Windows 10

Backup Start menu layout is a very simple portable freeware Application to backup and restore Windows 10 start menu layout. Extract the downloaded ZIP file and run Appropriate .exe file (x64 or x86)

Backup start menu layout

1. To backup Windows 10 start menu layout use the second icon (Diskette Icon) , an input will appear in the Program interface.

2. If you select the backup entry and use the first icon You can restore the saved windows 10 start menu layout. you can also double click on it

Restore start menu layout

How to reset Start Menu Layout in Windows 11 and Windows 10

If your Start Menu has gotten overly cluttered, or want to restore the tiles that you’ve unpinned from Start Menu just use Backup Start menu layout v1.1 Reset start menu layout feture. It will reset your start menu layout back to it’s default configuration. To do that Just click the Lifesaver icon or Use File – Reset Star Menu Layout

How to reset start menu layout

You can delete any backup with Trash can button. To see all the supported command line parameters , use the File – Command Line Info feature

backup start menu layout cmd support

Supported operating systems: Windows 11 and Windows 10 (x64 – x86)

Supported languages: English, Turkish, German, Italian, French , Korean , Portuguese (Brasil) , Chinese (Simplified) , Polish , Spanish , Greek , Dutch (Nederlands), Russian , Hungarian , Swedish , Japanese

Eula license for our freware

File: BackupSML_x64.exe │ Virustotal
MD5: f64b66d943f915a2746efb4f093d5b39
SHA1: 7a635aca8b5520f256eb1866e0133b3c5512fe9f

File: BackupSML.exe │ Virustotal
MD5: a350315317d22e968f0a5fbf13689216
SHA1: e13f1b1be304d3f7736172601be2cff2ebc6e0b9

Download


Source link


Powerrun by sordum
PowerRun is a portable freeware to launch regedit.exe , Cmd.exe or other software with the same privileges as the TrustedInstaller / Nt Authority/system Why would you need it? Sometimes it is just not enough to just be running as Administrator, Maybe it’s a file or a registry key that is locked or not editable, PowerRun a tool with this powerful privilege most likely solve that , PowerRun doesn’t require any installation process or additional dll files.

What is new on version 1.5  (Friday, 25 June 2021)

1. [Fixed] – program does not save the size of the screen before it closed
2. [Fixed] – Translate GUI errors and some translation errors
3. [Fixed] – Font size in some parts on list is too small
4. [Fixed] – Some minor code weaknesses and BUGs
5. [Added] – Program will save the width of the columns in the list for the next boot
6. [Added] – dragged and dropped file location will set as the working directory automatically


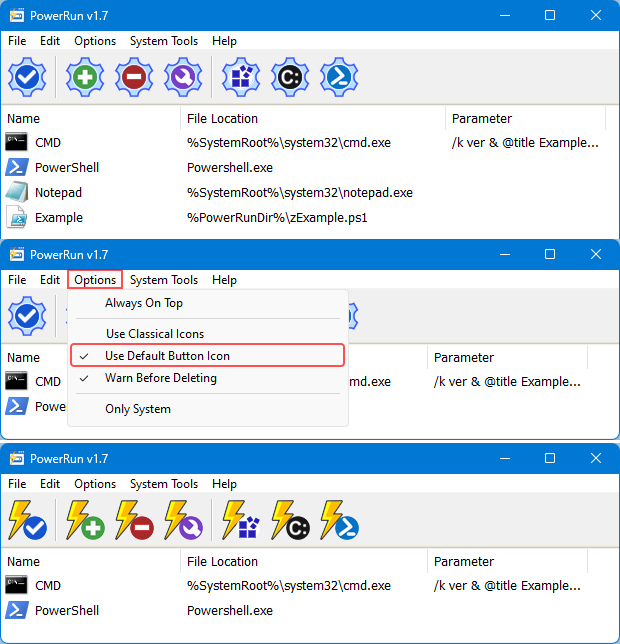
powerrun main

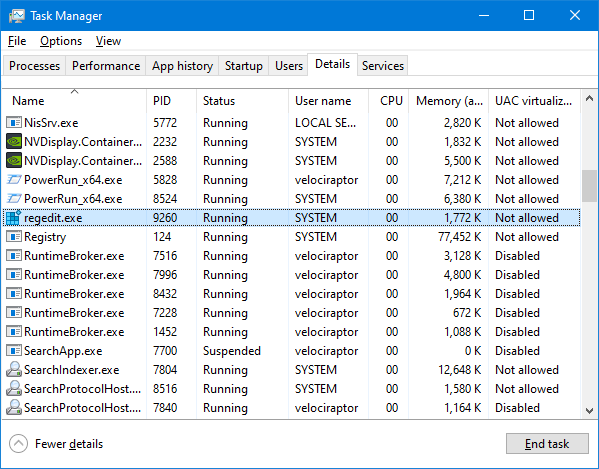
How to use : After downloading, extract PowerRun to your desired location, then run it. You can drag and drop any files on it for example ; program files , Program files shortcuts , script files , text files usw. to run a listed file in TrustedInstaller/SYSTEM privileges you can select it and use run button or right click on it and choose “Run File” feature , the file will run with Highest privileges , you can check the Task manager’s details tab to verify that the selected file running under SYSTEM Privileges

PowerRun run as System

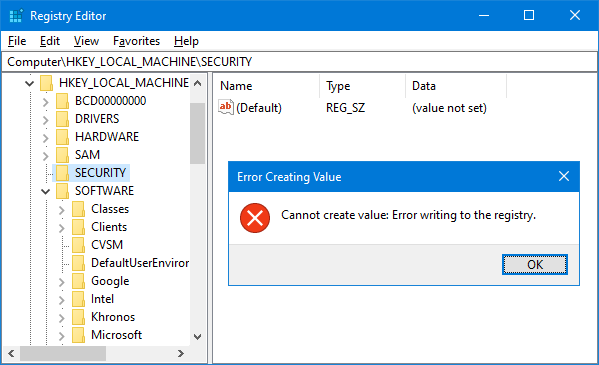
If you’re trying to edit or delete keys from the registry , you might find that some keys won’t let you do anything with them and you’ll get an error such as “Cannot delete xxxxx: Error while deleting key”. These keys are usually protected to stop accidental deletion , You could also be the administrator on the computer, but still can’t manipulate the required key.

Registry writing error

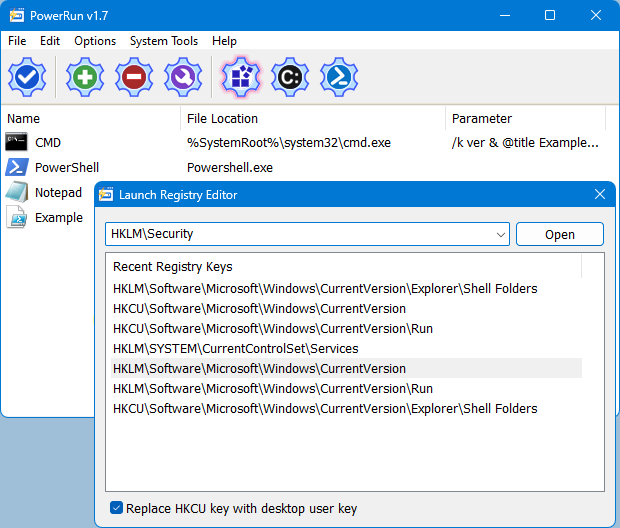
Even though the administrator account has a great deal of control, there are other hidden accounts and levels on the system which have even greater access and therefore standard administrator privileges are not enough. To solve this problem, you have to force the registry to allow the logged on user full control of the subkeys in such cases PoweRun can help you : use the “Launch Registry Editor” button

PowerRun launch registry editor

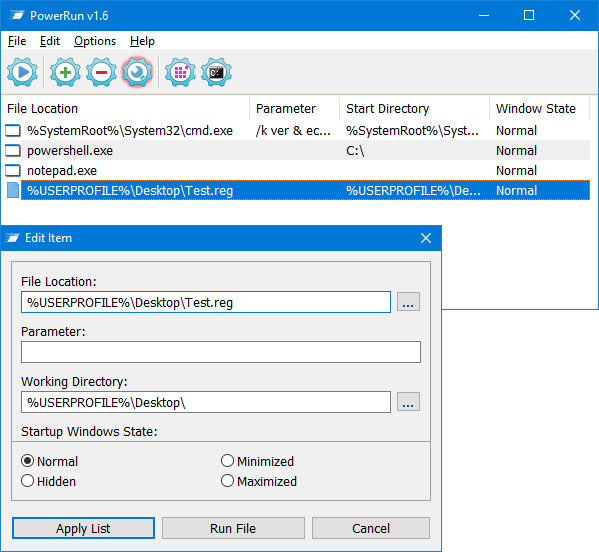
Copy desired registry key and click “Open” button , PowerRun will open regedit (with Highest Privileges) and jump the key Automatically. If you want to add any parameter to listed script or program rigt click on it and use “Edit Item” or just use wrench Button

powerrun edit item

For automation purpose PowerRun allows you to create a vbs or bat file with necessary parameters in it , to use this feature :

1. Select the Program
2. And use Edit – create – Create bat/Vbs File feature

PowerRun create vbs or bat

Don’t forget to run the script in the same folder with PowerRun.exe or PowerRun_x64.exe

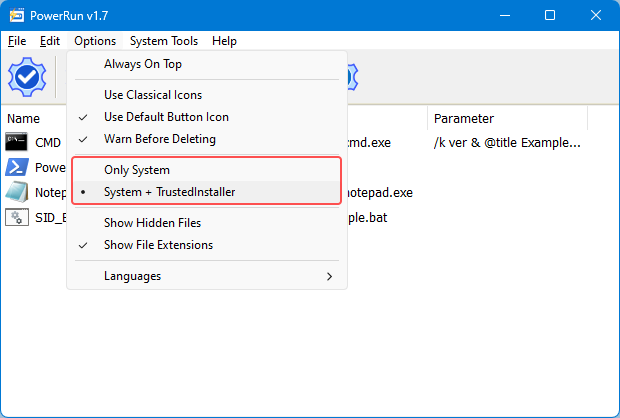
Choosing between System or TrustedInstaller Privileges

You can use PowerRun.exe Only with SYSTEM privileges , to do that ; Please open PowerRun.ini with a text editor and change “TrustedInstaller=1” Value , from “1” to “0”

powerrun with trustedinstaller privileges

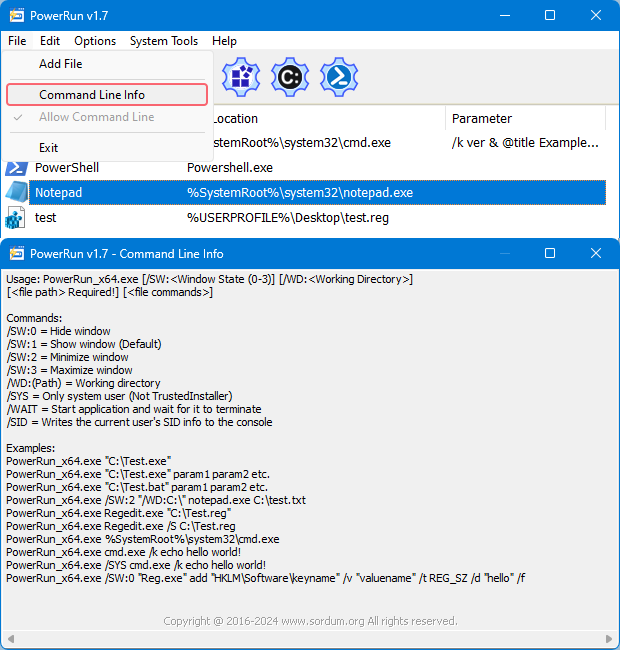
to see all the supported cmd parameters of PowerRun, use PowerRun.exe ? command

powerrun cmd parameters

NOTE: PowerRun can not run only with “TrustedInstaller” privileges it can also run with “Nt Authority/system” privileges

Supported operating systems: Windows 10 , Windows 8.1 , Windows 8 and Windows 7

Supported languages: English , Turkish , German , French , Chinese Simplified , Chinese Traditional , Korean , Persian , Hungarian , Danish , Italian , Greek , Russian , Vietnamese , Dutch , Finnish , Portuguese (Português), Portuguese (Brasileiro) , Spanish, Polish , Slovenian , Indonesian , Bulgarian , Czech , Japanese , Hebrew , Romanian

Eula license for our freware

File: PowerRun_x64.exeVirustotal
MD5: efe5769e37ba37cf4607cb9918639932
SHA1: f24ca204af2237a714e8b41d54043da7bbe5393b

File: PowerRun.exeVirustotal
MD5: 71c7975385f73ae32b06f69dbe79290b
SHA1: 05a1197cb8bd88447199e42a75bfcf99e32f2c48

Download


Source link


Reduce memory


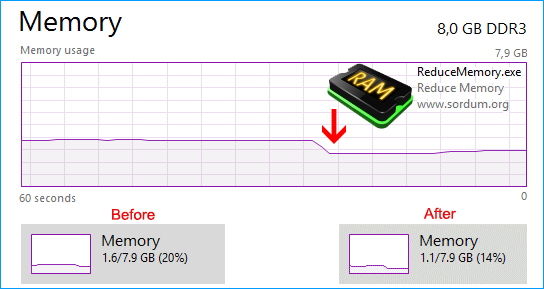
MSDN: Removes as many pages as possible from the working set of the specified process.When too many programs are using up your computer’s RAM (Random Access Memory), you may find your system becoming slow or unresponsive. to clear out the clutter from your system’s memory and get it running smoothly again use “Reduce Memory” , it will free up your RAM memory a little in Windows.

Memory has been reduced

If you use it under the Normal/restricted user or with /O parameter , it will free up Memory for current user and only for Applications but if you use it with Administrator privileges it can optimize memory usage for services and Background working programs.

What is new : (Friday, 19th March 2021)

1. [ ADDED ] – Language Support
2. [ ADDED ] – Automatic optimization feature
3. [ ADDED ] – Tray icon changing feature
4. [ FIXED ] – Minor BUGS

How to use it :

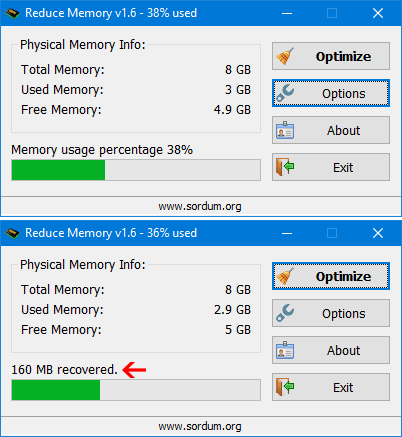
Extract the ZIP to any folder and then run the program. Click the “Clear memory” button to clear Memory Cache , You can see how much memory has been freed up for a short time.

Reduce memory main

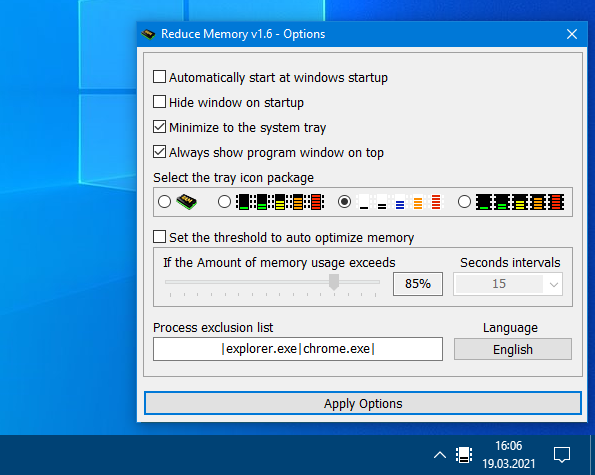
Under Options button you can find some other options for example ; Automatically start at window startup, Hide window at startup,Minimize to the sytem try,Always show Program window  on top , Set the Amount of memory usage exceeds … If you choose Optimize memory every x Seconds , Reduce memory will optimize RAM usage automatically. You can write between 5 – 99999 seconds in the box. If a number which less than 5 is written, the box will recognize it as 5 . If you tick the Set the Amount of memory usage exceeds , when the System Memory usage reaches the threshold which specified by the slider, Ram usage will be Automatically optimized at intervals specified in the seconds box.

Reduce memory options

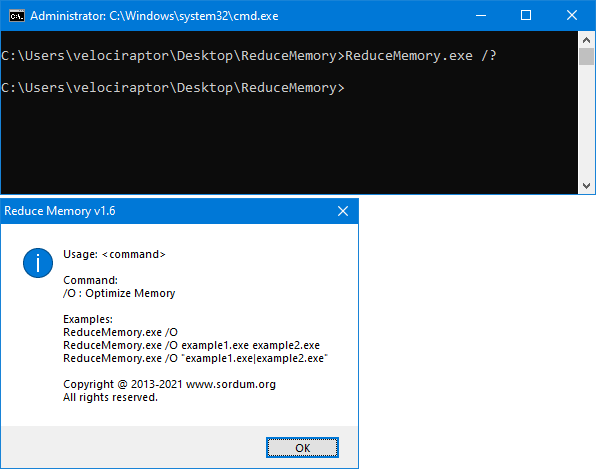
You can add some Processes which you want to exclude from Ram Optimization, into the “Process Exclusion List” box. Reduce Memory has Cmd Parameter support

Reduce memory Cmd support

With your suggestions We can add it extra features and develop it further.

Supported operating systems: Windows 10 , Windows 8.1 , Windows 8 , Windows 7 , Windows Vista , Windows Xp – (x86 & x64)

Supported languages: English , Turkish , German , French , Korean

Eula license for our freware

File: ReduceMemory_x64.exe │ Virustotal
MD5: 10309f8fd772a0518510093ed0b27afa
SHA1: f8dadd3b6cf3f734020586bf23f5057820875e33

File: ReduceMemory.exe │ Virustotal
MD5: cc8d9cb2ce9419fc20fc1208ae02504a
SHA1: c8d8965c79af5875f9ca64c98758cc0bde08cf46

Download


Source link


Restart Explorer portable freeware


Windows Explorer (or File Explorer) is a file management program providing a graphical user interface for accessing your file systems. It was introduced with Windows 95, Windows Explorer used frequently to browse your PC for files and folders.There are many instances where you need to reboot your PC. It could be that you’ve installed updates, installed a new software or may be your computer just hung up. All this scenarios usually need a system restart. Small issues (Windows explorer freezes , you can not delete some files…) could be taken care of by just restarting Windows explorer.

Restart Explorer v1.5 – (Wednesday, November 25th 2020)

[FIXED] – When we restart the File explorer, folders which do not have a normal address such as my computer, control panel, recycle bin can’t restore
[ADDED] – Command prompt support
[ADDED] – Code improvements

There are many ways to restart File Explorer without rebooting for exampe Using Task Manager, Using Command-Prompt or PowerShell or you can hold Ctrl+Shift while right-clicking any empty area of the taskbar

Ctrl+Shift restart file explorer

On the modified context menu, click the “Exit Explorer” command but all of these methods have their downsides. Therefore we have coded a small portable Application to restart windows Explorer (File Explorer). Restart Explorer has no GUI , usage is very simple just clik on it and it will restart File explorer.

Restart explorer portable freeware

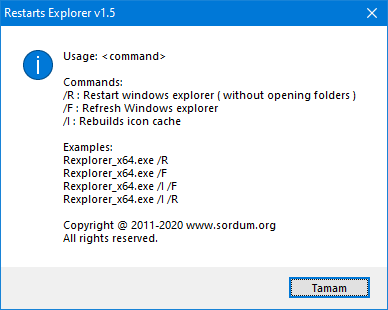
The difference of this software from others is ; if you open my computer, control panel, recycle bin… folder (which do not have a normal address) and restart windows explorer, open window will not come back with “Restart explorer” these open windows can be restored, It has also Command prompt support, to see all the supported parameters use “Rexplorer.exe /?” command.

Restart Explorer Cmd parameters

You can use it not only for restart File explorer. It can also be used for Refresh Windows explorer and Rebuild Icon cache.

Supported operating systems: Windows 10 , Windows 8.1 , Windows 8 , Windows 7 , Windows Vista , Windows Xp – (x86 & x64)

Eula license for our freware

File: Rexplorer_x64.exeVirustotal
MD5: 0244da37e5d02a7e9d3b84cf90b1ca23
SHA1: 646831e92c6c731a4378c9d95b8cb216ee06c85a

File: Rexplorer.exeVirustotal
MD5: f597303b8311f840bfc1e49bbe264e0e
SHA1: 962be7e9eab461f6b6055333c51bd8469422d068

Download


Source link