Tag

v14

Navegando


Hibernate Enable or Disable
Hibernation is the process of saving the content currently in memory to the hard drive to allow your PC to shut down completely, When your computer hibernates, it takes a snapshot of your system files and drivers and saves that snapshot to your hard drive before shutting down . This allows your computer to start up faster , Hibernate is enabled by default and reserves some of your disk for its file the “hiberfil.sys” file . At any time, you can turn your PC on to resume from hibernation and continue working where you left off.

If you’re looking to free up space on your disk, you can disable the hibernate function if you rarely use the feature. So, the main reason you might want to disable hibernate on your computer is if you really need those extra gigs of hard drive space back.

In fact, if you are using a SSD for your Windows 11 or 10 computer, it’s better to turn off the hibernate function to save SSD life .Whenever the operating system goes to to hibernation, it writes the contents of its RAM to the hiberfil.sys and then shuts off power. On systems with solid state disks, the constant writing to the hibernate file may be dangerous to the health of the SSD, because unlike regular hard drives, SSDs can only sustain a limited number of writes before breaking or voiding the warranty. That is why, on most modern laptop computers with SSD drives, hibernation is disabled by default. “Hibernate Enable or Disable” is a very simple Portable freeware to Disable or Enable Hibernation.

Hibernate Enable or Disable v1.4 – (Thursday, 8. February 2024)

[Added] – /Auto parameter (Hibernate off if drive is SSD, on if not)
[Added] – Some code Improvements

How to use :

After downloading, extract “Hibernate Enable or Disable” to your desired location, then run it, Application GUI will show you the Hibernation status , if Hibernate enabled you can see your Hibernation file size on the “Size” Button


hibernate enabled

You can Disable hibernation by clickin “Disable Hibernation” button

hibernate disabled

if any problem occurs , you will see the Orange icon

hibernate enable or disable problem

To Change the size of hiberfil.sys file use the “Size” button and choose One of the Appropriate option

hibernate size

Minimum size = 40 % of the total amount of installed RAM (memory)
Medium size = 75 % of the total amount of installed RAM (memory)
Maximum size = 100 % of the total amount of installed RAM (memory)
Reduced Size = 20% of the total amount of installed RAM (memory) – only on Windows 10 and above OS.

Hibernate Enable or Disable has CMD (command line) support. to see the All supported Parameters please use the “Hibernate.exe /?” command

hibernate cmd parameters

NOTE: In some cases, such as systems running from vhd, hibernate doesn’t work.

Supported languages : English , Turkish , German , Polish , Hungarian, French , Greek , Bulgarian , Spanish , Russian , Swedish ,Chinese (Simplified) , Korean , Japanese , Hebrew , Romanian , Italian , Arabic , Dutch (Nederlands)

Supported Operating Systems : Windows 11 , Windows 10 , Windows 8.1 , Windows 8 , Windows 7 , Windows Vista , Windows Xp (32 and 64-bit).

Eula license for our freware

File: Hibernate_x64.exeVirustotal
MD5: 7fc56cf41626ca3881a8793bac00803a
SHA1: 6a273fcd20ae6ee49fa8d119b37a2242fefea940

File: Hibernate.exeVirustotal
MD5: dfd9b953d9780c1672b13be488dbc029
SHA1: 17761aa3447fffc3b63d57793df7170242990aab

Download


Source link


Network Profile Name Changer
When you connect to a Ethernet or wired network for the first time, Windows automatically creates a network profile and assigns generic names like Network 1, Network 2, etc. finally stores it on your computer as a known network. A wireless network profile will use the SSID of the wireless network (ex: router) . Some users and administrators may dislike the non-descriptive network connections names and want to rename , delete or clear redundant network profiles (names). After Windows 7 , Microsoft removed Netork Profile rename option therefore you will not find any option whatsoever in the Settings app or Control Panel to change the network name. It is still possible to edit network profile names to make them more descriptive but the only effective way to Rename or remove the connections in Windows 11, Windows 10 and Windows 8 is by using the registry editor. (valid in all Windows versions)

What is New (Thursday, September 28, 2023)

1.[FIXED] – Deleted network profile leaves leftover in a registry key
2.[FIXED] – Can’t upper/lower letter in renaming
3.[ADDED] – Multiple selection feature in the List with Ctrl key
4.[ADDED] – x64 version
5.[ADDED] – High contrast support
6.[ADDED] – Manage Known Networks has been added (Under the menu button)
7.[ADDED] – Some code Improvements

How to Change the Active Network Profile Name

You can check the current name in the Network and Sharing Center on Windows , press the Windows + R keys to open the Run dialog, type one of the following commands and press Enter.

control.exe /name Microsoft.NetworkAndSharingCenter
explorer.exe shell:::{8E908FC9-BECC-40f6-915B-F4CA0E70D03D}

The name of the network is displayed at the very top of the page.


Netowrk and sharing center

Windows Users have three main options to change a network name ;

1. Using Local Security Policy (It is only available in professional versions of Windows)
2. Using the Windows Registry
3. Using Network Profile Name Changer which is a Portable freeware

Delete / Rename Network Connections In Windows by using Registry

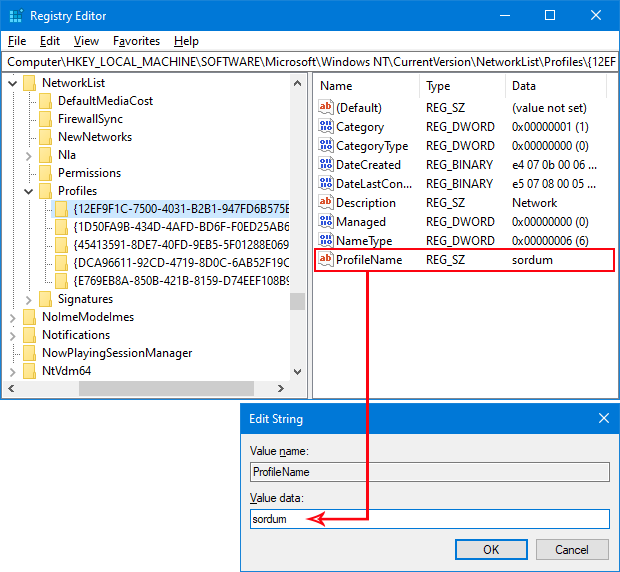
Go to the following key
HKEY_LOCAL_MACHINESOFTWAREMicrosoftWindows NTCurrentVersionNetworkListProfiles
The Profiles folder will provide a list of all the network connections with a unique ID , Each network location is represented by a subfolder therefore you need to click on each to check the ProfileName until you find the network name that you want to change. To rename a network location, click on the corresponding subfolder and edit the key named ProfileName. Input the new name for the network location. You can also delete individual subfolders to remove Network connections.

Network profile name in registry

Using Network Profile Name Changer to Delete / Rename Network Connections

Registry way is not Straightforward for Novice Windows users , to simplify the whole Process you can use Network Profile Name Changer.

1. After download and unzipping , run the program , It will list all you Network Profiles
2. Choose one of the Network Profile then use Rename or Delete button

Network Profile Name Changer

You can also right click any network profile and perform the same action from the context menu or double click any of the listed Item to rename it.

Network Profile Name Changer

With the context menu, you can rename any network Profile, change a Network Profile from Public to Private or vice versa, open a network Profile registry key or delete a network Profile easily.

Note: If you delete all Network profiles or if the profile you have edited, cannot be recognized by the system, turn off the adapter you connect to the internet and turn it on again, or disconnect and reconnect to the internet, the problem will be solved.

Supported languages: English ,Turkish , German , Hungarian , Polish , Bulgarian , French , Korean , Brazilian (Portuguese) , Russian , Japanese , Italian , Arabic , Chinese (Simplified) , Swedish , Romanian , Greek , Spanish , Danish

Supported operating systems: Windows 11 , Windows 10 , Windows 8.1 , Windows 8 , Windows 7 (x86 & x64) , Vista

Eula license for our freware

File: NetPnc_x64.exeVirustotal
MD5: db0f223584c85edd6f0f12cfd0375fcb
SHA1: f72832558afd4de2437ed88d43ee901dbe8c765b

File: NetPnc.exeVirustotal
MD5: 90b5d3a5daadade73a2922ff3fa428de
SHA1: 29343856c961fbae2a2148efa92ae0e0094ed1b2

Download


Source link


Bluetooth Version Finder
Some of the features in Windows operating system is available only if you are running a specific or later version of Bluetooth. For instance, the Nearby Share (a feature to share files between two Windows 10 computers) requires Bluetooth 4.0 or later versions. Bluetooth 4.0 adds Bluetooth Smart / Bluetooth Low Energy standard in addition to the Classic Bluetooth specification, so it is a significant improvement in prolonging battery life of devices. The batteries in Bluetooth low energy devices will last several times longer than their classic Bluetooth counterparts.

Bluetooth version number is usually mentioned in PC’s manual or product information page on your manufacturer’s website. But if your laptop is few years old, you likely have lost the manual and might not be able to find its information on the web as well.

Check Bluetooth Version manually

We can use Windows Device Manager to find out the Bluetooth version .

1. Make sure your Bluetooth is turned on. You can turn it on from the Action Center toggle, or you can open the Settings app and go to the Devices group of settings and turn it on from the Bluetooth tab

2. Right click the Start button to open its context menu and Select the item called “Device Manager”.


Open device manager

3. In Device Manager, expand the Bluetooth set of devices. You may see one or several devices under this. Look for Interl(R) Wireless Bluetooth(R) or your Bluetooth brand name. Right-click it, and select Properties.

Bluetooth properties

4. In the Properties window, go to the Advanced tab. Here, you will see a Firmware Version entry with something like LMP followed by a number, the number will correspond to the version of Bluetooth that you’re running.

Bluetooth version

The LMP versions Table:

LMP 13 – Bluetooth 5.4
LMP 12 – Bluetooth 5.3
LMP 11 – Bluetooth 5.2
LMP 10 – Bluetooth 5.1
LMP 9.x – Bluetooth 5.0
LMP 8.x – Bluetooth 4.2
LMP 7.x – Bluetooth 4.1
LMP 6.x – Bluetooth 4.0
LMP 5.x – Bluetooth 3.0 + HS
LMP 4.x – Bluetooth 2.1 + EDR
LMP 3.x – Bluetooth 2.0 + EDR
LMP 2.x – Bluetooth 1.2
LMP 1.x – Bluetooth 1.1
LMP 0.x – Bluetooth 1.0b
For instance, Bluetooth adapter’s LMP version 6.x indicates that your Bluetooth version is 4.0

Bluetooth versions by Years

Bluetooth Version Finder v1.4

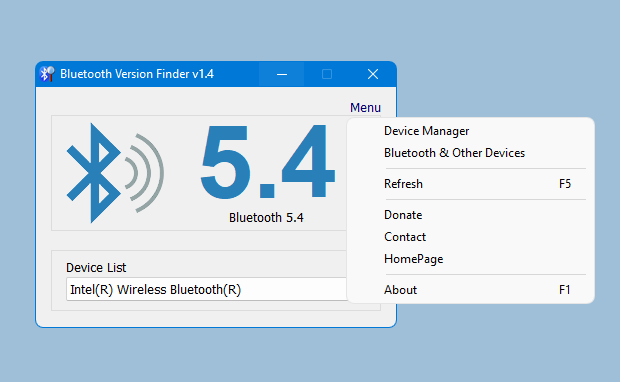
Finding Bluetooth verison manually through the graphical user interface would be time consuming, tedious and, prone to human error therefore we have coded a portable Freeware “Bluetooth Version Finder” . It is the easiest method to find the Bluetooth version number. Just download and unzip it then clik to run it will show your Bluetooth version number

What is New v1.4 (Wednesday, July 5 2023)

[ ADDED ] – Cmd support.
[ ADDED ] – Improvements in program codes.

Bluetooth version finder main

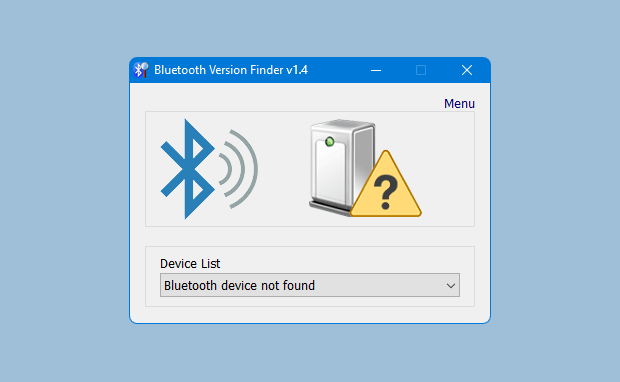
Under the big version number you can read the details . If it fails , you will see a question mark icon

Bluetooth version finder main

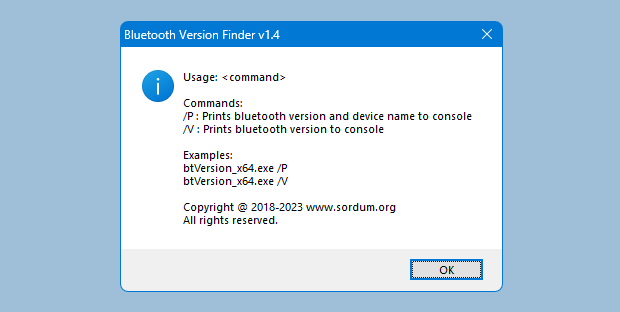
Bluetooth Version Finder has Cmd parameter support, to view the commands it supports, simply open Cmd where the exe is located and run the btVersion_x64.exe /? command.

Bluetooth version finder Cmd Support

Supported operating systems: Windows 11 , Windows 10

Supported languages: English

Eula license for our freware

File: btVersion_x64.exeVirustotal
MD5: 7a065631b51f58767dd904af486d5c3e
SHA1: ccfa03f61f508dbe9eee24ac3cd7ad8a531cfd68

File: btVersion.exeVirustotal
MD5: 985ddf1fd4806b3c24b999536d0bca7a
SHA1: 710a464d481128dc0ee8ff18c75c93e585c07b5a

Download Bluetooth Version Finder


Source link


Bluelife hostst editor is a Portable freeware
when you type a domain name in your browser that you wish to connect to, your application must first convert it to an IP address that it will use to connect to.The way these hostnames are resolved to their mapped IP address is called Domain Name Resolution. On almost all operating systems whether they be Apple, Linux, Unix, Netware, or Windows the majority of resolutions from domain names to IP addresses are done through a procedure called DNS. DNS stands for Domain Name System and is the standard domain name resolution service used on the Internet , There is another way to resolve domain names without using the Domain Name System, and that is by using your HOSTS file. Almost every operating system that communicates via TCP/IP, the standard of communication on the Internet, has a file called the HOSTS file. This file allows you to create mappings between domain names and IP addresses Another way to think of a hosts file is as an address translator and redirector.

What is New (Thursday, 3 November 2022)

1. [ Fixed ] – Mouse flickering in HostName box
2. [ Fixed ] – Hosts file causes error if attributes are marked as hidden or system
3. [ Fixed ] – When trying to add “https://www.sordum.org/” it adds as “ww.sordum.org”
4. [ Fixed ] – Program doesn’t keep text mode after restart (Start in list mode)
5. [ Added ] – High contrast support
6. [ Added ] – Some code Improvements in the program

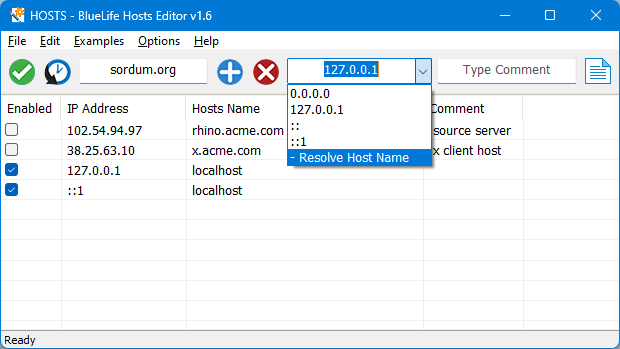
Bluelife hosts editör is a Portable Freeware hosts-file editor and Allows you to easily add/delete , Block , Update domain names to your hosts file , Simply type the hostname you wish to add in the first box and Select resolve domain names from the drop down menu then add in to the list with plus button


bluelife hosts editor main gui

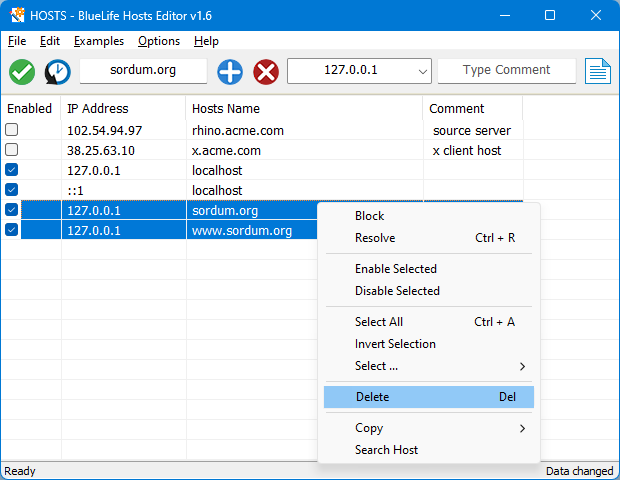
Finally use Save button (green button), if you want to Block a domain name you must select the appropriate option from the drop-down menu then use Save button , you can also use the right click menu to block , unblock … domain names on the list.

Bluelife hostst editor right click menu

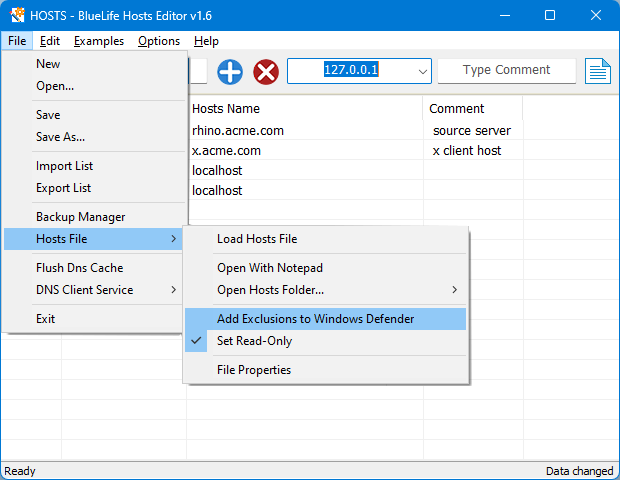
In some cases, windows can reset “Hosts” file to default state because of the Protection, you may need to use File – Hosts File – Add Exclusions to Windows Defender feature to avoid it. If you want to add a different “hosts” file to your system, you can use the File – Import List feature.

Add hosts file to the defender exclusion list

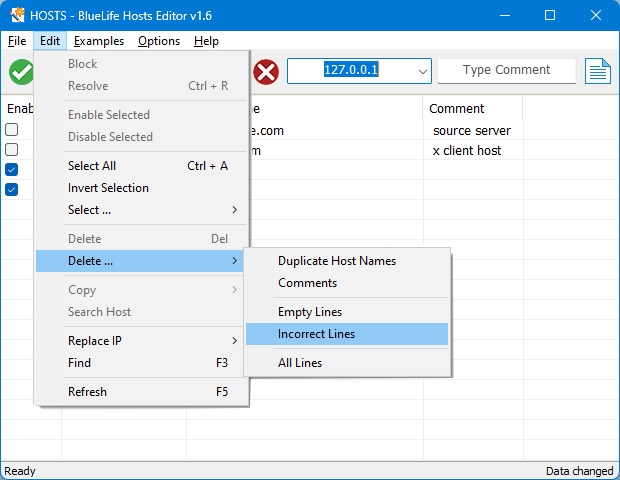
You can use the “Examples” menu to easily block some of the social media Web Pages like Facebook,Twitter or Youtube, Under the edit menu, you will find ; Delete dublicate hosts names, Delete comments,Delete Emty Lines,Incorrect Lines and replace IP with 0.0.0.0 – 127.0.0.1 or vice versa features.

bluelife hosts editor edit menu

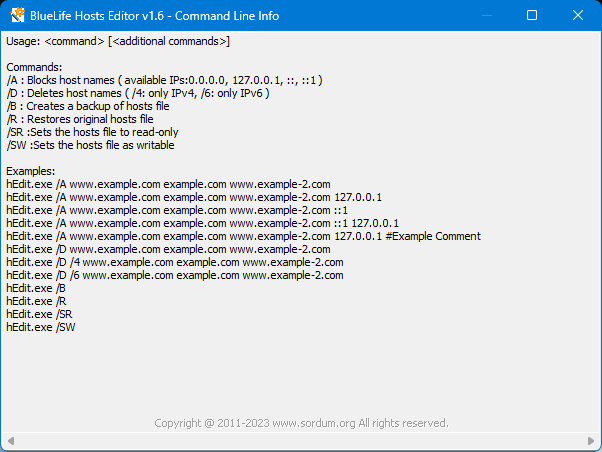
BlueLife Hosts editor v1.2 has also Command Line Parameters support

bluelife hosts editor cmd parameter support

Compatibility: Windows 11 , Windows 10 , Windows 8.1 , Windows 8 , Windows 7 , Windows Vista , Winsows Xp – (both x86 and x64)
Supported Languages: English , Turkish , German , French , Russian , Chinese (Simplified) , Chinese (Traditional) , Italian , Dutch (Nederlands) , Greek , Persian , Portuguese , Polish , Hebrew , Romanian , Hungarian , Spanish

Eula license for our freware

File: hEdit_x64.exeVirustotal
MD5: ccb9e28ae5b87f10b4937bb25cd4005d
SHA1: bf42f862c6cb35143caf57ebca626ab10cea45cb

File: hEdit.exeVirustotal
MD5: 190c4a19b408684c47d2877562f064ff
SHA1: a5cc93e8b4d9dc4ef5afec17c0864846fd00b8a1

Download


Source link


Reduce memory


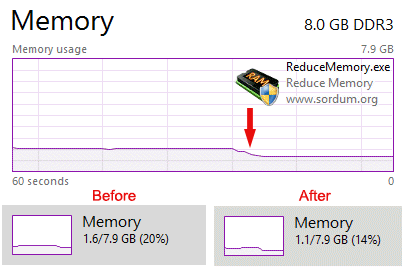
MSDN: Removes as many pages as possible from the working set of the specified process.When too many programs are using up your computer’s RAM (Random Access Memory), you may find your system becoming slow or unresponsive. to clear out the clutter from your system’s memory and get it running smoothly again use “Reduce Memory” , it will free up your RAM memory a little in Windows.

Memory has been reduced

If you use it under the Normal/restircted user or with /O parameter , it will free up Memory for current user and only for Applications but if you use it with Administrator privileges it can optimize memory usage for services and Background working programs.

How to use it :

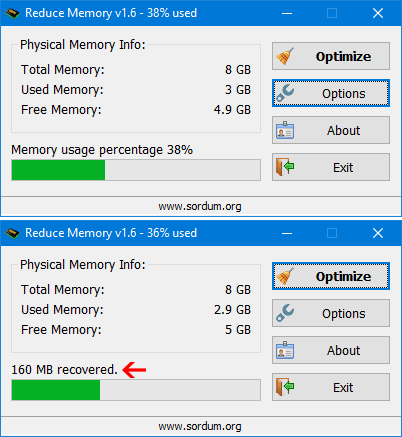
Extract the ZIP to any folder and then run the program. Click the “Clear memory” button to clear Memory Cache , You can see how much memory has been freed up for a short time.

Reduce memory main

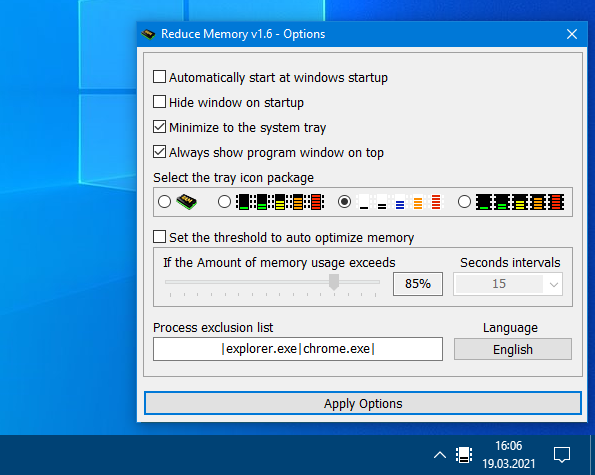
Under Options button you can find some other options for example ; Automatically start at window startup, Hide window at startup,Minimize to the sytem try,Show “Reduce memory” Always on top … If you choose Optimize memory every x Seconds , Reduce memory will optimize RAM usage automatically. You can write between 1 – 99999 seconds in the box

Reduce memory options

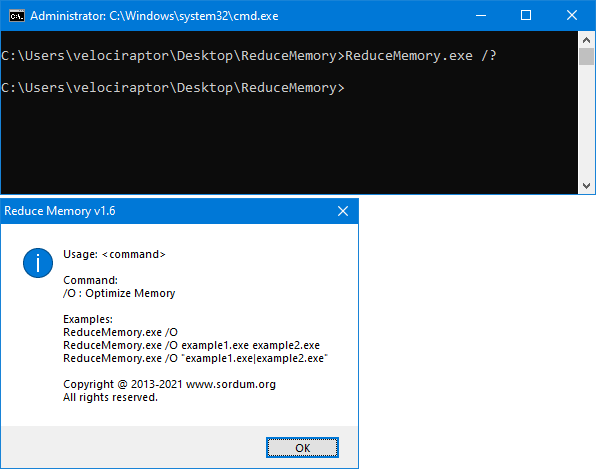
You can add some Processes which you want to exclude from Ram Optimization, into the “Process Exclusion List” box. Reduce Memory has Cmd Parameter support

Reduce memory Cmd support

With your suggestions We can add it extra features and develop it further.

Supported operating systems: Windows 10 , Windows 8.1 , Windows 8 , Windows 7 , Windows Vista , Windows Xp – (x86 & x64)

Eula license for our freware

File: ReduceMemory_x64.exe │ Virustotal
MD5: 4d84effe3c155a884fad4d347e2fa6b0
SHA1: 4598043e2a2faf718a906b8c4f71982ed8842727

File: ReduceMemory.exe │ Virustotal
MD5: 08e9fed45eddbad5b24f5389ef46b0ef
SHA1: f1f8a1a3df1a7cf8d07b7e3b92caff9e72387367

Download


Source link


webcam on off Portable freeware


Webcams allow us to stay in touch with family and friends, or perhaps record and stream video from your computer to the internet or to a file. When not in use , you may wish to disable your
webcam to ensure it is not making unwanted recordings. Malware can take over webcams, so there is potential for spying. Hackers can utilize trojan-horse attacks, enabling them to take control of your webcam, allowing them to record you or take pictures of you without your knowledge.

If you’re a parent, you may also wish to disable your webcam for safety reasons. Instant messengers and websites that utilize video aren’t always safe for children, thus disabling your webcam may be the best course of action. If the camera is external, you could always unplug it and hide it, but this can become tiresome if you are frequently in need of it. And what if, as on most laptops, you have a built in camera?

protect webcam and Microphone from hacking

The Washington Post highlighted an unnerving study published at Johns Hopkins University which found that a laptop webcam can function in relative secrecy – a slightly more subtle Eye of Sauron, if you will. Webcam spying, particularly the variant that involves disabling LED indicator lights, takes quite a bit of effort, but the practice isn’t limited to the realm of academics. The FBI has publicly acknowledged its ability to employ such techniques when investigating criminal activity.

As you can see, disabling your webcam completely is the safest way to protect your privacy. Because of this, we have created “Webcam On-Off” which is both portable and freeware. With it you can easily disable or enable your webcam. Don’t let your home become someone else’s reality TV!

What is new on version 1.4 (Friday 4 December 2020)

1.[Fixed] – WebCam On-Off Doesn’t Work on Windows 10 20H2 Properly
2.[Fixed] – GUI is too small (New GUI)
3.[Fixed] – It Doesn’t show the Name of the Webcam in List
4.[Added] – Language support
5.[Added] – Block Web Feature – Win10 support only
6.[Added] – Block Microphone Feature – Win10 support only
7.[Added] – Open Webcam and Microphone Privacy settings – Win10 support only
8.[Added] – Change Webcam Preview dimansion via drag – Win10 support only

How to Use WebCAm On – Off :

1. Extract the ZIP file to the folder of your choice, then run the program. You will see the Name and current status of your webcam in the list.

webcam on off enabled

2. To disable your webcam, Click the “Disable” button to safely turn off your webcam and prevent applications from accessing the Camera. If your webcam is disabled, the text and indicator icon will turn red. You can also tick the Block microphone box and disable WebCam and Microphone together to prevent them from being opened without your permission.

webcam And Microphone Has been Blocked

To enable it/them again click the Enable button. After disabling Webcam, you can check its status in an application that would normally use it. You should see a ‘No Webcam driver detected‘ error. You can also check your Camera with Windows Camera Application by just typing Camera in search box or using Menu – Windows Camera Link. The error message “We Cannot Find Your Camera” will appear

no webcam device error

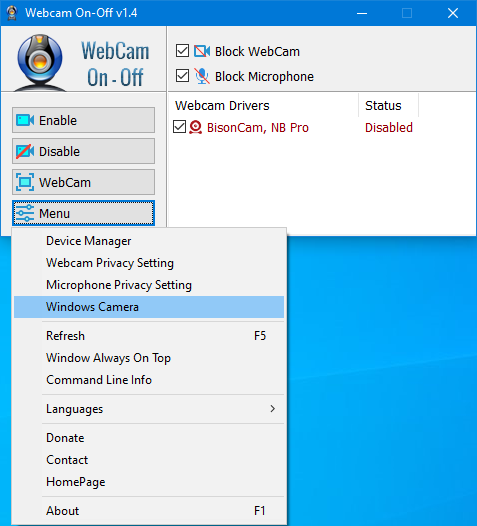
You can also open Device Manager and check for your webcam device in the list. Webcam On-Off can also serve as a portable webcam viewer. To use it as such, just click the Webcam button. You can use it to snap a picture, and also use zoom in and zoom out. There is a settings button as well. To increase or decrease the screen size of the opened webcam screen, hold the edges and drag it. To close the WebCam screen, move the mouse over the screen, then click the gear icon that will appear in the upper left corner

Webcam screen dimension

Click the Menu button to check the Driver of your webcam by clicking the Device manager . When you click the Command Line Info in the same menu, you can view the Cmd Parameter Support. You can also use the “webcam.exe /?” command to see all supported commands (shown below):

Webcam_on_off_cmd_parameters

Supported operating systems: Windows 10 , Windows 8.1 , Windows 8 , Windows 7 , Windows Vista , Windows xp – (both x86 and x64)

Supported languages: English , Turkish , German

Eula license for our frewareVirus total clean reportWebCam On – Off - 5 Sterne @ GIGA.de

File: WebCam.exe
MD5: 50101cfc4c03273f830cec74e2babdec
SHA1: e9c7089ab9d07283b5c79a2813d825ef781c8926

Download


Source link


Backup Start Menu Layout


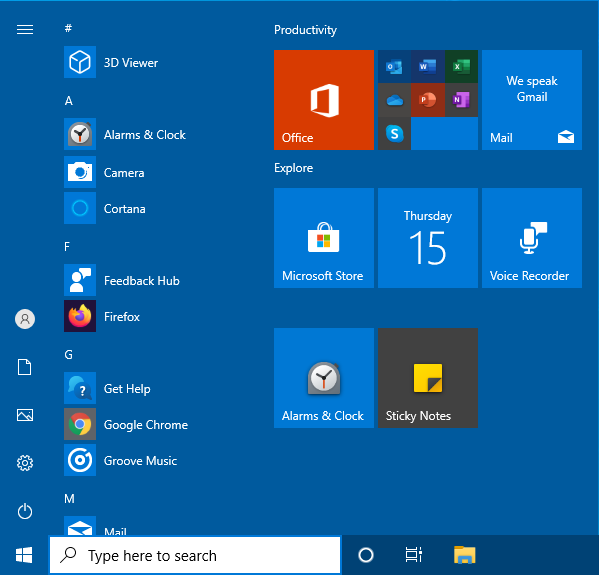
The Windows 10 Start Menu lets you pin apps so that they are easier to access. You can group them together and manage the size of the tiles as well as the width of the Start Menu. Whether you love tiles or not, you can find ways to customize and work them so it’s easier to access your favorite apps. You can resize your tiles, pin and unpin them on the Start menu or Start screen. After devoting so much time arranging tiles on the Start menu, it would be annoying if something were to happen to it , a registry corruption , a new application installation or a bad update can rearrange or delete the tiles on the Start menu. To avoid such a situation you can Back Up And Restore The Start Menu Layout In Windows 10. This can be also handy if you do not want to have to setup your Start menu layout from scratch again. Say after a clean install of Windows 10.

Backup Start Menu Layout v1.4 – (Thursday, 15 October 2020)

[FIXED] – The font in the list is too small
[FIXED] – If you run it with Admin privileges in a Limited user, Admin account Start Menu is processed
[Added] – Language Support
[Added] – Sorting list by pressing the headline
[Added] – Disable Uninstallation,Right Click and Drag & drop of Pinned Tiles
[Added] – Open Start Menu Program Folder (Under the File menu)

Default start menu layout

Backup and Restore Start Menu Layout in Windows 10

Backup Start menu layout is a very simple portable freeware Application to backup and restore Windows 10 start menu layout. Extract the downloaded ZIP file and run Appropriate .exe file (x64 or x86)

Backup start menu layout

1. To backup Windows 10 start menu layout use the second icon (Diskette Icon) , an input will appear in the Program interface.

2. If you select the backup entry and use the first icon You can restore the saved windows 10 start menu layout. you can also double click on it

Restore start menu layout

How to reset Start Menu Layout in Windows 10

If your Start Menu has gotten overly cluttered, or want to restore the tiles that you’ve unpinned from Start Menu just use Backup Start menu layout v1.1 Reset start menu layout feture. It will reset your start menu layout back to it’s default configuration. To do that Just click the Lifesaver icon or Use File – Reset Star Menu Layout

How to reset start menu layout

You can delete any backup with Trash can button. To see all the supported command line parameters , use the File – Command Line Info feature

Bs menu cmd support parameters

Supported operating systems: Windows 10 (x64 – x86)

Supported languages: English, Turkish, German, Italian, French , Korean , Portuguese (Brasil) , Chinese (Simplified) , Polish

Eula license for our freware

File: BackupSML_x64.exe │ Virustotal
MD5: a63a416b7df36dac98e1e4dd27aed1ed
SHA1: d1b066ab0392e6d4475c322bb4070b217de586e5

File: BackupSML.exe │ Virustotal
MD5: 367365a5b32d35eb5c07393485a017da
SHA1: 1f31c02cd7e463ef3c6d9d579c7f8ee4384d1329

Download


Source link