Tag

v13

Navegando


Switch Power Scheme portable freeware
Switching power plans require you to open Power Options applet from Control Panel or from Windows Settings app. In the Power Options applet, you can choose one of the three options — Balanced, High performance and Power saver, or you can create your own custom plans. You might have some reasons to switch between power plans for example ;

1. You can choose “High Performance” power plan to increase FPS while playing a Game
2. When the laptop battery is low , You can switch to the “power saver” plan and make the battery last longer.
3. In summer, you can create your own power plan to reduce the CPU frequency and avoid the laptop from getting hot.
4. You can create a special plan to prevent the computer from going to sleep during the download.

There are Lots of methods to switch power plans , for example ; Right Click battery icon in task-bar – Choose Power Options – Choose One of the suitable power Plan or You can use Windows Mobility Center and choose the power plan you wish to use under Battery Status. You can also use command prompt or powershell. Switching power plans multiple times a day is time consuming. We have created a small Portable free Application “Switch Power Scheme” to simplify the whole process.

What is New (Friday, 11 July 2021)

01. [FIXED] – The translation error in the export – import option
02. [ADDED] – You can see active power scheme when mouse hovers over tray icon
03. [ADDED] – Ability to choose location of current program for import and export
04. [ADDED] – Some cede Improvements

How to use Switch Power Scheme Application

1. Download and unzip it, then run appropriate exe file (x86 or x64)


switch power scheme main gui

It has a minimalistic interface. All your current power plans will be listed on the GUI

2. To Switch between them just choose one and use “Apply selected” Button or Right click one of them and choose “Activate” option.

switch power scheme right click menu

Switch Power Plans Quickly via Desktop Right-click Menu

You can also Add all your power plans to your desktop right-click menu. Choose Options – Add to desktop context menu , if you prefer you can use “Use the Shift Key to display” feature too. This feature require Administrator privileges after you choose the “Add to desktop context menu” feature a popup will ask for permission to run the software with administrative Rights

Add Power plan to your desktop context menu

Please repeat the last action after the software started with administrator privileges (this is not an error or BUG).Then right click your desktop to change your Power Plans via the Right-click menu.

change powerplan via right click menu

If you wish you can use “Switch Power Scheme” optionsvia system tray, Clicking on the System Tray icon gives you quick access to all your power states. The App is compatible with custom power plans, so you can create your own power settings option and Switch Power Scheme will let you choose it.

change power plans via sytem tray

Export-Import a Power Plan or create a shortcut

Switch Power Scheme Application allows you easily export or Import any Power plan. Right clik one of them and choose Export option or select one of your Power plan and use edit – Export menu. To Import a exported Power plan use File – Import Power Plan feature

how to export or import a power plan

With Switch Power Scheme, you can reset your Power Plans , easily rename one of them or create a desktop shortcut to switch this Plan with one click easily.

Supported Operating Systems: Windows 10 , Windows 8.1 , Windows 8 , Windows 7 , Vista
Supported languages: English , Turkish , German , Polish , Japanese , French , Korean , Greek , Russian , Bulgarian , Spanish , Italian , Dutch (Nederlands) , Persian , Romanian , Hungarian

Eula license for our freware

File: sPowers_x64.exe │ Virustotal
MD5: 8070124a0301d81c5b48e421a9626536
SHA1: 05c262ab85dd4c625eab23f1955872ad81cc0cfe

File: sPowers.exe │ Virustotal
MD5: b4802866d0f389fb380c8f5492fe7a55
SHA1: 7dcedb59666d039c1c78f54fdf6647c20ed78357

EDownload Switch Power Scheme


Source link


Update Time


Keeping the correct time on your computer is essential because Computers apply a timestamp to the files and folders you create. You will also not be able to use some software and tools that require internet-based authorization if your system time is too far off from the current time. If you set the clock incorrectly, bad dates become a flood of erroneous information, leading to lost files, missed appointments and poor recordkeeping. Incorrect date and time settings are the most common reason for “Error Code 0x80072F8F” error, You should be able to fix this error by Correct The Date and Time.

Common Causes for Windows 10 Time Being Wrong

1. An Incorrect Time Zone Setting : Even if you fix the time manually, Windows will reset itself to the wrong time zone once you reboot. To fix your time zone in Windows 10 , call up the Run command dialog box via Windows key + R keyboard shortcut combination and execute ms-settings:dateandtime command then select the correct time zone from drop down menu (1) and use Sync Now button (2)

Sync date and time

To see which time zone is currently selected, on the command line, type the first command and press Enter.

tzutil /g
tzutil /l

Second command will list all possible Time zones which you can use. To Fix your Time zone via Cmd , Type the following command to set the new time zone and press Enter:
tzutil /s “Your Time zone” for example ; tzutil /s “W. Europe Standard Time”

Correct Time zone via Cmd

2. A Dead CMOS Battery : The CMOS battery sits on your computer’s motherboard and stores information about the system configuration, including the date and time. If this battery goes bad, the chip starts losing information.

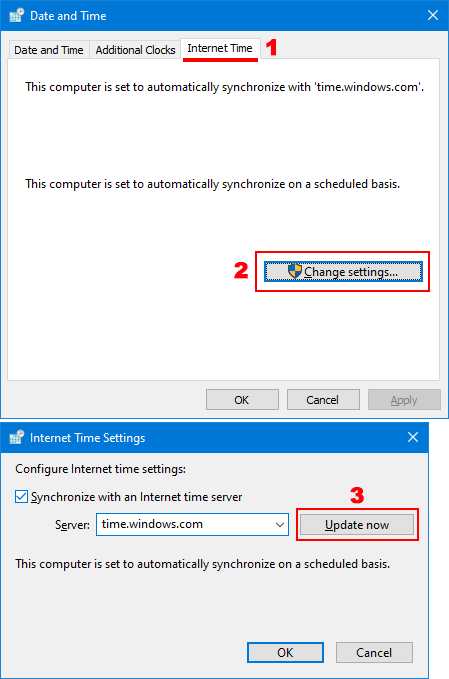
3. Windows Time Is Out of Sync : You should first confirm that your computer is syncing its clock with a valid time server. To do this, Use the “timedate.cpl” command then Click on the “Internet Time” tab (1) and  Click on “Change settings…” (2) finally choose a server  and use Update Now button (3)

Internet Time settings

If you want to force Windows 10 time to synch with a time server Press Windows key + X and select Command prompt(Admin). Type each one of the command below and press enter.

net stop w32time
w32tm /unregister
w32tm /register
net start w32time
w32tm /resync

Restart the computer to test the issue again.

4. Malware : Your computer may have been hijacked by a virus that messes with your computer time. To fix it, First, make sure your anti-virus program is up to date with the latest virus definitions. And then perform a Full computer scan in Safe mode.

5. Third-party utility or program : Third-party programs or screen savers can cause the time to stop or decrease significantly. close and disable all screen savers, and End Task all TSRs to ensure your lost time is not being caused by these programs.

How To Fix Windows 10 Time is Wrong Issue easily

To Fix Wrong Date & Time Issues in Windows PC you can use Update Time Software. It is portable and freeware Application. I had mainboard Issue and then I could not correct my Windows Clock , if I Shut down my computer ,Windows time stopped to working, I have replaced the CMOS battery but Problem doesn’t solved , because I have already damaged my old mainboard during the “BIOS update” for this reason I coded a small Application which called “Update Time” . It is very easy to use, just double clik on it to correct your computer Date & Time

Update Time software

You can set Up a service to update the Time and Date at bootup too , to do this use _UpdateTime_Options.vbs in downloaded folder and tick the Appropriate checkbox

Update Time Options

If the service is installed, it only works at Windows startup and after updating the system date and time closes itself this mean It will not work again until the next system startup (Doesn’t run in the background) .Update Time Application has Cmd parameter support , here are the supported commands

Update Time Cmd Support

Of course, you can also run this software at startup with the help of scheduled tasks.

NOTE: If Your clock setting is updated incorrectly, please check the time zone settings.

Supported operating systems: Windows 10 , Windows 8.1 , Windows 8 , Windows 7 , Windows Vista , Windows Xp – (x86 & x64)

Eula license for our freware

Updated : Sunday, march 7, 2021
File: UpdateTime_x64.exeVirustotal
MD5: a07e23493c35237cd33e45779a62d75e
SHA1: 4dc84fa1150ae38db029d50e1b18281f65e61e42

File: UpdateTime.exeVirustotal
MD5: 90a3e249950b57421c721bde852c51ed
SHA1: b254c91c90bd7873ff7eb9927340d4930768d685

Download


Source link


Copy public Ip Application


An IP address is an identifier for devices on a TCP/IP network, Every device that connects to the Internet has its own Internet Protocol (IP) address. IP addresses make it possible, among other things, for computers from different networks to find each other. IP addresses are vital for all Internet-based activities, and yet it’s not uncommon that a user doesn’t know his computer’s IP. IP addresses are one of the most critical resources that need to be managed in any network . All IPv4 IP addresses can be divided into two major groups , External and local IP addresses both serve the same purpose, the difference is scope.

1. External (Public) IP Address : Global, or public, or external this group can also be called ‘WAN addresses’. An external or public IP address is used across the entire Internet to locate computer systems and devices. Your Internet Service Provider (ISP) assigns you an external IP address when you connect to the Internet. When your web browser requests a webpage, it sends this IP address along with it. Your ISP uses this to know which of its customers are requesting which webpage.

difference between Public and internal IP Addresses

2. Local (Internal) IP Address : Private, or local, or internal addresses, those that are used in the local network (LAN).A local or internal IP address is used inside a private network to locate the computers and devices connected to it. If your computer is connected to a router with default settings, that router will automatically assign a local IP address to your computer. Your local IP address is hidden from the outside world and used only inside your private network. You generally don’t need to know much about it unless you’re trying to set up a game or web server.

Addresses in IPv4 are 32-bits long. This allows for a maximum of 4,294,967,296 (232) unique addresses. Addresses in IPv6 are 128-bits, which allows for 3.4 x 1038 (2128) unique addresses.

How to Find your External IP address

Copy IP is a Portable freeware to find your İnternet IP address easily, to use it just double click on it – you will see an information on the system tray , it will show your external ip address .

what is my External ip adress

Copy Public IP Application has Cmd parameter support

Copy your Public IP Address

With your suggestions We can add it extra features and develop it further

Supported operating systems: Windows 10 , Windows 8.1 , Windows 8 , Windows 7 , Windows Vista , Windows Xp – (x86 & x64)

Eula license for our frewareVirus total clean report

Updated : Saturday 13th February 2021
File : CopyIP.exe
Size : 674 KB
MD5: aa4b8e31bc703d19809bc50c4c282b82
SHA-1: e58d2c44740edec83f9281d9a0b7d9da0ffbcbaa

Download


Source link


Colorful folder with Folder Painter


All of us want our computer to be well organized, as it would be easier to access your files and folders when you need it. Apart from organizing your files using separate folders for different kind of files, you can also customize the folder itself. One of the pertinent issues that most of us come across often is that we just can’t instantly seem to locate the folder we need because all of them look the same. We then resort to searching for its name or taking a more closer look. This can be taken care of if we could add different colors to the folders in Windows Explorer . If you can assign a different color to different folders, then it would become easier to access them next time. After all, recognizing a folder with a color would be much easier than going through the names of the folder.

Windows 10 doesn’t have any options for you to customize folder colors. FolderPainter is a freeware that lets you color your Windows explorer folder color and change it from the default yellow color. Using this application, you can assign any color to your frequently accessed folders for example your financial folder can be green (like money) and your tasks folder can be red (urgent maybe?). After that No longer will you have to run your eyes over many folders to access your favorite folder. Having a different color will make the folder stand out, so that you can open it quickly.

What is New (Tuesday, january 19, 2021)

[ADDED] – Sub folder support added. Limit can be set from “IconsFolderPainter.ini” file
[ADDED] – Refresh Options from .ini file
[FIXED] – Font in main interface is too small
[FIXED] – Folder change date changes with every icon change
[FIXED] – Some minor Bugs

How to use :

Folder Painter is an easy to use Portable Freeware program, which allows you to change the color of the icon representing a chosen folder to any color you like.

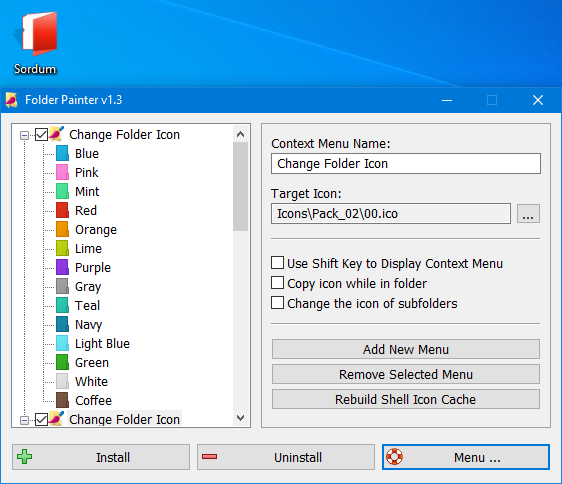
1. After Download Unzip it and run the run the appropriate exe file “FolderPainter_x86 or FolderPainter_x64.exe” you can choose an icon pack from left pane, 3 icon packages are available by default but You can download 21 icon packs in total.

Folder Painter Context Menu settings

2. Use “install” button , to add Folder Painter to your Context menu , after that Right-click any folder to open its context menu that will now include a “Change Folder Icon” option as in the snapshot below. Select that option to expand its submenu.

Folder Painter Context Menu

The submenu above includes a few colors for you to select. Choose a color from there to add it the folder . Press the “Default Folder Icon” option on the context menu to revert back to the default color.To uninstall Folder Painter from your right click menu just use Uninstall Button.

Make the color permanent for other Computers

Just tick the “Copy icon while in folder”. while Changing the folder color , folder icon will be copied into it and this will make the changes permanent.for example ; if you copy the folder into the USB drive folder color will remain the same in other computers.

Make folder color permanent

Change the color All subFolders

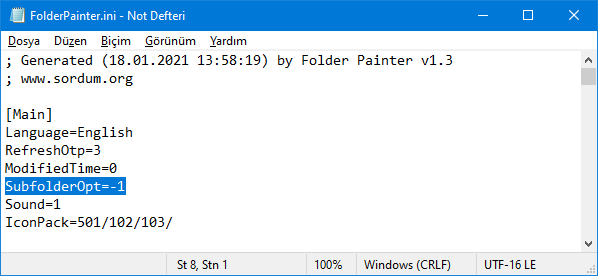
If you tick the “Change the icon of subfolders” section in the interface, changing the icon will affect the subfolders. The limit can be set from the SubfolderCount = -1 line in the  “IconsFolderPainter.ini” file.

SubfolderCount = -1 (There is no limitation, All subfolders icons will be changed)
SubfolderCount =  0 (only changes the icon of the first subfolders)
SubfolderCount =  x (x > 0 , The number of subfolders whose icon will be changed)

Folder painter ini file

RefreshOtp=1 , values ;
0 : No renewal message will sent.
1 : The default refresh message will sent.
2 : BroadcastChange message will sent
4 : F5 message will sent to all open explorer windows
8 : Refresh iconcache message will sent.

Use ready made icon packs or add your own:

We have prepared total 21 icon packs (294 icons) , you can download them from the following links

Download FolderPainter icon packs

You can customize Icon folder by your custom color icons , to do this ;
1. Add your custom colored icon files into the Icon folder and rename them like Orginals (01,02…)
2. Change the color names in the FolderPainter.ini file

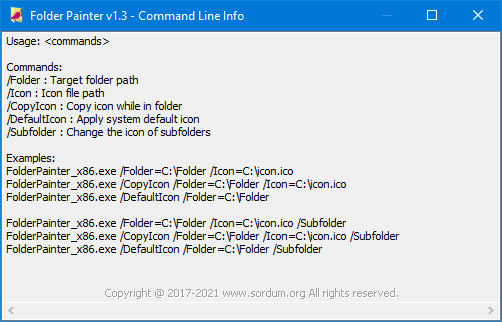
Folder Painter has CMD (command line) support

Folder Painter cmd support

The application doesn’t affect system performance in any way and the best of all is that it works smoothly on Windows 7 and Above , No installation , No activation code , Portable , Freeware.

NOTE: Adding “Change Folder icon” feature to the context menu is done by writing to registry. The Sub menu support only available Windows 7 and above Operating systems and sub Menu supports only up to 16 items (Why is restricted unclear and Microsoft leaves questions unanswered)

Supported operating systems: Windows 10 , Windows 8.1 , Windows 8 , Windows 7
Supported languages: English , Turkish , German , French , Slovenian , Polish , Russian , Persian , Japanese , Hungarian , Korean , Greek , Italian , Hebrew , Portuguese , Arabic , Spanish , Chinese Simplified , Chinese Traditional , Ukrainian , Dutch , Danish , Czech ,Português (Brasil)

Eula license for our freware

File: FolderPainter_x64.exeVirustotal
MD5: 882119e099b8cf263918f1f7f3f475ee
SHA1: 5be14be4d79983b420bdf03f8353ea0b01fa5ae0

File: FolderPainter.exeVirustotal
MD5: fdc2d39751542b8c79f446a842e9b44b
SHA1: acfaedc28b90f11e577539113d917e9480b670ad

Download


Source link


Bluelife hostst editor is a Portable freeware


when you type a domain name in your browser that you wish to connect to, your application must first convert it to an IP address that it will use to connect to.The way these hostnames are resolved to their mapped IP address is called Domain Name Resolution. On almost all operating systems whether they be Apple, Linux, Unix, Netware, or Windows the majority of resolutions from domain names to IP addresses are done through a procedure called DNS. DNS stands for Domain Name System and is the standard domain name resolution service used on the Internet , There is another way to resolve domain names without using the Domain Name System, and that is by using your HOSTS file. Almost every operating system that communicates via TCP/IP, the standard of communication on the Internet, has a file called the HOSTS file. This file allows you to create mappings between domain names and IP addresses Another way to think of a hosts file is as an address translator and redirector.

What is New (Tuesday , 23. June 2020)

1. [ Added ] – x64 Version
2. [ Added ] – Block Youtube, Twitter, facebook examples
3. [ Added ] – Replace Custom IP besides 127.0.0.1 and 0.0.0.0
4. [ Added ] – Additional Command Line parameters
5. [ Fixed ] – Buttons are too small
6. [ Fixed ] – Bl Hosts editor add itself to the “Windows Defender” exclusions list automatically and this causes False positive
7. [ Fixed ] – Some Minor Bugs and code weaknesses (code improvements)

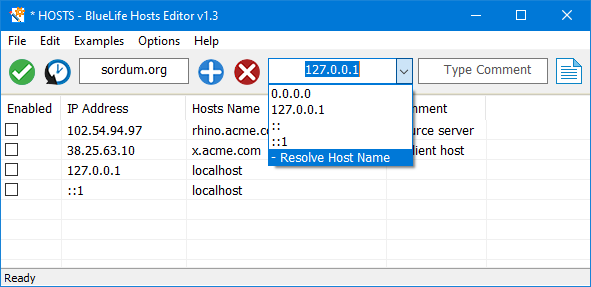
Bluelife hosts editör is a Portable Freeware hosts-file editor and Allows you to easily add/delete , Block , Update domain names to your hosts file , Simply type the hostname you wish to add in the first box and Select resolve domain names from the drop down menu then add in to the list with plus button

bluelife hosts editor main gui

Finally use Save button (green button), if you want to Block a domain name you must select the appropriate option from the drop-down menu then use Save button , you can also use the right click menu to block , unblock … domain names on the list.

Bluelife hostst editor right click menu

In some cases, windows can reset “Hosts” file to default state because of the Protection, you may need to use File – Hosts File – Add Exclusions to Windows Defender feature to avoid it. If you want to add a different “hosts” file to your system, you can use the File – Import List feature.

Add hosts file to the defender exclusion list

You can use the “Examples” menu to easily block some of the social media Web Pages like Facebook,Twitter or Youtube, Under the edit menu, you will find ; Delete dublicate hosts names, Delete comments,Delete Emty Lines,Incorrect Lines and replace IP with 0.0.0.0 – 127.0.0.1 or vice versa features.

bluelife hosts editor edit menu

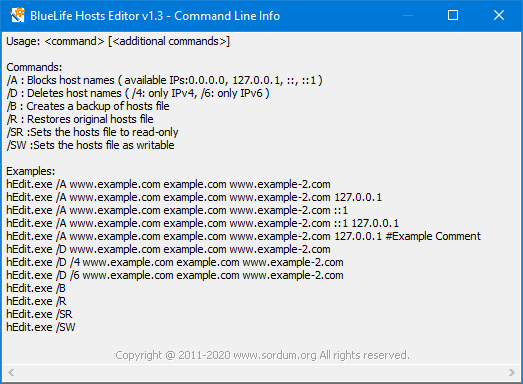
BlueLife Hosts editor v1.2 has also Command Line Parameters support

bluelife hosts editor cmd parameter support

Compatibility: Windows 10 , Windows 8.1 , Windows 8 , Windows 7 , Windows Vista , Winsows Xp – (both x86 and x64)
Supported Languages: English , Turkish , German , French , Russian , Chinese (Simplified) , Italian , Dutch (Nederlands) , Greek , Persian , Portuguese , Polish

Eula license for our freware

File: hEdit_x64.exeVirustotal
MD5: d892c8e3626e3e3eef16b09fb2317349
SHA1: dafdfbc6d8e588927c6d668b3f9dfadb970776a5

File: hEdit.exeVirustotal
MD5: b6095afd7fc13b4fbc8fe45d435b3968
SHA1: 68b3a92a454530d0db0c6ef5c39c12a85612dec2

Download


Source link