Tag

v13

Navegando


Sendto Menu Editor
The Windows ‘Send to’ menu is a handy way of sending a file to a specific folder, application, or other item. You can use it to send, copy, or print an individual file to a specific location, device, application, or other item , If you want to add your own app or folder to the Send to menu or if you want to delete some of the Unnecessary items in it you can tweak the Send to menu to suit your needs. Open File Explorer in Windows Right click on a file and From the pop-up menu, move your mouse to the Send to command , Click on a specific entry. The file you click on is then sent to the entry you select.


Sendto Menu Editor

If you want to add your own app or folder to the Send to menu, it’s very simple: Just open the Run dialog box by pressing Win+R, then paste shell:sendto command into the text box. This will open the folder where all those shortcuts located. Alternatively, you can navigate to following folder location
%UserProfile%AppDataRoamingMicrosoftWindowsSendTo
But you can simplify the whole process with the “Send To Menu Editor” is a portable freeware which helps users manage the shortcuts present in the Windows “Send To” Menu.

What is New (Wednesday, 3 May 2023)

1.[ FIXED ] – Unable to add a folder shortcut to the software interface
2.[ ADDED ] – A Feature for default user to restore files in SendTo folder
3.[ ADDED ] – Some code Improvements

How to use SendTo Menu Editor 

After downloading, extract “SendTo Menu Editor” to your desired location and run Appropriate one (x64 or x86)

sendto menu editor main

On GUI you will see all of the send to Menu items , to add a new one use plus icon or just drag and drop it on main window. If you use Add Button you can edit Shortcut name , you can use a Shortcut Parameter or change the Shortcut Icon.

Add shortcut optipns

To delete a Send To Menu item use delete icon or right click any listed item and choose “Delete From menu” feature.

delete from menu

You can hide the related entry by removing the check mark at the beginning of the items in the list. If you want to remove Send to menu completely use Options – Remove SendTo menu choice , you can also hide all of the Dirves by using “No Drives in SendTo menu” both options require administrator privileges.

Remove sendto menu

If you accidentally delete a component from the Send to menu, or if some components are missing from the corresponding menu, use the File – Restore Default Files command from the top menu to restore the default components in one click.

Restore sendto menu

Note: The program interface does not show removable drives. It only shows shortcuts and files in the Send To folder.

Supported operating systems: Windows 11 , Windows 10, Windows 8.1 , Windows 8 , Windows 7 , Windos Vista ,Windows XP (3264-bit).

Supported languages: English , Turkish , German , Korean , French , Russian , Arabic , Greek , Slovenian , Spanish , Portuguese Brasil , Vietnamese , Indonesian , Chinese , Polish, Hungarian , Japanese , Italian , Dutch (Nederlands) , Persian , Romanian , Ukrainian , Hebrew

Eula license for our freware

File: SendToEditor_x64.exe │ Virustotal
MD5: 264747660e0cd5677002d9ddaaf7187e
SHA1: 8a107f8fd6790d97c22cd80ecb07930ae3847a14

File: SendToEditor.exe │ Virustotal
MD5: 3caa06cd16726f2b4324dfd23b11ef7d
SHA1: c5d1ba0baf86e737e55c6b804daeaf52cb067021

Download


Source link


Windows TopMost Control portable freeware
Some Windows Applications doesn’t offer an option to make itself topmost , that is to keep it above all other windows , with Windows Topmost control you can add this feature to any. There are situation that you need this feature, for example when you are monitoring a process window or you are watching a live video feed while doing something else, application doesn’t have a GUI , Once it’s running you can see the Windows TopMost Control icon in your system tray, if you right click it you can see the program Options , under Windows you will find the List of Open windows , To make any Window topmost just click on it – in menu list marked item is topmost.

What is New (Monday, 2 January, 2023)

1. [ ADDED ] – Remove All Windows On Top feature
2. [ ADDED ] – Remove “always on top” feature from all windows (D parameter)
3. [ ADDED ] – Class control for automatic “OnTop” feature
4. [ ADDED ] – High contrast support
5. [ ADDED ] – Some code Improvements


Windows TopMost Control main

If you don’t want to use tray menu , you can use the Ctrl + Alt + Space shortcut to lock your currently selected window to the top level of your screen . Now, even if you focus on another window, this application will always stay on top , To unlock it , just select it again and use the same shortcut or you can right click it’s taskbar icon and untick the program name under the windows. To access the options , right click on the software icon on the desktop and select “Options”, you will see the following screen.

Topmost control options

As you see You can customize the software according to your needs.Windows TopMost Control supports Command line options, here is the list of Parameters:

Windows TopMost Control cmd support

To make a window always on Top you have 4 Options :

1. Select a Window and double click to Windows TopMost Control icon in system tray
2. Select a Window and use Ctrl + Alt + Space Keyboard shortcuts
3. Use Windows TopMost Control “Windows List” in system tray menu
4. Use a Cmd Parameter

Note : To set programs topmost which running as administrator, Window TopMost Control must run with administrator privilege. With your suggestions We can add it extra features and develop it further.

Supported operating systems: Windows 11 , Windows 10 , Windows 8.1 , Windows 8 , Windows 7 , Windows Vista , Windows Xp – (x86 & x64)

Eula license for our freware

File: TopMost_x64.exeVirustotal
MD5: 0115e19acc8cd780d1fc6fbf6fc7018b
SHA1: 2f771ac760cedd264123a2fb9c130021b48dd619

File: TopMost.exeVirustotal
MD5: fb9ef97e643c0c1dd992ffbe54b30c8b
SHA1: 2ff54bd780e32f3de6826fb770a152969542033f

Download


Source link


Bluetooth Version finder
Some of the features in Windows operating system is available only if you are running a specific or later version of Bluetooth. For instance, the Nearby Share (a feature to share files between two Windows 10 computers) requires Bluetooth 4.0 or later versions. Bluetooth 4.0 adds Bluetooth Smart / Bluetooth Low Energy standard in addition to the Classic Bluetooth specification, so it is a significant improvement in prolonging battery life of devices. The batteries in Bluetooth low energy devices will last several times longer than their classic Bluetooth counterparts.

Bluetooth version number is usually mentioned in PC’s manual or product information page on your manufacturer’s website. But if your laptop is few years old, you likely have lost the manual and might not be able to find its information on the web as well.

Check Bluetooth Version manually

We can use Windows Device Manager to find out the Bluetooth version .

1. Make sure your Bluetooth is turned on. You can turn it on from the Action Center toggle, or you can open the Settings app and go to the Devices group of settings and turn it on from the Bluetooth tab

2. Right click the Start button to open its context menu and Select the item called “Device Manager”.


Open device manager

3. In Device Manager, expand the Bluetooth set of devices. You may see one or several devices under this. Look for Interl(R) Wireless Bluetooth(R) or your Bluetooth brand name. Right-click it, and select Properties.

Bluetooth properties

4. In the Properties window, go to the Advanced tab. Here, you will see a Firmware Version entry with something like LMP followed by a number, the number will correspond to the version of Bluetooth that you’re running.

Bluetooth version

The LMP versions Table:

LMP 12 – Bluetooth 5.3
LMP 11 – Bluetooth 5.2
LMP 10 – Bluetooth 5.1
LMP 9.x – Bluetooth 5.0
LMP 8.x – Bluetooth 4.2
LMP 7.x – Bluetooth 4.1
LMP 6.x – Bluetooth 4.0
LMP 5.x – Bluetooth 3.0 + HS
LMP 4.x – Bluetooth 2.1 + EDR
LMP 3.x – Bluetooth 2.0 + EDR
LMP 2.x – Bluetooth 1.2
LMP 1.x – Bluetooth 1.1
LMP 0.x – Bluetooth 1.0b

For instance, Bluetooth adapter’s LMP version 6.x indicates that your Bluetooth version is 4.0

Bluetooth Version finder v1.3

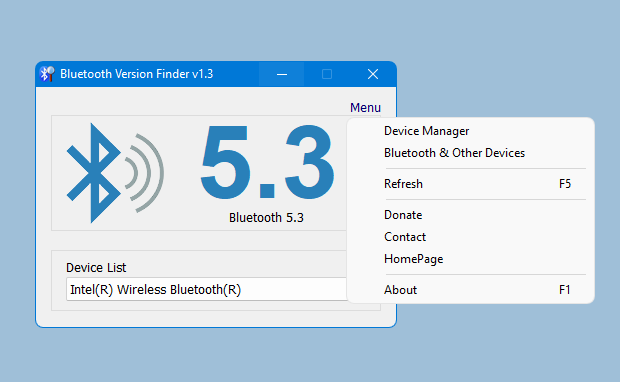
Finding Bluetooth verison manually through the graphical user interface would be time consuming, tedious and, prone to human error therefore we have coded a portable Freeware “Bluetooth Version finder” . It is the easiest method to find the Bluetooth version number. Just download and unzip it then clik to run it will show your Bluetooth version number

What is New v1.3 (Wednesday, July 27 2022)

[ FIXED ] – Unable to detect Latest (5.3) bluetooth version
[ FIXED ] – need to use the drop down menu to detect some Bluetooth versions
[ ADDED ] – Bluetooth version discovery mechanism has been changed

Bluetooth version finder main

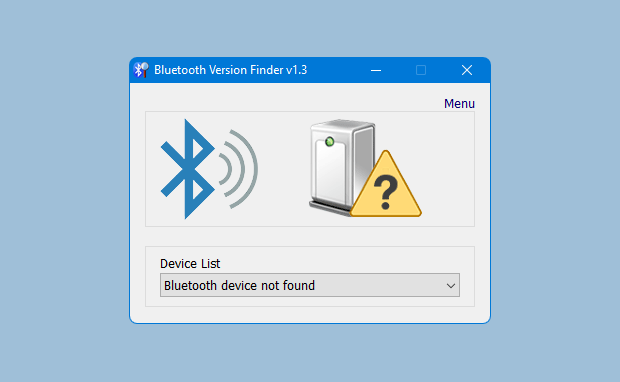
Under the big version number you can read the details . If it fails , you will see a question mark icon

Bluetooth version finder main

Supported operating systems: Windows 11 , Windows 10

Supported languages: English

Eula license for our freware

File: btVersion_x64.exeVirustotal
MD5: 46354176dfff8348e3631dd803b5ad62
SHA1: b42083e7964a2161f856e3c914879a0359d77944

File: btVersion.exeVirustotal
MD5: 1b4e41e6141a97c46002d9e823a6d803
SHA1: 6a93b060676cbba703468a0c5243407de089c8ca

Download Bluetooth Version Finder


Source link


Network Profile Name Changer
When you connect to a Ethernet or wired network for the first time, Windows automatically creates a network profile and assigns generic names like Network 1, Network 2, etc. finally stores it on your computer as a known network. A wireless network profile will use the SSID of the wireless network (ex: router) . Some users and administrators may dislike the non-descriptive network connections names and want to rename , delete or clear redundant network profiles (names). After Windows 7 , Microsoft removed Netork Profile rename option therefore you will not find any option whatsoever in the Settings app or Control Panel to change the network name. It is still possible to edit network profile names to make them more descriptive but the only effective way to Rename or remove the connections in Windows 11, Windows 10 and Windows 8 is by using the registry editor. (valid in all Windows versions)

What is New (Tuesday, March 22, 2022)

1.[FIXED] – After a Network Profile has been deleted, some Values leaves in a registry key
2.[ADDED] – Language support
3.[ADDED] – Windows Vista support
4.[ADDED] – Some Improvements in coding

How to Change the Active Network Profile Name

You can check the current name in the Network and Sharing Center on Windows , press the Windows + R keys to open the Run dialog, type one of the following commands and press Enter.

control.exe /name Microsoft.NetworkAndSharingCenter
explorer.exe shell:::{8E908FC9-BECC-40f6-915B-F4CA0E70D03D}

The name of the network is displayed at the very top of the page.


Netowrk and sharing center

Windows Users have three main options to change a network name ;

1. Using Local Security Policy (It is only available in professional versions of Windows)
2. Using the Windows Registry
3. Using Network Profile Name Changer which is a Portable freeware

Delete / Rename Network Connections In Windows by using Registry

Go to the following key
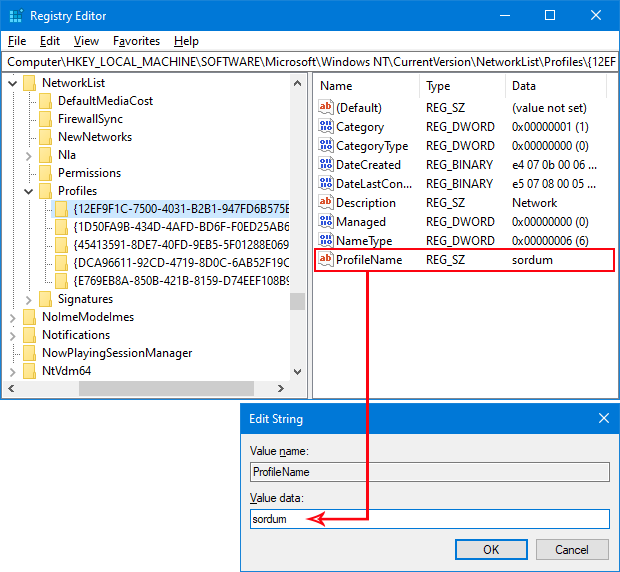
HKEY_LOCAL_MACHINESOFTWAREMicrosoftWindows NTCurrentVersionNetworkListProfiles
The Profiles folder will provide a list of all the network connections with a unique ID , Each network location is represented by a subfolder therefore you need to click on each to check the ProfileName until you find the network name that you want to change. To rename a network location, click on the corresponding subfolder and edit the key named ProfileName. Input the new name for the network location. You can also delete individual subfolders to remove Network connections.

Network profile name in registry

Using Network Profile Name Changer to Delete / Rename Network Connections

Registry way is not Straightforward for Novice Windows users , to simplify the whole Process you can use Network Profile Name Changer.

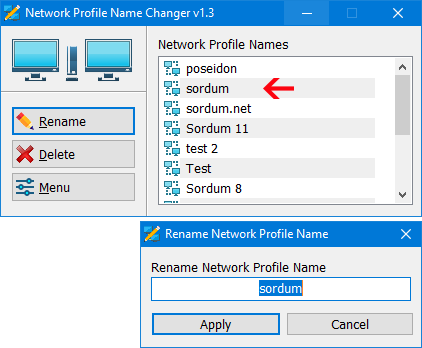
1. After download and unzipping , run the program , It will list all you Network Profiles
2. Choose one of the Network Profile then use Rename or Delete button

Network Profile Name Changer

You can also right click any network profile and perform the same action from the context menu or double click any of the listed Item to rename it.

Network Profile Name Changer

With the context menu, you can rename any network Profile, change a Network Profile from Public to Private or vice versa, open a network Profile registry key or delete a network Profile easily.

Note: If you delete all Network profiles or if the profile you have edited, cannot be recognized by the system, turn off the adapter you connect to the internet and turn it on again, or disconnect and reconnect to the internet, the problem will be solved.

Supported languages: English ,Turkish , German

Supported operating systems: Windows 11 , Windows 10 , Windows 8.1 , Windows 8 , Windows 7 (x86 & x64) , Vista

Eula license for our freware

File: NetPnc.exeVirustotal
MD5: 177aa667b9c7be766ae53888b3c3fd73
SHA1: 541084c57d0cd96f8e23326e304e9faf3d77cff2

Download


Source link


Fix Print Spooler
Have you ever run into the situation where you try to print something and nothing happens? You wait for it to print, but the job doesn’t go through? There are a ton of reasons why a print job may not actually print, but one of the common causes is that the printer queue has a stuck print job. You may need to clear the print queue of stuck print jobs. Print spooler service is a service which gives the print command to printer. It is manage the multiple print commands and gives to the print one by one when last print is done. Printer spooler service works with two system files spoolss.dll / spoolsv.exe and one service. Users wants to take print out however they getting the error message “Print spooler service has stopped please restart the service, the local print spooler is not running. please restart the spooler”

What is New (Thursday, January 20, 2022)

1. [ADDED] – Language support.
2. [ADDED] – Some code Improvements

Clear and reset the print spooler manually

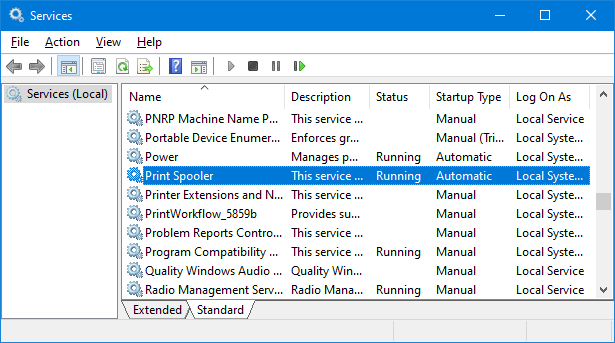
1. Use the keyboard shortcut Windows + R,it will open the Run command box immediately and then Type “services.msc” and press Enter.

2. Select the Standards tab, and then double-click Print Spoolers service


Print spooler service

3. Select Stop, and then select OK

stop spooler service

4. Use %WINDIR%system32spoolprinters command in the Run command box and then delete all files in the folder.

Clean printer queue

5. Find Print Spooler in the list of services then Right click Print Spooler and select Start, select Automatic in the Startup Type box, and then select OK. The print spooler queue is now cleared. Print the file again Source

Print Spooler, a native, built-in Windows service that is enabled by default on Windows machines. “Print Nightmare” is a bug in the Windows spooler service that under some circumstances can result in an attacker being able to remotely run code on a Microsoft Windows system as the local SYSTEM user. You can temporarily disable the Windows Print Spooler service to mitigate the vulnerability until a proper fix is released.

Clear and reset the print spooler with one click

Fix Print Spooler is a Portable freeware Application , it can reset and clear the Print Spooler queue and “%systemroot%System32spoolprinters” folder and then restart the spooler service. You can also use it to disable the Windows Print Spooler service to ptotect your system against print nightmare vulnerability.

How to use Fix Print Spooler Application

After  download extract it and run the appropriate exe file. Fix Print Spooler software has a minimalistic interface.

Manage spooler service

To fix Print Spooler queue errors just use Fix Spooler Service button . You can disable Spooler service with second button. Fix Print Spooler Program has Command Line support , to see all the supported parameters use Menu – Command Line Info 

Fix Print Spooler Cmd parameter support

It will open All supported Cmd parameters window

Fix Print Spooler Cmd Paramaters

With your suggestions We can add it extra features and develop it further

Supported operating systems: Windows 11 , Windows 10 , Windows 8.1 , Windows 8 , Windows 7 , Windows Vista , Windows Xp – (x86 & x64)

Supported languages: English ,Turkish , German , Russian , Korean

Eula license for our freware

Updated : Tuesday, 27 July 2021

File: FixSpooler_x64.exeVirustotal
MD5: a869fd1690a8fb8cbef275445d4f52df
SHA1: eeaffd17c299f2e984bbd74fab865fcebe8b79fd

File: FixSpooler.exeVirustotal
MD5: eee997c907345ffe5c6fa8a9cadd0149
SHA1: bea36d1df77698ca82bb678c4114546db3dce6c5

Download


Source link


Rebuild Shell Icon Cache App
If one or more of your icons are not displaying correctly, or that your icon cache is corrupted, then you might consider rebuilding the icon cache to reset and reload the icon images into the icon cache. The Icon Cache or IconCache.db is a special database file that Windows utilizes to keep copies of each icon handy

Rebuild Shell Icon Cache v1.3 – (Tuesday, 23 november 2021)

[FIXED] – Conflict with 7-zip
[ADDED] – Some code improvements


Rebuild Shell Icon Cache fix broken icons

Having to retrieve all possible icon images from hard disk and to render them dynamically can consume lots of system resources. As a result, Windows save icons it’s already retrieved in its memory. When Windows needs to draw an icon, it uses the copy from the cache instead of retrieving the icon image from the original application file. This helps in making Windows draw the icons faster.

Rebuild Shell Icon Cache is a Portable freeware and have ability to Refresh the Windows’s icon cache. Usage of the Application is quite simple, just double click on it that’s all. You can use Rebuild Shell Icon Cache with Command Prompt here are the supported parameters

Rebuild Shell Icon Cache cmd Parameters

Supported operating systems: Windows 11 , Windows 10 , Windows 8.1 , Windows 8 , Windows 7 , Windows Vista , Windows Xp – (x86 & x64)

Eula license for our freware

Updated : October 15, 2019
File: ReIconCache_x64.exe │ Virustotal
MD5: 622a1f1a9aad418808567341176dbbb0
SHA1: 0d5b082a65d59a208c236b7ddd406e741296df50

Updated : October 15, 2019
File: ReIconCache.exe │ Virustotal
MD5: 8f1b9d40de44599e1438bf715076ed0a
SHA1: 95e89ab247af7de17bf1e340efe01c267903b205

Download


Source link


Hibernate Enable or Disable
Hibernation is the process of saving the content currently in memory to the hard drive to allow your PC to shut down completely, When your computer hibernates, it takes a snapshot of your system files and drivers and saves that snapshot to your hard drive before shutting down . This allows your computer to start up faster , Hibernate is enabled by default and reserves some of your disk for its file the “hiberfil.sys” file . At any time, you can turn your PC on to resume from hibernation and continue working where you left off.

If you’re looking to free up space on your disk, you can disable the hibernate function if you rarely use the feature. So, the main reason you might want to disable hibernate on your computer is if you really need those extra gigs of hard drive space back.

In fact, if you are using a SSD for your Windows 11 or 10 computer, it’s better to turn off the hibernate function to save SSD life .Whenever the operating system goes to to hibernation, it writes the contents of its RAM to the hiberfil.sys and then shuts off power. On systems with solid state disks, the constant writing to the hibernate file may be dangerous to the health of the SSD, because unlike regular hard drives, SSDs can only sustain a limited number of writes before breaking or voiding the warranty. That is why, on most modern laptop computers with SSD drives, hibernation is disabled by default. “Hibernate Enable or Disable” is a very simple Portable freeware to Disable or Enable Hibernation.

Hibernate Enable or Disable v1.3 – (Thursday, 4. November 2021)

[Added] – Language support
[Added] – x64 bit version
[Added] – Some code Improvements
[Fixed] – GUI is too small

How to use :

After downloading, extract “Hibernate Enable or Disable” to your desired location, then run it, Application GUI will show you the Hibernation status , if Hibernate enabled you can see your Hibernation file size on the “Size” Button


hibernate enabled

You can Disable hibernation by clickin “Disable Hibernation” button

hibernate disabled

if any problem occurs , you will see the Orange icon

hibernate enable or disable problem

To Change the size of hiberfil.sys file use the “Size” button and choose One of the Appropriate option

hibernate size

Minimum size = 40 % of the total amount of installed RAM (memory)
Medium size = 75 % of the total amount of installed RAM (memory)
Maximum size = 100 % of the total amount of installed RAM (memory)
Reduced Size = 20% of the total amount of installed RAM (memory) – Only fo Windows 10

Hibernate Enable or Disable has CMD (command line) support. to see the All supported Parameters please use the “Hibernate.exe /?” command

hibernate cmd parameters

NOTE: In some cases, such as systems running from vhd, hibernate doesn’t work.

Supported languages : English , Turkish , German , Polish

Supported Operating Systems : Windows 11 , Windows 10 , Windows 8.1 , Windows 8 , Windows 7 , Windows Vista , Windows Xp (32 and 64-bit).

Eula license for our freware

File: Hibernate_x64.exeVirustotal
MD5: 9f27239bcc03850394d03182dff96a58
SHA1: 1ebc9c41256523a2f915fa19efd59773c0ba0741

File: Hibernate.exeVirustotal
MD5: db06baee9c0f6392e7ce1cab26e5a416
SHA1: 3e65adde9ea9cbf37bd576623fa80fd5c2784709

Download


Source link


Hibernate Enable or Disable
Hibernation is the process of saving the content currently in memory to the hard drive to allow your PC to shut down completely, When your computer hibernates, it takes a snapshot of your system files and drivers and saves that snapshot to your hard drive before shutting down . This allows your computer to start up faster , Hibernate is enabled by default and reserves some of your disk for its file the “hiberfil.sys” file . At any time, you can turn your PC on to resume from hibernation and continue working where you left off.

If you’re looking to free up space on your disk, you can disable the hibernate function if you rarely use the feature. So, the main reason you might want to disable hibernate on your computer is if you really need those extra gigs of hard drive space back.

In fact, if you are using a SSD for your Windows 11 or 10 computer, it’s better to turn off the hibernate function to save SSD life .Whenever the operating system goes to to hibernation, it writes the contents of its RAM to the hiberfil.sys and then shuts off power. On systems with solid state disks, the constant writing to the hibernate file may be dangerous to the health of the SSD, because unlike regular hard drives, SSDs can only sustain a limited number of writes before breaking or voiding the warranty. That is why, on most modern laptop computers with SSD drives, hibernation is disabled by default. “Hibernate Enable or Disable” is a very simple Portable freeware to Disable or Enable Hibernation.

Hibernate Enable or Disable v1.3 – (Thursday, 4. November 2021)

[Added] – Language support
[Added] – x64 bit version
[Added] – Some code Improvements
[Fixed] – GUI is too small

How to use :

After downloading, extract “Hibernate Enable or Disable” to your desired location, then run it, Application GUI will show you the Hibernation status , if Hibernate enabled you can see your Hibernation file size on the “Size” Button


hibernate enabled

You can Disable hibernation by clickin “Disable Hibernation” button

hibernate disabled

if any problem occurs , you will see the Orange icon

hibernate enable or disable problem

To Change the size of hiberfil.sys file use the “Size” button and choose One of the Appropriate option

hibernate size

Minimum size = 40 % of the total amount of installed RAM (memory)
Medium size = 75 % of the total amount of installed RAM (memory)
Maximum size = 100 % of the total amount of installed RAM (memory)
Reduced Size = 20% of the total amount of installed RAM (memory) – Only fo Windows 10

Hibernate Enable or Disable has CMD (command line) support. to see the All supported Parameters please use the “Hibernate.exe /?” command

hibernate cmd parameters

NOTE: In some cases, such as systems running from vhd, hibernate doesn’t work.

Supported languages : English , Turkish , German , Polish , Hungarian, French , Greek , Bulgarian , Spanish , Russian , Swedish ,Chinese (Simplified) , Korean , Japanese

Supported Operating Systems : Windows 11 , Windows 10 , Windows 8.1 , Windows 8 , Windows 7 , Windows Vista , Windows Xp (32 and 64-bit).

Eula license for our freware

File: Hibernate_x64.exeVirustotal
MD5: 9f27239bcc03850394d03182dff96a58
SHA1: 1ebc9c41256523a2f915fa19efd59773c0ba0741

File: Hibernate.exeVirustotal
MD5: db06baee9c0f6392e7ce1cab26e5a416
SHA1: 3e65adde9ea9cbf37bd576623fa80fd5c2784709

Download


Source link


Defender Exclusion Tool
Regardless of whether you choose Microsoft Defender Antivirus, or a third party antivirus solution you need to be sure these products are not scanning critical File and folders because Occasionally Microsoft Security Essentials or Microsoft Defender cause problems with some Files and folders. Typical issues include slow performance , deleting some necessary files or erratic operation or it may flag a file or folder that you trust as malicious. To work around these problems you can add this kind of files and folders to the list of exceptions.

What is new: (Thursday, 09. September 2021)

1. [Fixed] – Defender Exclusion Tool Doesn’t work on Windows 11
2. [Added] – Some code improvements

In Windows 10 , there is a new app called Microsoft Defender Security Center . The app, formerly known as “Microsoft Defender Dashboard”, has been created to help the user control his security and privacy settings. You can add any trusted file, file type, folder, or a process to the exclusions list with the following steps ;

1. Open settings Application
2. Choose Update & security
3. Open Windows security
4. Select Virus & threat protection
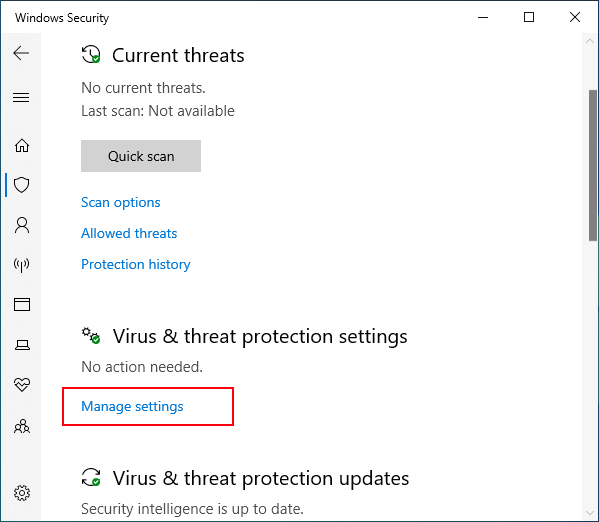
5. Click  Manage settings under the Virus & threat protection settings


Manage defender Threat settings

6. Click Add or remove exclusions

Add or remove exclusions

7. Under Add an exclusion, select the files, folders, file types, or process.

Add an exclusion

You may need to repeat the instructions to exclude other items you don’t want the antivirus to scan to avoid false positives

As you see adding exceptions manually through the graphical user interface would be time consuming, tedious and, prone to human error therefore we have coded a portable Freeware to simplify the whole process.

How to use Defender Exclusion Tool

After downloading, extract the zip file to your desired location, then double click the “ExcTool.exe” file . To Add an exclusion to Microsoft Defender list , just drag and drop any file or Folder on the software GUI , you can also use File or folder buttons

Defender exclusion tool main

To remove listed file or folder whether you can select the item on the list and use Remove button (Minus button) or you can Right click on it and choose “Delete selected” feature

Defender Exclusion tool delete selected

You can also Add defender Exclusion tool to your context menu , to do this use Options – Add to the Contex Menu –  Add to File Context Menu and  Add to Folder Context Menu feature

Defender exclusion tool context menu

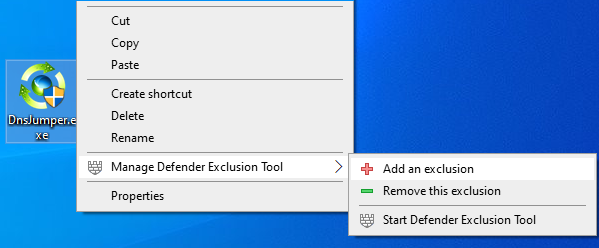
after that right click any file or Folder to add it into the Microsoft Defender exclusion list , you can use the same way to remove it from the exclusion list .

Defender exclusion tool right click menu

After exclude files and folders from Microsoft Defender Antivirus scans you can use Export fature to save all your settings (Green Up arrow) , In the future if you want to use these settings again for examle after a system reset, you can use the Import feature (Red Down arrow)

Defender exclusion tool Export import

Note: Please do not add important folders which containing system files to the exclusion list

Supported systems: Windows 11, Windows 10 , Windows 8.1 , Windows 8 , Windows 7

Supported languages: English, Turkish , German , French , Bulgarian , Hungarian , Spanish , Korean , Chinese (Traditional) , Chinese (Simplified) , Russian , Swedish , Dutch , Greek , Hebrew , Slovenian , Japanese , Italian , Persian , Arabic , Vietnamese , Portuguese

Eula license for our frewareVirus total clean report

File : ExcTool.exe
Size : 752 KB
MD5 : 77ffa8c7af0df18f0285f11b490d726f
SHA1 : d2b13b47eeab95a98ba93fa2bd86419029f2c5b1
SHA-256 : 7d8f35945c17c54056d4aaca05c14bd45640a8c9d1d38f646ae06a8b9cb0c117

Download


Source link


Defender Exclusion Tool
Regardless of whether you choose Microsoft Defender Antivirus, or a third party antivirus solution you need to be sure these products are not scanning critical File and folders because Occasionally Microsoft Security Essentials or Microsoft Defender cause problems with some Files and folders. Typical issues include slow performance , deleting some necessary files or erratic operation or it may flag a file or folder that you trust as malicious. To work around these problems you can add this kind of files and folders to the list of exceptions.

What is new: (Thursday, 09. September 2021)

1. [Fixed] – Defender Exclusion Tool Doesn’t work on Windows 11
2. [Added] – Some code improvements

In Windows 10 , there is a new app called Microsoft Defender Security Center . The app, formerly known as “Microsoft Defender Dashboard”, has been created to help the user control his security and privacy settings. You can add any trusted file, file type, folder, or a process to the exclusions list with the following steps ;

1. Open settings Application
2. Choose Update & security
3. Open Windows security
4. Select Virus & threat protection
5. Click  Manage settings under the Virus & threat protection settings


Manage defender Threat settings

6. Click Add or remove exclusions

Add or remove exclusions

7. Under Add an exclusion, select the files, folders, file types, or process.

Add an exclusion

You may need to repeat the instructions to exclude other items you don’t want the antivirus to scan to avoid false positives

As you see adding exceptions manually through the graphical user interface would be time consuming, tedious and, prone to human error therefore we have coded a portable Freeware to simplify the whole process.

How to use Defender Exclusion Tool

After downloading, extract the zip file to your desired location, then double click the “ExcTool.exe” file . To Add an exclusion to Microsoft Defender list , just drag and drop any file or Folder on the software GUI , you can also use File or folder buttons

Defender exclusion tool main

To remove listed file or folder whether you can select the item on the list and use Remove button (Minus button) or you can Right click on it and choose “Delete selected” feature

Defender Exclusion tool delete selected

You can also Add defender Exclusion tool to your context menu , to do this use Options – Add to the Contex Menu –  Add to File Context Menu and  Add to Folder Context Menu feature

Defender exclusion tool context menu

after that right click any file or Folder to add it into the Microsoft Defender exclusion list , you can use the same way to remove it from the exclusion list .

Defender exclusion tool right click menu

After exclude files and folders from Microsoft Defender Antivirus scans you can use Export fature to save all your settings (Green Up arrow) , In the future if you want to use these settings again for examle after a system reset, you can use the Import feature (Red Down arrow)

Defender exclusion tool Export import

Note: Please do not add important folders which containing system files to the exclusion list

Supported systems: Windows 11, Windows 10 , Windows 8.1 , Windows 8 , Windows 7

Supported languages: English, Turkish , German , French , Bulgarian , Hungarian , Spanish , Korean , Chinese (Traditional) , Chinese (Simplified) , Russian , Swedish , Dutch , Greek , Hebrew , Slovenian , Japanese , Italian , Persian , Arabic , Vietnamese , Portuguese , Romanian , Polish

Eula license for our frewareVirus total clean report

File : ExcTool.exe
Size : 752 KB
MD5 : 77ffa8c7af0df18f0285f11b490d726f
SHA1 : d2b13b47eeab95a98ba93fa2bd86419029f2c5b1
SHA-256 : 7d8f35945c17c54056d4aaca05c14bd45640a8c9d1d38f646ae06a8b9cb0c117

Download


Source link