Tag

v12

Navegando


Fix Print Spooler
Have you ever run into the situation where you try to print something and nothing happens? You wait for it to print, but the job doesn’t go through? There are a ton of reasons why a print job may not actually print, but one of the common causes is that the printer queue has a stuck print job. You may need to clear the print queue of stuck print jobs. Print spooler service is a service which gives the print command to printer. It is manage the multiple print commands and gives to the print one by one when last print is done. Printer spooler service works with two system files spoolss.dll / spoolsv.exe and one service. Users wants to take print out however they getting the error message “Print spooler service has stopped please restart the service, the local print spooler is not running. please restart the spooler”

Clear and reset the print spooler manually

1. Use the keyboard shortcut Windows + R,it will open the Run command box immediately and then Type “services.msc” and press Enter.

2. Select the Standards tab, and then double-click Print Spoolers service
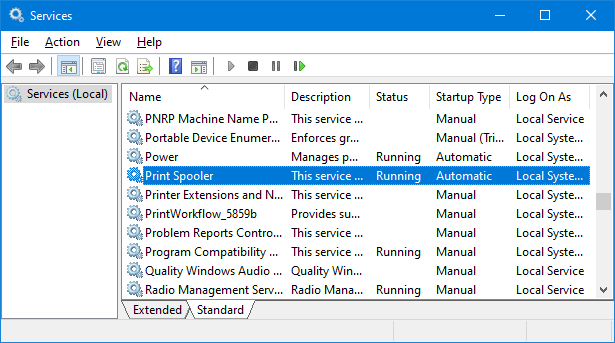


Print spooler service

3. Select Stop, and then select OK

stop spooler service

4. Use %WINDIR%system32spoolprinters command in the Run command box and then delete all files in the folder.

Clean printer queue

5. Find Print Spooler in the list of services then Right click Print Spooler and select Start, select Automatic in the Startup Type box, and then select OK. The print spooler queue is now cleared. Print the file again Source

Print Spooler, a native, built-in Windows service that is enabled by default on Windows machines. “Print Nightmare” is a bug in the Windows spooler service that under some circumstances can result in an attacker being able to remotely run code on a Microsoft Windows system as the local SYSTEM user. You can temporarily disable the Windows Print Spooler service to mitigate the vulnerability until a proper fix is released.

Clear and reset the print spooler with one click

Fix Print Spooler is a Portable freeware Application , it can reset and clear the Print Spooler queue and “%systemroot%System32spoolprinters” folder and then restart the spooler service. You can also use it to disable the Windows Print Spooler service to ptotect your system against print nightmare vulnerability.

How to use Fix Print Spooler Application

After  download extract it and run the appropriate exe file. Fix Print Spooler software has a minimalistic interface.

Manage spooler service

To fix Print Spooler queue errors just use Fix Spooler Service button . You can disable Spooler service with second button. Fix Print Spooler Program has Command Line support , to see all the supported parameters use Menu – Command Line Info 

Fix Print Spooler Cmd parameter support

It will open All supported Cmd parameters window

Fix Print Spooler Cmd Paramaters

With your suggestions We can add it extra features and develop it further

Supported operating systems: Windows 11 , Windows 10 , Windows 8.1 , Windows 8 , Windows 7 , Windows Vista , Windows Xp – (x86 & x64)

Eula license for our freware

Updated : Tuesday, 27 July 2021

File: FixSpooler_x64.exeVirustotal
MD5: f0819af701a2561475f5303491f3c18a
SHA1: c3369e4b576d129425db80455eb7e5598783c7bd

File: FixSpooler.exeVirustotal
MD5: aff2b33c953f1c97aeed795462925bc5
SHA1: 68fa2cb8a3221f05f2621d4f438219b04efce497

Download


Source link


Defender Exclusion Tool
Regardless of whether you choose Windows Defender Antivirus, or a third party antivirus solution you need to be sure these products are not scanning critical File and folders because Occasionally Microsoft Security Essentials or Windows Defender cause problems with some Files and folders. Typical issues include slow performance , deleting some necessary files or erratic operation or it may flag a file or folder that you trust as malicious. To work around these problems you can add this kind of files and folders to the list of exceptions.

What is new: (Friday, June 4, 2021)

1. [Added] – Language support
2. [Added] – Expor/Import feature
3. [Added] – Option to show all windows defender exclusions (include group policy)
4. [Added] – Some minor improvements
5. [Fixed] – Defender Injector sounds like the program is doing something malicious (Name changed)
6. [Removed] – CMD Parameter support (For security reason)

In Windows 10 , there is a new app called Windows Defender Security Center . The app, formerly known as “Windows Defender Dashboard”, has been created to help the user control his security and privacy settings. You can add any trusted file, file type, folder, or a process to the exclusions list with the following steps ;

1. Open settings Application
2. Choose Update & security
3. Open Windows security
4. Select Virus & threat protection
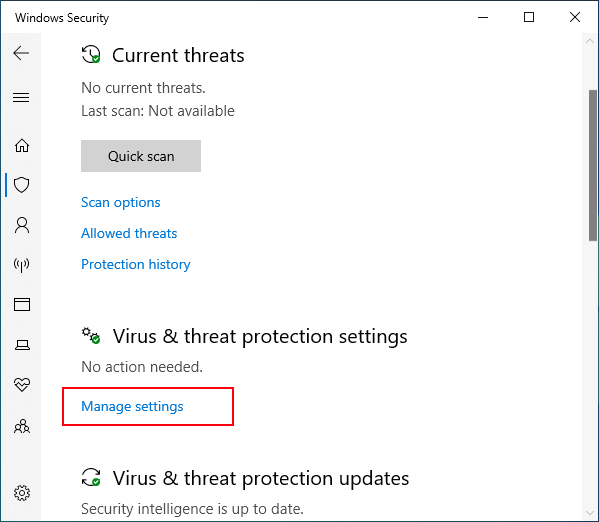
5. Click  Manage settings under the Virus & threat protection settings


Manage defender Threat settings

6. Click Add or remove exclusions

Add or remove exclusions

7. Under Add an exclusion, select the files, folders, file types, or process.

Add an exclusion

You may need to repeat the instructions to exclude other items you don’t want the antivirus to scan to avoid false positives

As you see adding exceptions manually through the graphical user interface would be time consuming, tedious and, prone to human error therefore we have coded a portable Freeware to simplify the whole process.

How to use Defender Exclusion Tool

After downloading, extract the zip file to your desired location, then double click the “ExcTool.exe” file . To Add an exclusion to Windows Defender list , just drag and drop any file or Folder on the software GUI , you can also use File or folder buttons

Defender exclusion tool main

To remove listed file or folder whether you can select the item on the list and use Remove button (Minus button) or you can Right click on it and choose “Delete selected” feature

Defender Exclusion tool delete selected

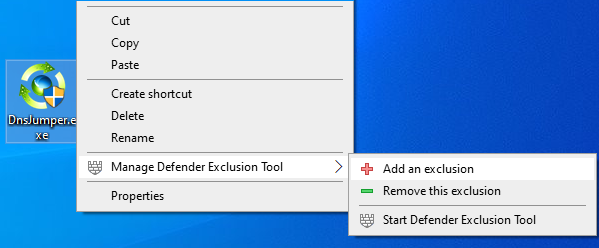
You can also Add defender Exclusion tool to your context menu , to do this use Options – Add to the Contex Menu –  Add to File Context Menu and  Add to Folder Context Menu feature

Defender exclusion tool context menu

after that right click any file or Folder to add it into the Windows Defender exclusion list , you can use the same way to remove it from the exclusion list .

Defender exclusion tool right click menu

After exclude files and folders from Windows Defender Antivirus scans you can use Export fature to save all your settings (Green Up arrow) , In the future if you want to use these settings again for examle after a system reset, you can use the Import feature (Red Down arrow)

Defender exclusion tool Export import

Note: Please do not add important folders which containing system files to the exclusion list

Supported systems: Windows 10 , Windows 8.1 , Windows 8 , Windows 7

Supported languages: English, Turkish , German

Eula license for our frewareVirus total clean report

MD5: b4b80d4eb4cea72a064a135751a601b2
SHA1: aacc088dfbb8a5b97bf0fe1666dd974d6c578383
SHA-256: 3cbbd45d2acc6fe5dbb71faa7febc910329d1b032aaaede54036b203a6563367

Download


Source link


Bluetooth Version finder
Some of the features in Windows operating system is available only if you are running a specific or later version of Bluetooth. For instance, the Nearby Share (a feature to share files between two Windows 10 computers) requires Bluetooth 4.0 or later versions. Bluetooth 4.0 adds Bluetooth Smart / Bluetooth Low Energy standard in addition to the Classic Bluetooth specification, so it is a significant improvement in prolonging battery life of devices. The batteries in Bluetooth low energy devices will last several times longer than their classic Bluetooth counterparts.

Bluetooth version number is usually mentioned in PC’s manual or product information page on your manufacturer’s website. But if your laptop is few years old, you likely have lost the manual and might not be able to find its information on the web as well.

Check Bluetooth Version manually

We can use Windows Device Manager to find out the Bluetooth version .

1. Make sure your Bluetooth is turned on. You can turn it on from the Action Center toggle, or you can open the Settings app and go to the Devices group of settings and turn it on from the Bluetooth tab

2. Right click the Start button to open its context menu and Select the item called “Device Manager”.


Open device manager

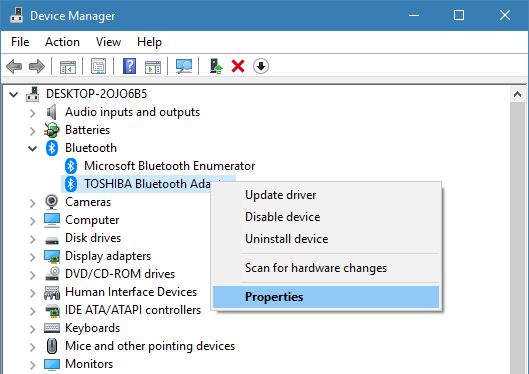
3. In Device Manager, expand the Bluetooth set of devices. You may see one or several devices under this. Look for Interl(R) Wireless Bluetooth(R) or your Bluetooth brand name. Right-click it, and select Properties.

Bluetooth properties

4. In the Properties window, go to the Advanced tab. Here, you will see a Firmware Version entry with something like LMP followed by a number, the number will correspond to the version of Bluetooth that you’re running.

Bluetooth version

The LMP versions Table:

LMP 11 – Bluetooth 5.2
LMP 10 – Bluetooth 5.1
LMP 9.x – Bluetooth 5.0
LMP 8.x – Bluetooth 4.2
LMP 7.x – Bluetooth 4.1
LMP 6.x – Bluetooth 4.0
LMP 5.x – Bluetooth 3.0 + HS
LMP 4.x – Bluetooth 2.1 + EDR
LMP 3.x – Bluetooth 2.0 + EDR
LMP 2.x – Bluetooth 1.2
LMP 1.x – Bluetooth 1.1
LMP 0.x – Bluetooth 1.0b

For instance, Bluetooth adapter’s LMP version 6.x indicates that your Bluetooth version is 4.0

Bluetooth Version finder v1.2

Finding Bluetooth verison manually through the graphical user interface would be time consuming, tedious and, prone to human error therefore we have coded a portable Freeware “Bluetooth Version finder” . It is the easiest method to find the Bluetooth version number. Just download and unzip it then clik to run it will show your Bluetooth version number

What is New v1.2 (Sunday, 23 May 2021)

[ ADDED ] – Menu option
[ ADDED ] – F5 keyboard shortcut
[ FIXED ] – Some minor bugs (Most of the codes have been updated)

Bluetooth version finder main

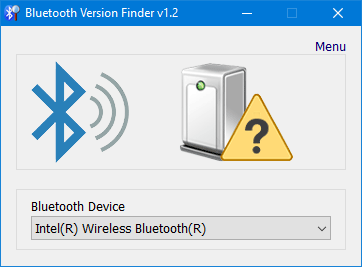
Under the big version number you can read the details . If it fails , you will see a question mark icon

Bluetooth version finder no bluetooth

Supported operating systems: Windows 10

Supported languages: English

Eula license for our frewareVirus total clean report

File : btVersion.exe
Size : 816 KB
MD5 : c385a27559fc4c0af811e84f2af6aa50
SHA1 : d116a745d8dc619a7b396c564fd852f41ae2f5ca
SHA-256 : 032835729c816e7cd4261882194f5906c716f732b74696d7b2bb18a085b10dd3

Download Bluetooth Version Finder


Source link


bluelife puzzle Portable freeware
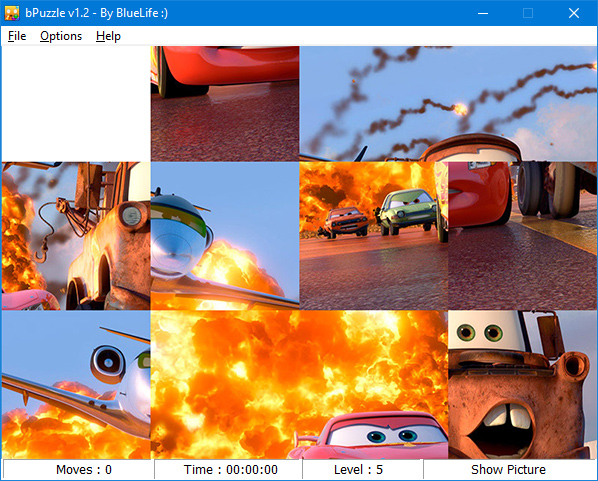
Puzzles have existed in various forms since the time of the ancient world.Puzzles have Advantages for Child Development , pieces are all mixed up, and must be organized and assembled. This creates a chance to learn problem solving skills. Studies have shown that the growth of new brain connections that are formed to help reduce the amount of brain damage in Alzheimer’s patients. Working on puzzles reinforce the connections between our brain cells and form new ones. BlueLife Puzzle (bPuzzle) is a simple game, played by sliding the puzzle pieces in the correct order. Drag and drop an image of your choice onto the main window or use File Menu to choose a default one. If the picture format is JPG, the size does not matter, but if it is Png it should be 800×600 px , bPuzzle will then cut the image into tiles and rearrange them . Your challenge is sliding the pieces to restore them back to the original.

Bpuzzle v1.2 Changelog  (Tuesday, 13 April 2021)

1. [Added] – Png format Support
2. [Added] – show image option in bottom right corner
3. [Added] – x64 version
4. [Fixed] – The playing Screen is too small (Game screen has been enlarged to 800×600 px)
5. [Fixed] – Some minor Bugs
6. [Fixed] – False Positive Issue

How to Play:

1. Extract the ZIP to the location of your choice, and run bpuzzle.exe.
2. Add an image file of your choice, by drag and drop or use the File menu


bluelife puzzle main GUI

You can add pictures of any size dimension, but the default image size is 800×600 px.

bluelife puzzle start the game

3. Click the OK button to start the game, and use your mouse or keyboard to move the pieces

bluelife puzzle slide squares

The status bar at the bottom of the window shows your number of moves, time played in the current game, and difficulty level. The Options menu allows you to change the difficulty and to select your Language.

bluelife puzzle choose a game

have fun

Supported languages: English , Turkish , German , Swedish , Persian , Arabic , Spanish , Polish , Greek , Vietnamese , Portuguese (Br) , Hungarian , Korean , French , Simplified Chinese , Traditional Chinese , Russian , Slovenian , Indonesian , Romanian

Supported Operating Systems: Windows 10 , Windows 8.1 , Windows 8 , Windows 7 , Windows Vista , Winsows Xp – (both x86 and x64)

Eula license for our frewarefreeware.de rating

File: bPuzzle_x64.exe │ Virustotal
MD5: 2e31026f822a4d1737c0c3a8e2040020
SHA1: 76b0e77466eb2733cfa60f86cdf86fd95e0973b1

File: bPuzzle.exe │ Virustotal
MD5: f4ef41aa003f6d3209e17b37b8375f19
SHA1: a23d1881b308ab4dfbe43fd2f1c2e88cfa1c0512

Download


Source link


Switch Power Scheme portable freeware


Switching power plans require you to open Power Options applet from Control Panel or from Windows Settings app. In the Power Options applet, you can choose one of the three options — Balanced, High performance and Power saver, or you can create your own custom plans. You might have some reasons to switch between power plans for example ;

1. You can choose “High Performance” power plan to increase FPS while playing a Game
2. When the laptop battery is low , You can switch to the “power saver” plan and make the battery last longer.
3. In summer, you can create your own power plan to reduce the CPU frequency and avoid the laptop from getting hot.
4. You can create a special plan to prevent the computer from going to sleep during the download.

There are Lots of methods to switch power plans , for example ; Right Click battery icon in task-bar – Choose Power Options – Choose One of the suitable power Plan or You can use Windows Mobility Center and choose the power plan you wish to use under Battery Status. You can also use command prompt or powershell. Switching power plans multiple times a day is time consuming. We have created a small Portable free Application “Switch Power Scheme” to simplify the whole process.

How to use Switch Power Scheme Application

1. Download and unzip it, then run appropriate exe file (x86 or x64)

switch power scheme main gui

It has a minimalistic interface. All your current power plans will be listed on the GUI

2. To Switch between them just choose one and use “Apply selected” Button or Right click one of them and choose “Activate” option.

switch power scheme right click menu

Switch Power Plans Quickly via Desktop Right-click Menu

You can also Add all your power plans to your desktop right-click menu. Choose Options – Add to desktop context menu , if you prefer you can use “Use the Shift Key to display” feature too. This feature require Administrator privileges after you choose the “Add to desktop context menu” feature a popup will ask for permission to run the software with administrative Rights

Add Power plan to your desktop context menu

Please repeat the last action after the software started with administrator privileges (this is not an error or BUG).Then right click your desktop to change your Power Plans via the Right-click menu.

change powerplan via right click menu

If you wish you can use “Switch Power Scheme” optionsvia system tray, Clicking on the System Tray icon gives you quick access to all your power states. The App is compatible with custom power plans, so you can create your own power settings option and Switch Power Scheme will let you choose it.

change power plans via sytem tray

Export-Import a Power Plan or create a shortcut

Switch Power Scheme Application allows you easily export or Import any Power plan. Right clik one of them and choose Export option or select one of your Power plan and use edit – Export menu. To Import a exported Power plan use File – Import Power Plan feature

how to export or import a power plan

With Switch Power Scheme, you can reset your Power Plans , easily rename one of them or create a desktop shortcut to switch this Plan with one click easily.

Supported Operating Systems: Windows 10 , Windows 8.1 , Windows 8 , Windows 7 , Vista
Supported languages: English , Turkish , German , Polish , Japanese , French , Korean , Greek , Russian , Bulgarian , Spanish

Eula license for our freware

File: sPowers_x64.exeVirustotal
MD5: ac7676dac5d8f2e2e3ac0d8e0b697b24
SHA1: c06c591337b912199f82e90614141ec584a1466a

File: sPowers.exeVirustotal
MD5: 9610ee9b3e1d6f28f1ff4bb053a01f5b
SHA1: 879bb774762b790a5cf4ca64769afb46de8925aa

EDownload Switch Power Scheme


Source link