Tag

v12

Navegando


Mouse settings changer
In Windows, mouse settings are controlled by using the Mouse Properties dialog box. There are different ways to open mouse settings , for example go to Start button- Control Panel, In the search tab type mouse and select the mouse you are using,you can also use Run dialog box to change mouse setting.

Mouse Settings Changer v1.2  (Friday, October 6, 2023)

1.[FIXED] – The mouse speed is not saved

Hold down the Windows Key and Press R on your keyboard. Once you’ve got the Run command box open, type one of the Following codes and press Enter.

main.cpl
control.exe main.cpl,,2

Mouse Properties dialog box will open
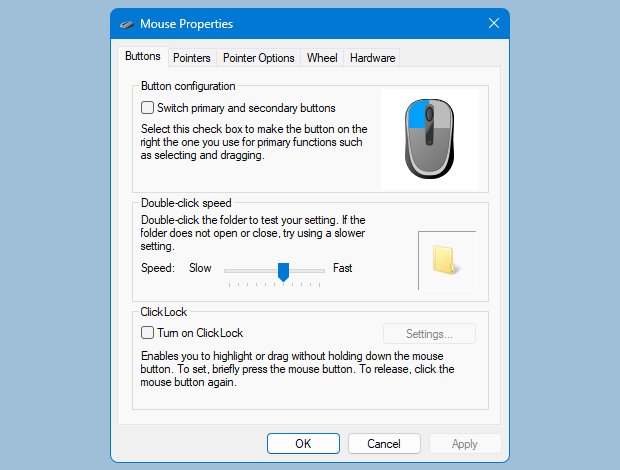


Mouse Properties Window

In addition , you can use Settings app to change the mouse settings so that you can adjust your mouse according to your comfort and make it work just the way you want it.

1. Launch the Settings app (Win+I keyboard shortcut).
2. Click the “Devices” category.
3. Click the “Mouse” page in the left menu of the Settings category.
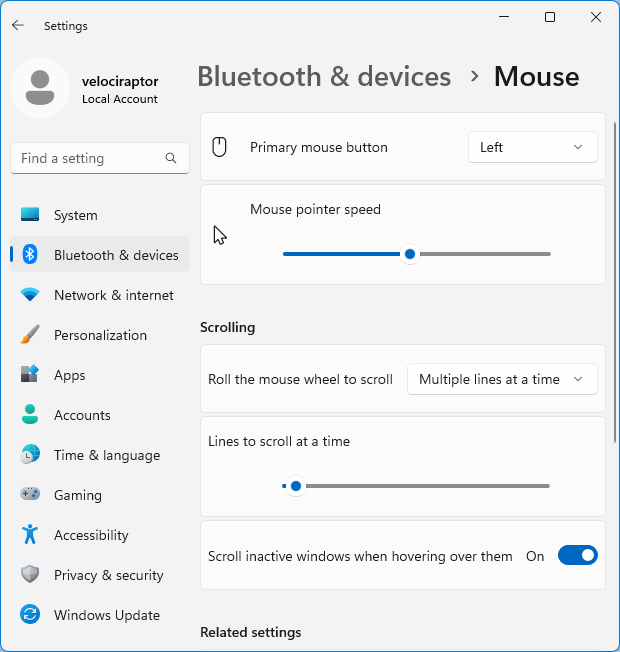
mouse settings dialog box

You can customise common mouse functions here but there is no way to change mouse settings in batch , vbscript or Command prompt, there are many Advantages of using scripting language for example , Allows complex tasks to be performed in relatively few steps. Mouse settings changer is a Portable freeware Application to help you change mouse settings without open Mouse Properties dialog box , it has no GUI.

How to use Mouse settings changer

Download and run the MouseSC_Info.bat file to see the whole Cmd parameters support list.
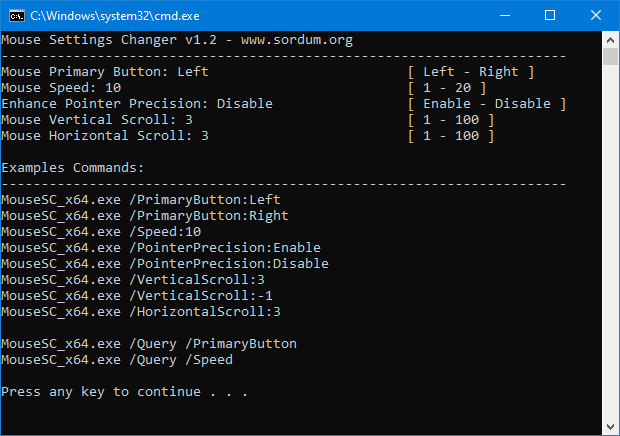
Mouse settings changer cmd parameters

For example , “MouseSC_x64.exe /PrimaryButton:Left” command will change your Primary Mouse button to left or “MouseSC_x64.exe /Speed:10” command will set the Mouse pointer speed

Mouse Pointer speed

You will find some example batch scripts in the downloaded file , MouseSC_Example.bat and MouseSC_Example2.bat , you can edit them according to your needs.

NOTE: If Mouse Properties window is open, Changing mouse settings may not reflect in the “Mouse properties window” therefore Please close the “Mouse properties” screen before using the program.

Supported Operating Systems: Windows 11 , Windows 10 , Windows 8.1 , Windows 8 , Windows 7, Windows Vista , Windows Xp (32 64-bit)

Eula license for our freware

File: MouseSC_x64.exeVirustotal
MD5: 6014fddabdd7b6e2f31c085a25b01c3d
SHA1: 8f5a49aecdfa0227f0ee3012ed24af808b6f0321

File: MouseSC.exeVirustotal
MD5: 4e9134b252b9641e8182de97902310a0
SHA1: 5877b14f2be649dd4d305f7f8f541f5ee7338ffc

Download Mouse Settings Changer


Source link


Windows 11 Classic Context menu
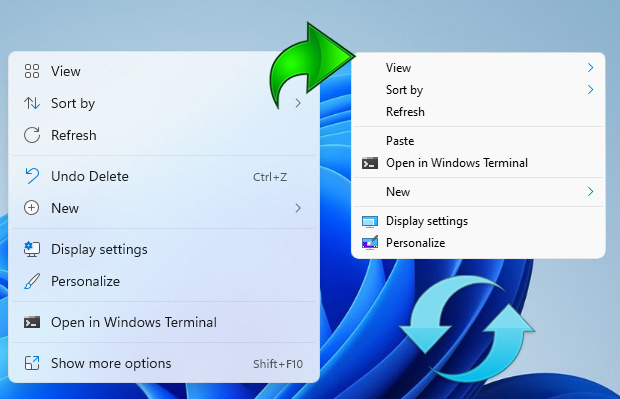
The context (Right Click) menu in Windows 11 is redesigned and kept with limited entries when compared to old windows . It includes a row of icons for basic actions like copy, paste, and delete, but hides some functionality you might want behind a ‘Show More Options’ button this mean Every time we need to press an extra option to see all the context menu options. We will make a brief assessment of the cost to the world of the “show more” option that Microsoft added to the Windows 11 desktop context menu. Ergonomics is important because, Implementing ergonomic solutions can help trim operating expenses by reducing costs and improving productivity. Imagine a workplace where 10 people work, each computer user clicks on the desktop 100 times a day, each click wastes an extra 1 second.

10 x 100 = 1000 seconds (16,67 Minutes) a day Lost.
30 x 1000 = 30000 seconds ( 500 Minutes = 8,33 Hours) a Month Lost.

Even in a workplace with only 10 employees, it causes loss of 8.33 hours per month. Consider the waste of time in the workplace where 100 people work.

Windows 11 Classic Context Menu v1.2 – (Thursday, 27 July 2023)

[Removed] – Move the Taskbar to the Top (Under menu) option
[Added] – Coding improvements have been made

How to Get the Classic (old) Context Menu on Windows 11


Windows 11 new and Old (Classic) context menu

If you want to remove the “Show More Options” entry from Windows 11 Context Menu and restore classic Right Click menus in Windows 11 you can use following registry entries.

Restore full right click context menu in Windows 11 via Registry

Windows Registry Editor Version 5.00

[HKEY_CURRENT_USERSoftwareClassesCLSID{86ca1aa0-34aa-4e8b-a509-50c905bae2a2}InprocServer32]
@=””

Get the default Windows 11 Context Menu back via Registry

Windows Registry Editor Version 5.00

[-HKEY_CURRENT_USERSoftwareClassesCLSID{86ca1aa0-34aa-4e8b-a509-50c905bae2a2}]

After applying the above registry entries, you need to restart File explorer for the settings to take effect. Alternatively you can use Command Prompt to do the same task.

Restore Classic Context Menu on Windows 11 with Cmd

1. Open Cmd with Administrator privileges
2. Copy and paste the below Code and press enter

reg.exe add “HKCUSoftwareClassesCLSID{86ca1aa0-34aa-4e8b-a509-50c905bae2a2}InprocServer32” /f 

Restore Default Context Menu on Windows 11 with Cmd

1. Open Cmd with Administrator privileges
2. Copy and paste the below Code and press enter

reg.exe delete “HKCUSoftwareClassesCLSID{86ca1aa0-34aa-4e8b-a509-50c905bae2a2}” /f

NOTE: Restart the file explorer after the above steps.

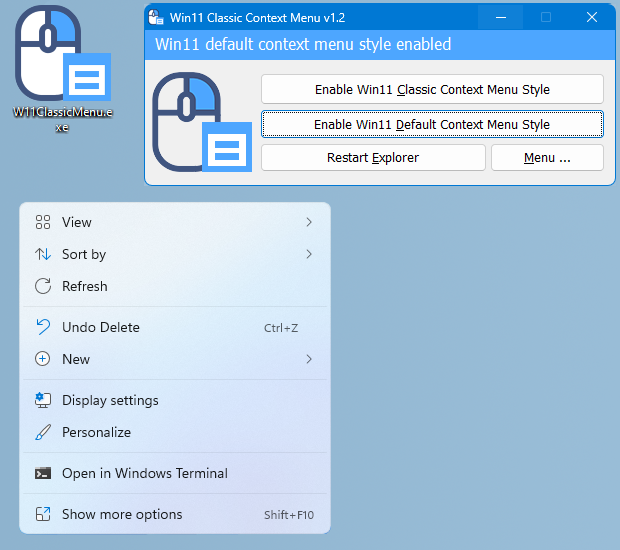
If you are looking for a one click solution to Disable or Enable the New Context Menu in Windows 11 instead of dealing with registry entries you can use Win 11 Classic Context Menu v 1.0 Portable freeware Application. It has minimalistic interface Use first Button “Enable Win 11 Classic Context Menu Style” button to disable “Show More Options” from the Right Click Menu in Windows 11

Get the Classic (old) Context Menu on Windows 11

To disable the classic Context Menu in Windows 11 use second button “Enable Win 11 default Context Menu Style”, If you need to restart Windows explorer, software will detect it and warn you

Get the Default Context Menu on Windows 11

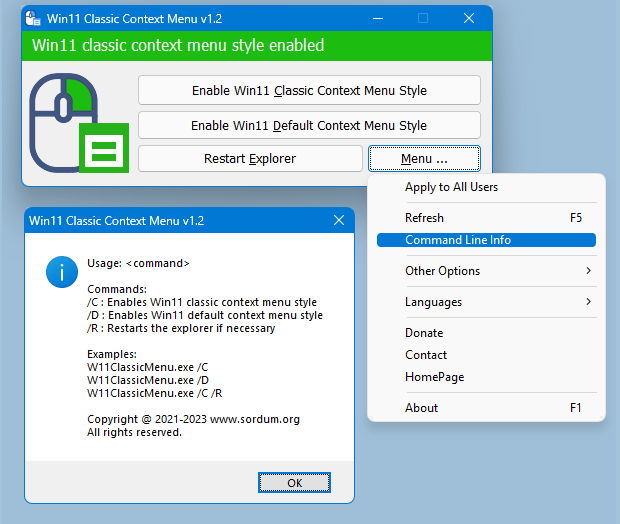
Windows 11 Classic Context menu has CMD parameter support. To see all the supported command line parameters , use the Menu – “Command Line Info” Button.

win11 classic context menu cmd parameters

With this Application you can easily toggle between Old Windows 10 Right Click Context Menu and default Windows 11 Context menu.

Supported operating systems: Windows 11

Supported languages: English ,Turkish , German , Russian , French , Spanish , Brazilian Portuguese , Greek , Korean , Chinese , Polish , Swedish , Hungarian , Czech , Bulgarian , Italian , indonesian , Japanese , Romanian , Hebrew , Vietnamese , Arabic , Persian , Dutch

Eula license for our freware

File: W11ClassicMenu.exeVirustotal
MD5: 3ef2c9d09a4e60b146ea2bc21a02308a
SHA1: 63799f0b3b20230366d6202d4471363825001e6e
SHA256: dd51c33c70819723b3dcbbd169e5245b5a1b2014defa8ce9e3b758b143e8a6e8

Download


Source link


Sendto Menu Editor
The Windows ‘Send to’ menu is a handy way of sending a file to a specific folder, application, or other item. You can use it to send, copy, or print an individual file to a specific location, device, application, or other item , If you want to add your own app or folder to the Send to menu or if you want to delete some of the Unnecessary items in it you can tweak the Send to menu to suit your needs. Open File Explorer in Windows Right click on a file and From the pop-up menu, move your mouse to the Send to command , Click on a specific entry. The file you click on is then sent to the entry you select.


Sendto Menu Editor

If you want to add your own app or folder to the Send to menu, it’s very simple: Just open the Run dialog box by pressing Win+R, then paste shell:sendto command into the text box. This will open the folder where all those shortcuts located. Alternatively, you can navigate to following folder location
%UserProfile%AppDataRoamingMicrosoftWindowsSendTo
But you can simplify the whole process with the “Send To Menu Editor” is a portable freeware which helps users manage the shortcuts present in the Windows “Send To” Menu.

What is New (Thursday, April 27, 2023)

1. [ FIXED ] – The program does not work if the “Send to Folder” is moved to different location.
2. [ FIXED ] – Application requires Administrator authorization on limited user
3. [ FIXED ] – The text on the interface is too small.
4. [ ADDED ] – High contrast support.
5. [ ADDED ] – Some code Improvements.

How to use SendTo Menu Editor 

After downloading, extract “SendTo Menu Editor” to your desired location and run Appropriate one (x64 or x86)

sendto menu editor main

On GUI you will see all of the send to Menu items , to add a new one use plus icon or just drag and drop it on main window. If you use Add Button you can edit Shortcut name , you can use a Shortcut Parameter or change the Shortcut Icon.

Add shortcut optipns

To delete a Send To Menu item use delete icon or right click any listed item and choose “Delete From menu” feature

delete from menu

You can hide the related entry by removing the check mark at the beginning of the items in the list. If you want to remove Send to menu completely use Options – Remove SendTo menu choice , you can also hide all of the Dirves by using “No Drives in SendTo menu” both options require administrator privileges.

Remove sendto menu

Note: The program interface does not show removable drives. It only shows shortcuts and files in the Send To folder.

Supported operating systems: Windows 11 , Windows 10, Windows 8.1 , Windows 8 , Windows 7 , Windos Vista ,Windows XP (3264-bit).

Supported languages: English , Turkish , German , Korean , French , Russian , Arabic , Greek , Slovenian , Spanish , Portuguese Brasil , Vietnamese , Indonesian , Chinese , Polish, Hungarian , Japanese , Italian , Dutch (Nederlands) , Persian , Romanian , Ukrainian , Hebrew

Eula license for our freware

File: SendToEditor_x64.exe │ Virustotal
MD5: FDC4DA6CB97E763410CD844977ADDFD2
SHA1: A7505229BD7F172E8BD7070D9279532D0C6AB4FB

File: SendToEditor.exe │ Virustotal
MD5: 6F64392271C73F872CBDFC7B5719A97C
SHA1: 8D1FA4A13A41C7CB90D12DE704541CACBAD4AC05

Download


Source link


URL Disabler
Users with unrestricted Internet access find themselves constantly battling malware infections and at risk of information leakage. Downloading copyrighted material from the company’s network can expose the company to legal action. By blocking some websites greatly reduce this risk and protects accidental browsing of mature, explicit and sensitive sites. It can also help conserve bandwidth for mission critical applications, and keep those charges down.Restricting access to specific URLs may also improve productivity and help staying focused , this point is especially important for children who need to study.


Blocked Page

Using software to block websites in order to control Internet access can be beneficial especially to businesses , schools that want to comply with child protection legislation and publicly accessible WiFi services that want to provide a family-friendly browsing environment and Home users.

What is New (Friday, 17 March 2023)

1. [ FIXED ] – Application runs very slowly with large entries.
2. [ FIXED ] – Status bar does not show every browser status.
3. [ ADDED ] – Apply the process for all users.
4. [ ADDED ] – Save changes automatically feature.
5. [ ADDED ] – Force browsers to close feature.
6. [ ADDED ] – Browsers support a maximum of 1000 entries (the limit is set to 999 URLs).
7. [ ADDED ] – Improvements were made in coding.

What is URL Disabler and how to use it

URL Disabler is a Portable (it requires no installation) and freeware to simplify the URL blocking process for Google Chrome , Firefox and Chromium EDGE users. The user can freely provide, modify, export and import the list of URLs to be blocked.

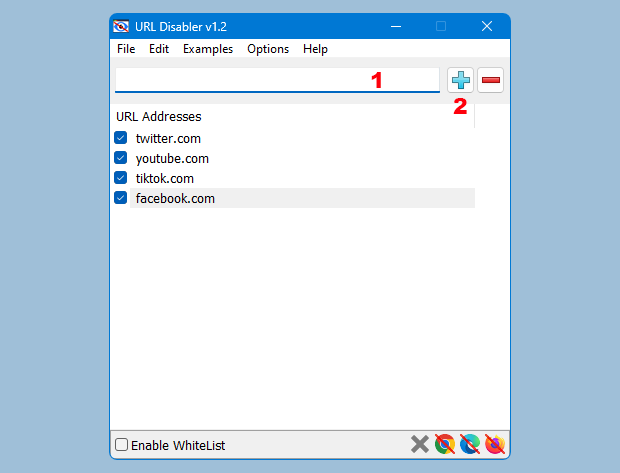
1. After download and Unzip it, please run Appropriate exe file (x64 or x86) then Type the URL of the web page you want to block into the URL field (1) and use plus button (Add to list) (2)

URL disabler Block URL

2. By default, the setting “Options – Save changes automatically” is checked, which means that when you add an URL to the software you don’t need to click the Apply Changes button. If “Automatically save changes” is not selected, use the “Apply changes” button to apply. Easily block any distracting or harmful website. You can click one of the browser icons at the bottom right to choose which browser to apply or unapply settings to.

url disabler blocking option

Whitelist URLs to set exceptions for websites you would like to allow. You can also choose the browser which the ban will be apply from the menu under options, by default all supported browsers are selected. Under the same menu you can use Password Properties to set the Password for the Application.

Url Disabler Password options

Under Examples menu; facebook.com, twitter.com, youtube.com URLs are given as examples. The export and import options are under the file menu, so you can easily reuse the list you created and backed up once.

URL disabler import export feature

URL Disabler doesn’t use%SystemRoot%System32driversetchostsfile method therefore resetting the Hosts file does not affect the blocking Rules. If you want to use hosts file Method for blocking web pages please try our “BlueLife Hosts Editor” software.

Note: If restarting browser does not apply the blocking Rules please log off and log in again (Very rare)

Supported languages: English, Turkish , German , French , Italian , Spanish , Russian , Hungarian , Hebrew , Polish , Japanese , Greek , Dutch (Nederlands), Vietnamese, Persian , Portuguese (Brasil) , Thai , Romanian , Chinese , Arabic , Korean

Supported Operating Systems: Windows 11 , Windows 10 , Windows 8.1 , Windows 8 , Windows 7

Supported Browsers: Google Chrome , Firefox, Chromium EDGE

Eula license for our freware

File: UrlDisabler_x64.exeVirustotal
MD5: aa176972a22cdf8327a04c9a5843e7ec
SHA1: 2853df34b2d8316ce59ad8889b9e403f7fad5ae1

File: UrlDisabler.exeVirustotal
MD5: c808aa596d409639359703a4d3f688d6
SHA1: 35a7d303536f872418465848fa0afc53e3c4a160

Download URL Disabler


Source link


Show desktop icon
To show or hide common icons on the desktop ; Click the Start button Picture of the Start button, type desktop icons into the search box, and then click Show or hide common icons on the desktop or you can use a run command , but if you use Home edition it can be restricted.

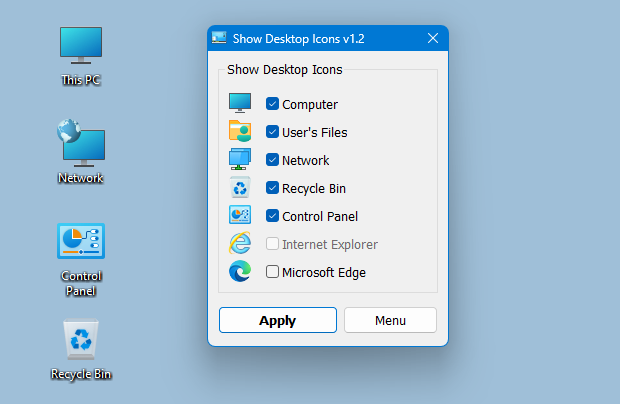
Show Desktop Icon is very Little tool to Add or hide common icons ( Internet Explorer, Computer, User’s Files, Network, Recycle Bin, Control Panel) on the desktop , it is a Portable freeware and was a request from one of our followers


show desktop icon main

It has a very simple interface , to show a icon on the desktop tick one of the box and use “Apply” button , to hide a icon untick it and use “Apply” again , With Windows defult “Show or hide common icons on the desktop” feature you can not add an internet explorer icon on the desktop but with “Show Desktop Icon” tool you can , this is not a internet explorer shortcut remember ; in early versions of Windows, Internet Explorer had a special icon right on the Desktop. It was not just a shortcut, but an ActiveX object which provided access to various IE settings and features by right clicking it. For instance, you could open Internet Options directly from its context menu or start a private browsing session. Such an icon can still be added to the Desktop

Add internet explorer icon on desktop

Tick the İnternet explorer or My Computer or any other icon box and use Apply button that is all.Show Desktop Icons v1.1 has Cmd parameter support here are the Parameters.

show desktop icon cmd support

Supported operating systems: Windows 11 , Windows 10 , Windows 8.1 , Windows 8 , Windows 7 , Windows Vista , Windows Xp – (x86 & x64)

Eula license for our freware

File: sDeskIcon_x64.exe │ Virustotal
MD5: c026fc016303652ed7a3561f1f592a10
SHA1: aea81ce94b4ddb9eeec4c57d6b7ca011942fbb1f

File: sDeskIcon.exe │ Virustotal
MD5: e6b6882dbb19577c3c4e3f05c5d2a52d
SHA1: 9537b6f7169d8c25014ce9ca4b042f01f8474c89

Download


Source link


windows settings blocker
In Windows 10 Version 1703 , Microsoft has added a new Group Policy for the Windows 10 that gives you control over the various settings pages that appear in the Windows Settings app this Group Policy will come in very handy for many organizations and Home users. It would behoove systems administrators to lockdown unnecessary panes in addition to securing those panes which IT specifically wishes to keep out of the hands of end-users. This feature is particularly useful in a network environment, such as when configuring a kiosk or guest machine but there are many other scenarios where disabling the Settings app and the Control Panel will come in handy too. For example, if you’re the tech support person for your family and friends, and they keep calling you to reconfigure a feature over and over again. You can fix their computer once, and then block them access to change settings or if you share a device in the house with children, and you don’t want them messing around with the settings on Windows 11 or 10.

If you don’t have Group Policy Editor (gpedit.msc) , you can lock down individual Settings panes through the Registry but it would be time consuming and , prone to human error. To stop users from changing settings in Windows 11 and 10 you can try our portable freeware “Windows Settings Blocker” Application.

What’s New (Saturday, July 16, 2022)

1. [Fixed] – Information pop ups overlap in Windows 11
2. [Fixed] – Settings app sometimes won’t close in Windows 11
3. [Fixed] – Software name only highlights Windows 10
4. [Fixed] – Software GUI and Font is too small
5. [Added] – Improvements in coding

How to use Windows Settings Blocker

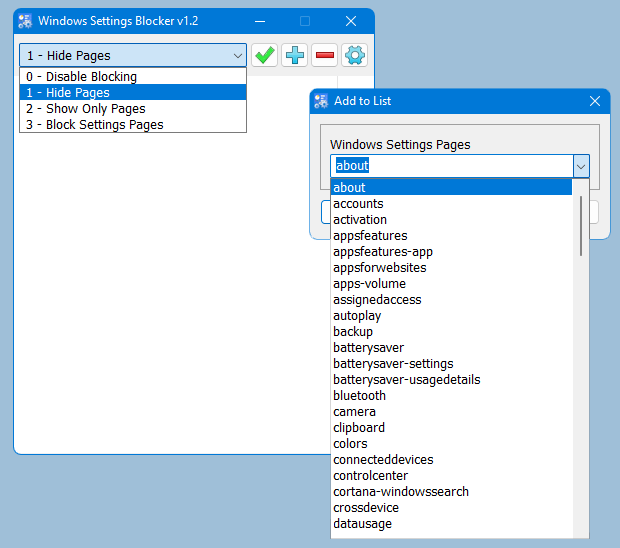
1. Download the Application , extract and run it. First Drop Down menu give us following choices ;

– Disable Blocking
– Hide Pages
– Show only pages
– Block settings pages

Block settings Pages will block All the setting app and Control panel access to unbloc them again we can use Disable Blocking feature.


Windows settings blocker main

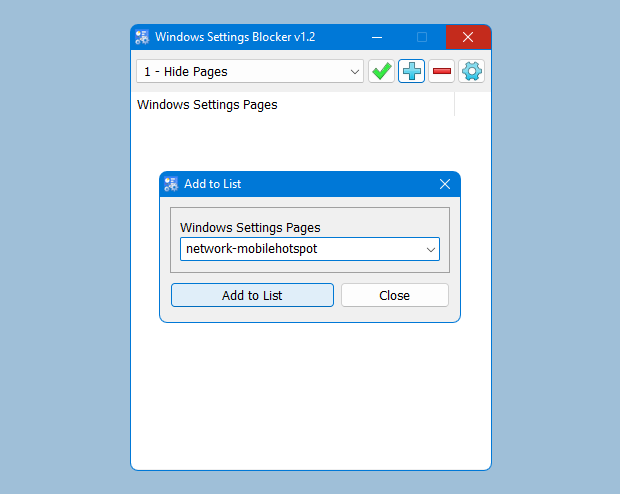
2. For example we want to block “Mobilhotspot” click Plus (Add to list) Button and choose Mobilhotspot from drop down menu , finally use Add to list button.

Add Windows settings blocker list

3. Now use the save settings (ok) Button . Mobilhotspot settings page has been blocked (we can add many items)

Windows settigns blocker list

you can untick the box and use save settings button to make Mobilhotspot settings page visible again or you can right click any added entry and choose disable or delete option and save settings.

Windows settigns blocker right click

How to block Control panel items

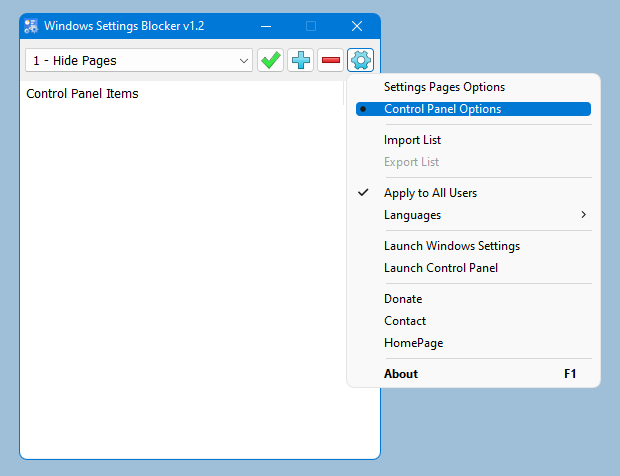
Windows Settings Blocker can block – Unblock (Hide – Unhide) Specified Control Panel Applets in Windows 11/10/8/7/vista/Xp . To hide a Control Panel item, click Options icon (wrench icon) and choose “Control Panel Options

control panel options

click Plus (Add to list) Button and choose any Control Panel Applet to hide (block) it.

Export – import Settings

After creating the Settings or control panel block List you can use the export feature and save your settings. Under Options menu you will find the Export – import feature , exporting setting will create a file like this “WsBlocker_20181110_123122.wsb” . You can restore all your settings newly installed windows system or you can import this file other computers on the network.

Windows Settings blocker export - Import feature

Supported operating systems: Windows 11 , Windows 10 (For settings pages)
Windows 11 , Windows 10 , Windows 8.1 , Windows 8 , Windows 7 , Vista , Xp (For Control Panel Applets)

Supported languages: English , Turkish , German , Bulgarian , French , Hungarian , Japanese , Slovenian , Russian , Greek , Spanish , Polish , Chinese , Swedish , japanese , Korean, Hebrew , Italian , Dutch (Nederlands) , Persian , Romanian

Eula license for our freware

File: WsBlocker_x64.exeVirustotal
MD5: aa840e08d7e5d6d2c9466b5f7387b84e
SHA1: bf026746dc96b8818f257f48de07a301d84c0e60

File: WsBlocker.exeVirustotal
MD5: 873a3227ee1f62fdead90c66218fadd0
SHA1: 446a41aefdf8cfc853a6145ee1a1d83e36237890

Download Win10 Settings Blocker


Source link


Network Profile Name Changer
When you connect to a Ethernet or wired network for the first time, Windows automatically creates a network profile and assigns generic names like Network 1, Network 2, etc. finally stores it on your computer as a known network. A wireless network profile will use the SSID of the wireless network (ex: router) . Some users and administrators may dislike the non-descriptive network connections names and want to rename , delete or clear redundant network profiles (names). After Windows 7 , Microsoft removed Netork Profile rename option therefore you will not find any option whatsoever in the Settings app or Control Panel to change the network name. It is still possible to edit network profile names to make them more descriptive but the only effective way to Rename or remove the connections in Windows 11, Windows 10 and Windows 8 is by using the registry editor. (valid in all Windows versions)

What is New (Monday, 20 September 2021)

1.[ADDED] – Delete a Network Profile via Context menu
2.[ADDED] – Changing a Network Profile to Public Or Private via Context menu
3.[ADDED] – Open With Registry Editor Context menu Option
4.[ADDED] – Rename a Network Profile via Context menu
5.[ADDED] – Some code improvements

How to Change the Active Network Profile Name

You can check the current name in the Network and Sharing Center on Windows , press the Windows + R keys to open the Run dialog, type one of the following commands and press Enter.

control.exe /name Microsoft.NetworkAndSharingCenter
explorer.exe shell:::{8E908FC9-BECC-40f6-915B-F4CA0E70D03D}

The name of the network is displayed at the very top of the page.


Netowrk and sharing center

Windows Users have three main options to change a network name ;

1. Using Local Security Policy (It is only available in professional versions of Windows)
2. Using the Windows Registry
3. Using Network Profile Name Changer which is a Portable freeware

Delete / Rename Network Connections In Windows by using Registry

Go to the following key
HKEY_LOCAL_MACHINESOFTWAREMicrosoftWindows NTCurrentVersionNetworkListProfiles
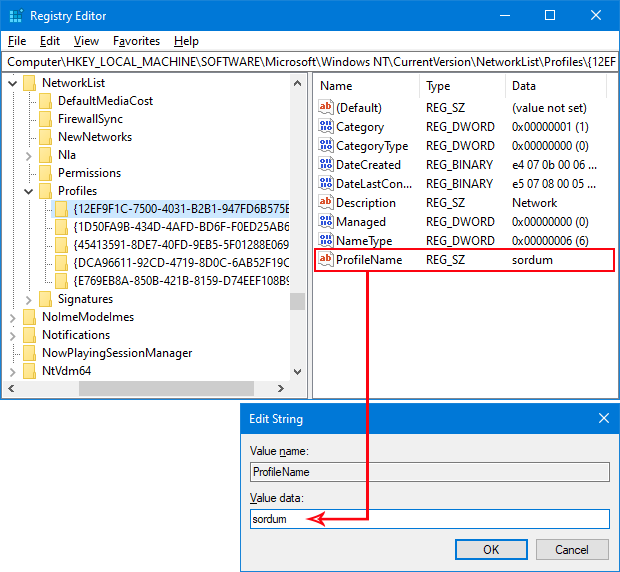
The Profiles folder will provide a list of all the network connections with a unique ID , Each network location is represented by a subfolder therefore you need to click on each to check the ProfileName until you find the network name that you want to change. To rename a network location, click on the corresponding subfolder and edit the key named ProfileName. Input the new name for the network location. You can also delete individual subfolders to remove Network connections.

Network profile name in registry

Using Network Profile Name Changer to Delete / Rename Network Connections

Registry way is not Straightforward for Novice Windows users , to simplify the whole Process you can use Network Profile Name Changer.

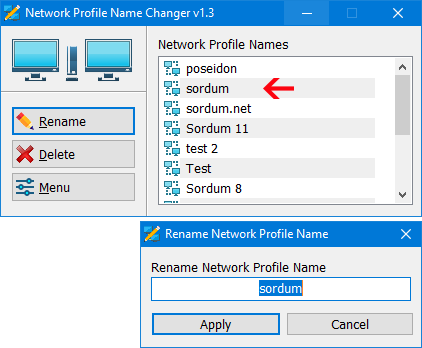
1. After download and unzipping , run the program , It will list all you Network Profiles
2. Choose one of the Network Profile then use Rename or Delete button

Network Profile Name Changer

You can also right click any network profile and perform the same action from the context menu or double click any of the listed Item to rename it.

Network Profile Name Changer

With the context menu, you can rename any network Profile, change a Network Profile from Public to Private or vice versa, open a network Profile registry key or delete a network Profile easily.

Note: If you delete all Network profiles or if the profile you have edited, cannot be recognized by the system, turn off the adapter you connect to the internet and turn it on again, or disconnect and reconnect to the internet, the problem will be solved.

Supported operating systems: Windows 11 , Windows 10 , Windows 8.1 , Windows 8 , Windows 7 (x86 & x64)

Eula license for our freware

File: NetPnc.exeVirustotal
MD5: 47726fe9c4224524f8799c306ac893d3
SHA1: 22c1f87e51283d711ce622944f71f9302c6121bf

Download


Source link


Network Profile Name Changer
When you connect to a Ethernet or wired network for the first time, Windows automatically creates a network profile and assigns generic names like Network 1, Network 2, etc. finally stores it on your computer as a known network. A wireless network profile will use the SSID of the wireless network (ex: router) . Some users and administrators may dislike the non-descriptive network connections names and want to rename , delete or clear redundant network profiles (names). After Windows 7 , Microsoft removed Netork Profile rename option therefore you will not find any option whatsoever in the Settings app or Control Panel to change the network name. It is still possible to edit network profile names to make them more descriptive but the only effective way to Rename or remove the connections in Windows 11, Windows 10 and Windows 8 is by using the registry editor. (valid in all Windows versions)

What is New (Monday, 20 September 2021)

1.[ADDED] – Delete a Network Profile via Context menu
2.[ADDED] – Changing a Network Profile to Public Or Private via Context menu
3.[ADDED] – Open With Registry Editor Context menu Option
4.[ADDED] – Rename a Network Profile via Context menu
5.[ADDED] – Some code improvements

How to Change the Active Network Profile Name

You can check the current name in the Network and Sharing Center on Windows , press the Windows + R keys to open the Run dialog, type one of the following commands and press Enter.

control.exe /name Microsoft.NetworkAndSharingCenter
explorer.exe shell:::{8E908FC9-BECC-40f6-915B-F4CA0E70D03D}

The name of the network is displayed at the very top of the page.


Netowrk and sharing center

Windows Users have three main options to change a network name ;

1. Using Local Security Policy (It is only available in professional versions of Windows)
2. Using the Windows Registry
3. Using Network Profile Name Changer which is a Portable freeware

Delete / Rename Network Connections In Windows by using Registry

Go to the following key
HKEY_LOCAL_MACHINESOFTWAREMicrosoftWindows NTCurrentVersionNetworkListProfiles
The Profiles folder will provide a list of all the network connections with a unique ID , Each network location is represented by a subfolder therefore you need to click on each to check the ProfileName until you find the network name that you want to change. To rename a network location, click on the corresponding subfolder and edit the key named ProfileName. Input the new name for the network location. You can also delete individual subfolders to remove Network connections.

Network profile name in registry

Using Network Profile Name Changer to Delete / Rename Network Connections

Registry way is not Straightforward for Novice Windows users , to simplify the whole Process you can use Network Profile Name Changer.

1. After download and unzipping , run the program , It will list all you Network Profiles
2. Choose one of the Network Profile then use Rename or Delete button

Network Profile Name Changer

You can also right click any network profile and perform the same action from the context menu or double click any of the listed Item to rename it.

Network Profile Name Changer

With the context menu, you can rename any network Profile, change a Network Profile from Public to Private or vice versa, open a network Profile registry key or delete a network Profile easily.

Note: If you delete all Network profiles or if the profile you have edited, cannot be recognized by the system, turn off the adapter you connect to the internet and turn it on again, or disconnect and reconnect to the internet, the problem will be solved.

Supported operating systems: Windows 11 , Windows 10 , Windows 8.1 , Windows 8 , Windows 7 (x86 & x64)

Eula license for our freware

File: NetPnc.exeVirustotal
MD5: 47726fe9c4224524f8799c306ac893d3
SHA1: 22c1f87e51283d711ce622944f71f9302c6121bf

Download


Source link


Fix Print Spooler
Have you ever run into the situation where you try to print something and nothing happens? You wait for it to print, but the job doesn’t go through? There are a ton of reasons why a print job may not actually print, but one of the common causes is that the printer queue has a stuck print job. You may need to clear the print queue of stuck print jobs. Print spooler service is a service which gives the print command to printer. It is manage the multiple print commands and gives to the print one by one when last print is done. Printer spooler service works with two system files spoolss.dll / spoolsv.exe and one service. Users wants to take print out however they getting the error message “Print spooler service has stopped please restart the service, the local print spooler is not running. please restart the spooler”

Clear and reset the print spooler manually

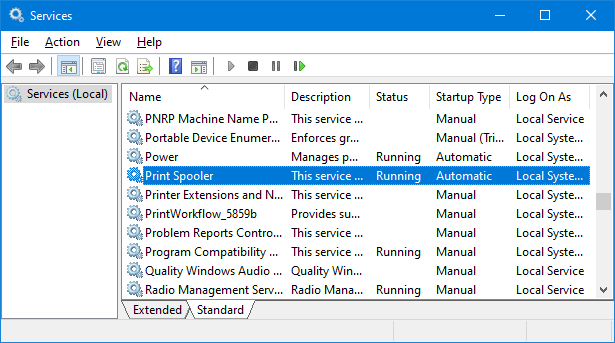
1. Use the keyboard shortcut Windows + R,it will open the Run command box immediately and then Type “services.msc” and press Enter.

2. Select the Standards tab, and then double-click Print Spoolers service


Print spooler service

3. Select Stop, and then select OK

stop spooler service

4. Use %WINDIR%system32spoolprinters command in the Run command box and then delete all files in the folder.

Clean printer queue

5. Find Print Spooler in the list of services then Right click Print Spooler and select Start, select Automatic in the Startup Type box, and then select OK. The print spooler queue is now cleared. Print the file again Source

Print Spooler, a native, built-in Windows service that is enabled by default on Windows machines. “Print Nightmare” is a bug in the Windows spooler service that under some circumstances can result in an attacker being able to remotely run code on a Microsoft Windows system as the local SYSTEM user. You can temporarily disable the Windows Print Spooler service to mitigate the vulnerability until a proper fix is released.

Clear and reset the print spooler with one click

Fix Print Spooler is a Portable freeware Application , it can reset and clear the Print Spooler queue and “%systemroot%System32spoolprinters” folder and then restart the spooler service. You can also use it to disable the Windows Print Spooler service to ptotect your system against print nightmare vulnerability.

How to use Fix Print Spooler Application

After  download extract it and run the appropriate exe file. Fix Print Spooler software has a minimalistic interface.

Manage spooler service

To fix Print Spooler queue errors just use Fix Spooler Service button . You can disable Spooler service with second button. Fix Print Spooler Program has Command Line support , to see all the supported parameters use Menu – Command Line Info 

Fix Print Spooler Cmd parameter support

It will open All supported Cmd parameters window

Fix Print Spooler Cmd Paramaters

With your suggestions We can add it extra features and develop it further

Supported operating systems: Windows 11 , Windows 10 , Windows 8.1 , Windows 8 , Windows 7 , Windows Vista , Windows Xp – (x86 & x64)

Eula license for our freware

Updated : Tuesday, 27 July 2021

File: FixSpooler_x64.exeVirustotal
MD5: f0819af701a2561475f5303491f3c18a
SHA1: c3369e4b576d129425db80455eb7e5598783c7bd

File: FixSpooler.exeVirustotal
MD5: aff2b33c953f1c97aeed795462925bc5
SHA1: 68fa2cb8a3221f05f2621d4f438219b04efce497

Download


Source link