Tag

v10

Navegando


Wi-Fi Filter Tool
Computers with Windows will show you a list of available WiFi networks in your surrounding , If you have a lot of wireless access points within your area, then you could have a lot of SSIDs (network names) in your available wireless networks list, to find the target Wi-Fi network you need to take some time . You may also want to block users from connecting some specific WLAN SSIDs, to ensure that corporate devices within corporate premises are only using the corporate network.

you can remove one or all of them from your list of Network Profiles or available networks. Windows doesn’t allow you to hide Wi-Fi networks Windows via a graphical user interface. You are required to run a few commands on Administrator Command Prompt.

1. Whitelist Only Wi-Fi Connections You Want
netsh wlan add filter permission=allow ssid=”WIFI NAME” networktype=infrastructure

2. Blacklist Nearby Wi-Fi Connections From Your List of Networks
netsh wlan add filter permission=block ssid=”WIFI NAME” networktype=infrastructure

There are many more commands you can use but if you are not an advanced windows user, this method will be complicated for you therefore we have coded a potable freeware to simplify all these processes.

How to use Wi-Fi Filter Tool

Download Wi-Fi Filter Tool , unzip it then double click and run the appropriate version (x64 or x86). The software gives you two options :

You can either Type the name of the Wi-Fi SSID in the space at the top or select it from the drop-down list and use the plus sign button to block it. The drop-down list in the software interface is only active when you are connected to a Wi-Fi network.


Wi-Fi Filter tool GUI

This will remove the blocked SSID from the list.
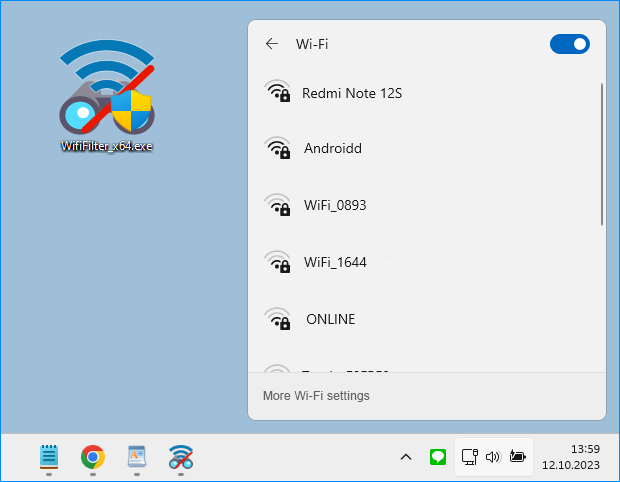
wifi list

2. If you check the White List box at the bottom left, only the SSID name allowed in the list will appear.

Wi-Fi Filter tool Whitelist Mode

A clean list with no neighbouring wireless networks is shown in the image below.

Wi-Fi List cleaned

To avoid reorganising the list each time, use “Save your settings” from the File menu.

Wi-Fi Filter tool save your settings

Other features such as restarting the Wi-Fi service are also available in the software File menu.

Supported languages: English ,Turkish , German

Supported Operating Systems: Windows 11 , Windows 10 , Windows 8.1 , Windows 8 , Windows 7, Windows Vista , Windows Xp (32 64-bit)

Eula license for our freware

File: WifiFilter_x64.exeVirustotal
MD5: a2e5df4054d26cf80e828678d5e8e4c2
SHA1: 6506a1e021d73a0c0775239d756f7ed06b24a520

File: WifiFilter.exeVirustotal
MD5: cea305b874a261115d7c82643527862a
SHA1: 6ddc21b931a17850885ce063049d865e7dec31b5

Download Wi-Fi Filter Tool


Source link


Add store Apps to the context menu
The Microsoft Store app comes built into Windows and allows you to download and install dozens of apps and games. It’s possible to open any Microsoft Store app from Command Prompt , Run dialog box or PowerShell. You can also easily add any Microsoft Store application to the Windows Right Click (Context) Menu. But, to be able to do that, you need to know the app’s Package Family Name and App ID. A Package Family Name is an opaque string derived from only two parts of a package identity – name and publisher:
< Name >_< PublisherId >
For example, the Package Family Name of the Windows Photos app is :
Microsoft.Windows.Photos_8wekyb3d8bbwe

Name :  Microsoft.Windows.Photos
Publisher ID : 8wekyb3d8bbwe

There are many ways to find your app’s unique Package Family Name and App User Model ID :

1. You can use a powershell script.

2. You can find the AUMID by using File Explorer.

3. You can use the registry to find out the AUMID of an application that is installed for the current user.

See the related microsoft article for details on the above topics. But none of the above methods will give you the direct code for the execution of a store application. For this reason, we have coded a simple application called: Commands for Store Apps. thats all.

How to use Store Apps Tool

1. Download the software from the link at the end of the page and run the exe file that matches the architecture of your operating system.

2. For example, let’s run the Windows Alarm & Clock application with the command, right click on the “Alarm & Clock” in the software interface and click on “Copy Command“, that’s all.


Store Apps tool copy command feature

Where to use the execution codes of the Microsoft Store

You can use the following code, which has been copied to your clipboard , in different ways.
Explorer.exe “Shell:AppsfolderMicrosoft.WindowsAlarms_8wekyb3d8bbwe!App”

1. You can use this code in the Run dialog box or in the Cmd and Powershell console to launch the appropriate Store application.

2. You can use this code to create a shortcut that automatically launches the Microsoft Store application when the system starts.

3. The code can also be used to add the app to your right click (context) menu.

4. With the help of scheduled tasks, related code can be executed at specific times of the day.

5. You can use the code inside a script too.

Run store Apps from Cmd or Powershell console

How to add a Store app to your desktop context menu

There are two different ways to do this ;

1. To make multiple selections from the list in the software interface, press Ctrl on your keyboard and select the Store apps you want to add to your desktop context menu, then right click on one of them and choose Add to desktop Context menu.

Add Store Apps to your desktop context menu

2. You can use the Desktop Context Menu Options button (3rd) at the top of the software.

a) Select Item Name in the context menu and click Install button.

b) You can change Main or Sub context menu Icon.

In the Options menu, you can click on “Save your settings“. This will save all the settings you have made.

Store Apps tool save settings feature

You can restore your saved settings by selecting “Load your settings” from the same menu.

Store Apps in the context menu

Functions of the software interface buttons

The first button on the interface opens the “Applications” folder, which is the folder containing the Microsoft store applications. The second button will open the Microsoft Store app and the third button  Opens the “Desktop Context Menu Options” Window. fourth button will refresh the list. The last button is the “Info” button.

Please , make sure that the “Add explorer.exe to command” option in the Options menu is selected so that the copied code will work properly in the cmd and powershell consoles.

Add Explorer to commands

If you right click on any store app in the list, you can create an application shortcut using the “Create Shortcut” menu, or you can choose to create a bat or vbscript file .

Run store Apps with script

Store Apps Tool is a Portable Freeware Application. To uninstall the software, simply right click and choose delete.

Supported operating systems: Windows 11 , Windows 10, Windows 8.1 and Windows 8

Supported languages: English , Turkish , German

Eula license for our freware

File: CmdSApps_x64.exeVirustotal
MD5: de6d02004a86a7ebc9e0b4ceb7e6a379
SHA1: a218ee492d71c37564d88c74f1fa5bebf800bd65

File: CmdSApps.exeVirustotal
MD5: c590869f0f147af69600b204b6c6f4c3
SHA1: b233dc29d94a74960af7fa8f54b80676953e4923

Download Store Apps Tool


Source link


Commands For store Apps
The Microsoft Store app comes built into Windows and allows you to download and install dozens of apps and games. It’s possible to open any Microsoft Store app from Command Prompt , Run dialog box or PowerShell. You can also easily add any Microsoft Store application to the Windows Right Click (Context) Menu. But, to be able to do that, you need to know the app’s Package Family Name and App ID. A Package Family Name is an opaque string derived from only two parts of a package identity – name and publisher:
< Name >_< PublisherId >
For example, the Package Family Name of the Windows Photos app is :
Microsoft.Windows.Photos_8wekyb3d8bbwe

Name :  Microsoft.Windows.Photos
Publisher ID : 8wekyb3d8bbwe

There are many ways to find your app’s unique Package Family Name and App User Model ID :

1. You can use a powershell script.

2. You can find the AUMID by using File Explorer.

3. You can use the registry to find out the AUMID of an application that is installed for the current user.

See the related microsoft article for details on the above topics. But none of the above methods will give you the direct code for the execution of a store application. For this reason, we have coded a simple application called: Commands for Store Apps. thats all.

How to use Commands for Store Apps

1. Download the software from the link at the end of the page and run the exe file that matches the architecture of your operating system.

2. For example, let’s run the Windows Alarm & Clock application with the command, right click on the “Alarm & Clock” in the software interface and click on “Copy Command“, that’s all.


Copy Ms Store Apps run command

Where to use the execution codes of the Microsoft Store

You can use the following code, which has been copied to your clipboard , in different ways.
Explorer.exe “Shell:AppsfolderMicrosoft.WindowsAlarms_8wekyb3d8bbwe!App”

1. You can use this code in the Run dialog box or in the Cmd and Powershell console to launch the appropriate Store application.

2. You can use this code to create a shortcut that automatically launches the Microsoft Store application when the system starts.

3. The code can also be used to add the app to your right click (context) menu. We recommend you to use our EC menu Software to simplify the process.

4. With the help of scheduled tasks, related code can be executed at specific times of the day.

5. You can use the code inside a script too.

Run store Apps from Cmd or Powershell console

The first button on the interface opens the “Applications” folder, which is the folder containing the Microsoft store applications. The second button will open the Microsoft Store app and the third button will refresh the list.  Please , make sure that the “Add explorer.exe to command” option in the Options menu is selected so that the copied code will work properly in the cmd and powershell consoles.

Add Explorer to commands

If you right click on any store app in the list, you can create an application shortcut using the “Create Shortcut” menu, or you can choose to create a bat or vbscript file .

Run Microsoft Store Apps with script

Commands for Store Apps is a Portable Freeware Application. To uninstall the software, simply right click and choose delete.

Supported operating systems: Windows 11 , Windows 10, Windows 8.1 and 8

Supported languages: English

Eula license for our freware

File: CmdSApps_x64.exeVirustotal
MD5: 26a17abf0e253202f7ba87cfc57ce53a
SHA1: 723f75b4100b3a60d737cc4a843140b106429871

File: CmdSApps.exeVirustotal
MD5: 47d49edbd75b5ef2d547d90ac199c189
SHA1: 049c0424d9a872e43e609753e3cf4e152deef34e

Download Skip UAC Prompt


Source link


skip uac promp
Running an app at system startup is easy; you can add it to the Startup folder on Windows. These apps run with normal user privileges and that’s fine in almost every case but Windows doesn’t allow elevated tasks at startup that is why you can’t just auto run programs with administrative privileges at startup. When running tasks or commands as administrator, Windows will throw a UAC (User Account Control) prompt that you’ll have to confirm if you want the task to run.

You can create an elevated shortcut for the program that will allow you to bypass UAC Prompt and run the program without seeing the UAC Prompt in Windows by using Task Scheduler this requires many steps. For this reason, we have coded the application called Skip UAC prompt. This utility also allows you to enable or disable UAC for the apps of your choosing without entirely deactivating UAC systemwide.

How to use Skip UAC Prompt

1. Extract the zip file from the download link and double click the exe file suitable for your system, then you can drag n’ drop a program or shortcut to the Application interface, you can also use the first button (Add File) for the same operation.


skip uac prompt main

The relevant software or scripts , were set to start at system startup without an UAC warning. Uncheck the boxes from software that you do not want to start automatically at system startup.

Uncheck to stop Autostart

You can also create a shortcut to run an Application without UAC warning. To undo this, simply use the “Delete Selected” button. There are a few customization options available under the Options menu ; always on top, Use Classical Icons and Warn before deleting.

Create a shortcut to the Escape UAC command prompt.

You can use the File Import List / Export List feature to import a backup file, or you can drag and drop the backup file directly onto the interface. To delete all items in the interface at the same time, right click on an empty space and select Delete all.

skip uac prompt delete all

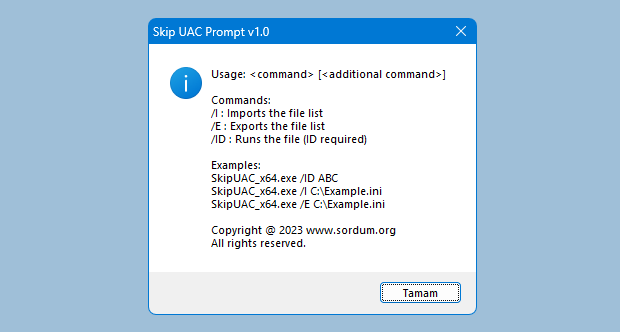
This Portable and free Software also has Cmd parameter support, to see the commands it supports, Open Cmd where the exe is located and run the SkipUAC_x64.exe /? command. Please make sure you use the program as a user with administrator rights.

Skip Uac Prompt Cmd support

Your wishes and suggestions for improving the software are welcome.

Supported operating systems: Windows 11 , Windows 10, Windows 8.1 and 8 , Windows 7 , Windows Vista

Supported languages: English

Eula license for our freware

File: SkipUAC_x64.exeVirustotal
MD5: 815252c499826ae52631f475afbc7c01
SHA1: fa8290798222d2a554e0a4a5b48b1787da567005

File: SkipUAC.exeVirustotal
MD5: 399d00fa162836a739126b819b273432
SHA1: df744550f4007c58eee269c8863a9950e45d883f

Download Skip UAC Prompt


Source link


Windows 11 Classic Context menu
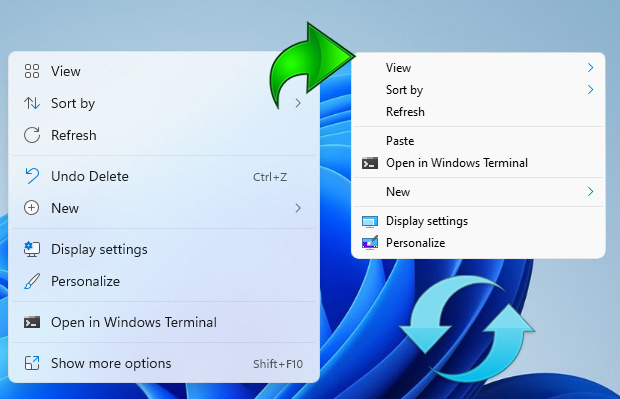
The context (Right Click) menu in Windows 11 is redesigned and kept with limited entries when compared to old windows . It includes a row of icons for basic actions like copy, paste, and delete, but hides some functionality you might want behind a ‘Show More Options’ button this mean Every time we need to press an extra option to see all the context menu options. We will make a brief assessment of the cost to the world of the “show more” option that Microsoft added to the Windows 11 desktop context menu. Ergonomics is important because, Implementing ergonomic solutions can help trim operating expenses by reducing costs and improving productivity. Imagine a workplace where 10 people work, each computer user clicks on the desktop 100 times a day, each click wastes an extra 1 second.

10 x 100 = 1000 seconds (16,67 Minutes) a day Lost.
30 x 1000 = 30000 seconds ( 500 Minutes = 8,33 Hours) a Month Lost.

Even in a workplace with only 10 employees, it causes loss of 8.33 hours per month. Consider the waste of time in the workplace where 100 people work.

How to Get the Classic (old) Context Menu on Windows 11


Windows 11 new and Old (Classic) context menu

If you want to remove the “Show More Options” entry from Windows 11 Context Menu and restore classic Right Click menus in Windows 11 you can use following registry entries.

Restore full right click context menu in Windows 11

Windows Registry Editor Version 5.00

[HKEY_CURRENT_USERSoftwareClassesCLSID{86ca1aa0-34aa-4e8b-a509-50c905bae2a2}InprocServer32]
@=””

Get the default Windows 11 Context Menu back

Windows Registry Editor Version 5.00

[-HKEY_CURRENT_USERSoftwareClassesCLSID{86ca1aa0-34aa-4e8b-a509-50c905bae2a2}]

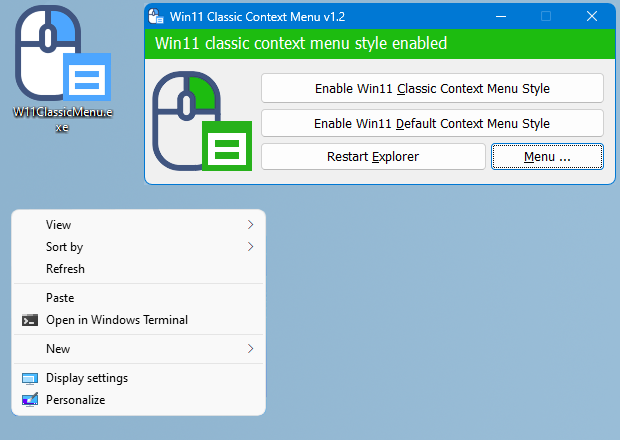
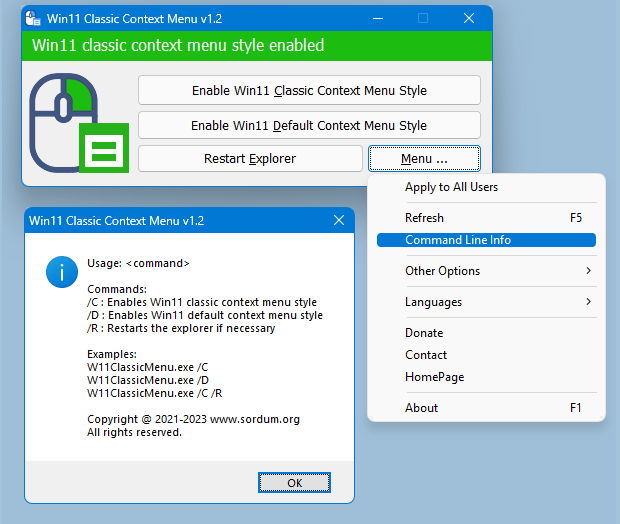
After applying the above registry entries, you need to restart File explorer for the settings to take effect. If you are looking for a one click solution to Disable or Enable the New Context Menu in Windows 11 instead of dealing with registry entries you can use Win 11 Classic Context Menu v 1.0 Portable freeware Application. It has minimalistic interface Use first Button “Enable Win 11 Classic Context Menu Style” button to disable “Show More Options” from the Right Click Menu in Windows 11

Get the Classic (old) Context Menu on Windows 11

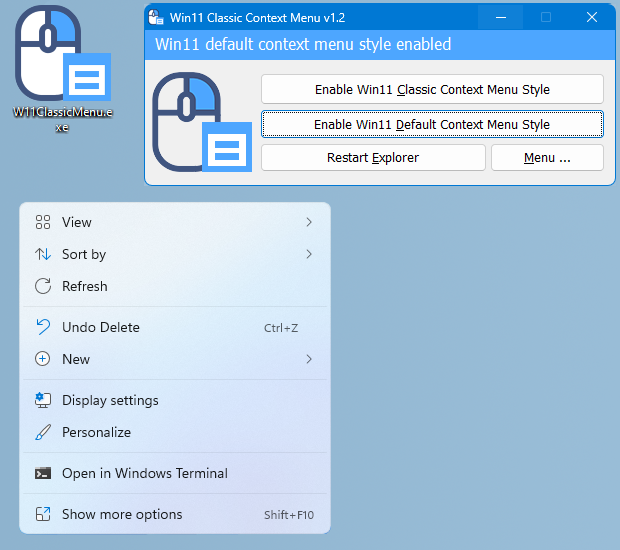
To disable the classic Context Menu in Windows 11 use second button “Enable Win 11 default Context Menu Style”, If you need to restart Windows explorer, software will detect it and warn you

Get the Default Context Menu on Windows 11

Windows 11 Classic Context menu has CMD parameter support. To see all the supported command line parameters , use the Menu – “Command Line Info” Button.

win11 classic context menu cmd parameters

With this Application you can easily toggle between Old Windows 10 Right Click Context Menu and default Windows 11 Context menu.

Supported operating systems: Windows 11

Eula license for our freware

File: W11ClassicMenu.exeVirustotal
MD5: 6e86b3bf4a01b2c40f9b08cfedf300b1
SHA1: 799969c3d0acf0135178e2aa2224f868316ecd08

Download


Source link


Windows 11 Classic Context menu
The context (Right Click) menu in Windows 11 is redesigned and kept with limited entries when compared to old windows . It includes a row of icons for basic actions like copy, paste, and delete, but hides some functionality you might want behind a ‘Show More Options’ button this mean Every time we need to press an extra option to see all the context menu options. We will make a brief assessment of the cost to the world of the “show more” option that Microsoft added to the Windows 11 desktop context menu. Ergonomics is important because, Implementing ergonomic solutions can help trim operating expenses by reducing costs and improving productivity. Imagine a workplace where 10 people work, each computer user clicks on the desktop 100 times a day, each click wastes an extra 1 second.

10 x 100 = 1000 seconds (16,67 Minutes) a day Lost.
30 x 1000 = 30000 seconds ( 500 Minutes = 8,33 Hours) a Month Lost.

Even in a workplace with only 10 employees, it causes loss of 8.33 hours per month. Consider the waste of time in the workplace where 100 people work.

How to Get the Classic (old) Context Menu on Windows 11


Windows 11 new and Old (Classic) context menu

If you want to remove the “Show More Options” entry from Windows 11 Context Menu and restore classic Right Click menus in Windows 11 you can use following registry entries.

Restore full right click context menu in Windows 11 via Registry

Windows Registry Editor Version 5.00

[HKEY_CURRENT_USERSoftwareClassesCLSID{86ca1aa0-34aa-4e8b-a509-50c905bae2a2}InprocServer32]
@=””

Get the default Windows 11 Context Menu back via Registry

Windows Registry Editor Version 5.00

[-HKEY_CURRENT_USERSoftwareClassesCLSID{86ca1aa0-34aa-4e8b-a509-50c905bae2a2}]

After applying the above registry entries, you need to restart File explorer for the settings to take effect. Alternatively you can use Command Prompt to do the same task.

Restore Classic Context Menu on Windows 11 with Cmd

1. Open Cmd with Administrator privileges
2. Copy and paste the below Code and press enter

reg.exe add “HKCUSoftwareClassesCLSID{86ca1aa0-34aa-4e8b-a509-50c905bae2a2}InprocServer32” /f 

Restore Default Context Menu on Windows 11 with Cmd

1. Open Cmd with Administrator privileges
2. Copy and paste the below Code and press enter

reg.exe delete “HKCUSoftwareClassesCLSID{86ca1aa0-34aa-4e8b-a509-50c905bae2a2}” /f

NOTE: Restart the file explorer after the above steps.

If you are looking for a one click solution to Disable or Enable the New Context Menu in Windows 11 instead of dealing with registry entries you can use Win 11 Classic Context Menu v 1.0 Portable freeware Application. It has minimalistic interface Use first Button “Enable Win 11 Classic Context Menu Style” button to disable “Show More Options” from the Right Click Menu in Windows 11

Get the Classic (old) Context Menu on Windows 11

To disable the classic Context Menu in Windows 11 use second button “Enable Win 11 default Context Menu Style”, If you need to restart Windows explorer, software will detect it and warn you

Get the Default Context Menu on Windows 11

Windows 11 Classic Context menu has CMD parameter support. To see all the supported command line parameters , use the Menu – “Command Line Info” Button.

win11 classic context menu cmd parameters

With this Application you can easily toggle between Old Windows 10 Right Click Context Menu and default Windows 11 Context menu.

Supported operating systems: Windows 11

Eula license for our freware

File: W11ClassicMenu.exeVirustotal
MD5: 6e86b3bf4a01b2c40f9b08cfedf300b1
SHA1: 799969c3d0acf0135178e2aa2224f868316ecd08

Download


Source link


Mouse settings changer


In Windows, mouse settings are controlled by using the Mouse Properties dialog box. There are different ways to open mouse settings , for example go to Start button- Control Panel, In the search tab type mouse and select the mouse you are using,you can also use Run dialog box to change mouse setting. Hold down the Windows Key and Press R on your keyboard. Once you’ve got the Run command box open, type one of the Following codes and press Enter.

main.cpl
control.exe main.cpl,,2

Mouse Properties dialog box will open

Mouse Properties Window

In addition , you can use Settings app to change the mouse settings so that you can adjust your mouse according to your comfort and make it work just the way you want it.

1. Launch the Settings app (Win+I keyboard shortcut).
2. Click the “Devices” category.
3. Click the “Mouse” page in the left menu of the Settings category.

mouse settings dialog box

You can customise common mouse functions here but there is no way to change mouse settings in batch , vbscript or Command prompt, there are many Advantages of using scripting language for example , Allows complex tasks to be performed in relatively few steps. Mouse settings changer is a Portable freeware Application to help you change mouse settings without open Mouse Properties dialog box , it has no GUI.

How to use Mouse settings changer

Download and run the MouseSC_Info.bat file to see the whole Cmd parameters support list.

Mouse settings changer cmd parameters

For example , “MouseSC_x64.exe /PrimaryButton:Left” command will change your Primary Mouse button to left or “MouseSC_x64.exe /Speed:10” command will set the Mouse pointer speed

Mouse Pointer speed

You will find some example batch scripts in the downloaded file , MouseSC_Example.bat and MouseSC_Example2.bat , you can edit them according to your needs.

NOTE: If Mouse Properties window is open, Changing mouse settings may not reflect in the “Mouse properties window” therefore Please close the “Mouse properties” screen before using the program.

Supported Operating Systems: Windows 10 , Windows 8.1 , Windows 8 , Windows 7, Windows Vista , Windows Xp (32 64-bit)

Eula license for our freware

File: MouseSC_x64.exeVirustotal
MD5: 428c1c3967825ea520feb5140c8be1cb
SHA1: 599baebb9a61da16220b4631c743e7995eb3d6c6

File: MouseSC.exeVirustotal
MD5: 779fd97c1c1fa4c6e53fb515b42a5453
SHA1: 99cf35ed28da6228903ef547ca7b70d9eabc2a34

Download Mouse Settings Changer


Source link


URL Disabler


Users with unrestricted Internet access find themselves constantly battling malware infections and at risk of information leakage. Downloading copyrighted material from the company’s network can expose the company to legal action. By blocking some websites greatly reduce this risk and protects accidental browsing of mature, explicit and sensitive sites. It can also help conserve bandwidth for mission critical applications, and keep those charges down.Restricting access to specific URLs may also improve productivity and help staying focused , this point is especially important for children who need to study.

Blocked Page

Using software to block websites in order to control Internet access can be beneficial especially to businesses , schools that want to comply with child protection legislation and publicly accessible WiFi services that want to provide a family-friendly browsing environment and Home users.

What is URL Disabler and how to use it

URL Disabler is a Portable (it requires no installation) and freeware to simplify the URL blocking process for Google Chrome , Firefox and Chromium EDGE users. The user can freely provide, modify, export and import the list of URLs to be blocked.

1. After download and Unzip it, please run Appropriate exe file (x64 or x86) then Type the URL of the web page you want to block into the URL field (1) and use plus button (Add to list) (2)

URL disabler Block URL

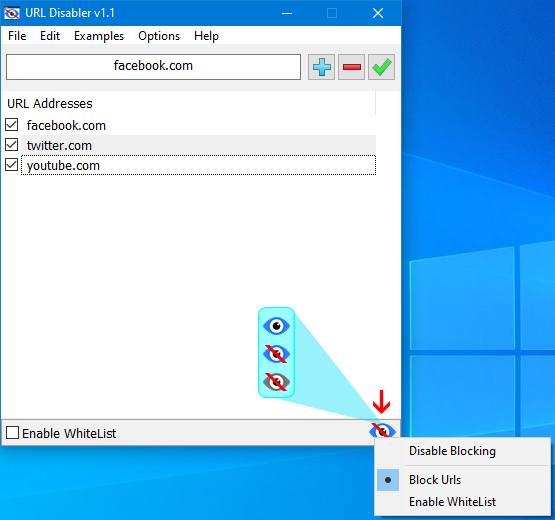
2. Finally use green tick (Aply changes) button (3) for the settings to take effect. Easily block any distracting or harmful website. You can disable Blocking or switch to the white list Mode with the eye icon in the bottom right corner

url disabler blocking option

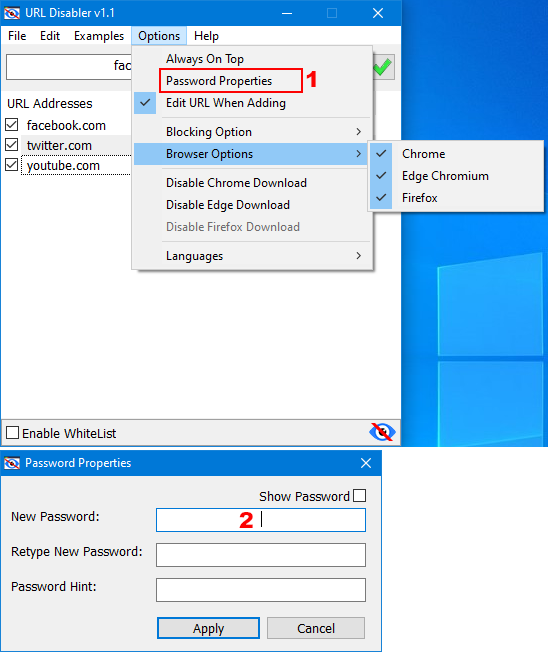
Whitelist URLs to set exceptions for websites you would like to allow. You can choose the browser which the ban will be apply from the menu under options, by default all supported browsers are selected. Under the same menu you can use Password Properties to set the Password for the Application.

Url Disabler Password options

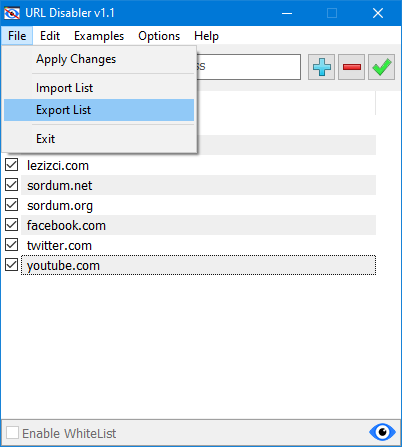
Under Examples menu; facebook.com, twitter.com, youtube.com URLs are given as examples. The export and import options are under the file menu, so you can easily reuse the list you created and backed up once.

URL disabler import export feature

URL Disabler doesn’t use%SystemRoot%System32driversetchostsfile method therefore resetting the Hosts file does not affect the blocking Rules. If you want to use hosts file Method for blocking web pages please try our “BlueLife Hosts Editor” software.

Note: If restarting browser does not apply the blocking Rules please log off and log in again (Very rare)

Supported languages: English, Turkish , German , French , Italian , Spanish , Russian , Hungarian , Hebrew , Polish , Japanese

Supported Operating Systems: Windows 10 , Windows 8.1 , Windows 8 , Windows 7

Supported Browsers: Google Chrome , Firefox, Chromium EDGE

Eula license for our freware

File: UrlDisabler_x64.exeVirustotal
MD5: 0be307115431b480a96b8054f9697669
SHA1: c2c8f6b9b170dbab51be0a6ce6bfc16695ff36aa

File: UrlDisabler.exeVirustotal
MD5: 36dc0797a8cf70ff5dabaf054d6b5a61
SHA1: b5715c791bd14e8f1e8f6ec14a9fa9dcdf6cb172

Download URL Disabler


Source link


Safe Mode Launcher


Safe mode is a boot option in which the operating system starts in diagnostic mode rather than in normal operating mode. It can be used when there is a system-critical problem that interferes with the normal operation of Windows. For example , Removing stubborn and difficult to uninstall software or faulty drivers, and deleting malware are just a few of the things that often require Safe Mode to be use. In safe Mode, Windows uses a generic VGA display driver instead of the vendor-specific driver, which means you will likely be working with only 16 colors in a low resolution.

There are several ways to start Windows in Safe Mode, depending on the version of Windows you’re running. The normal way for anybody to boot in to the Windows Safe mode is to repeatedly press the “F8” key as the operating system boots, just after the BIOS or manufacturer’s splash screen but , booting safe mode with F8 key is Not Working In Windows 10 because F8 boot menu was removed in order to improve system boot time. You can Enable F8 start key again with “Safe Mode Launcher” Please note that : different computer brands do Not use f8 in the same way, for example hp laptop has “helps” that make safe mode nearly impossible to find; Toshiba uses f12 …

The easy way to boot into safe mode

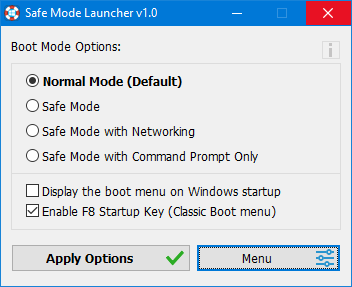
Safe Mode Launcher is a Portable freeware Application which provides you a Windows GUI for the Safe Mode options. Download and unzip it and Click the Appropriate exe file (x64 or x86)

Safe Mode Launcher GUI

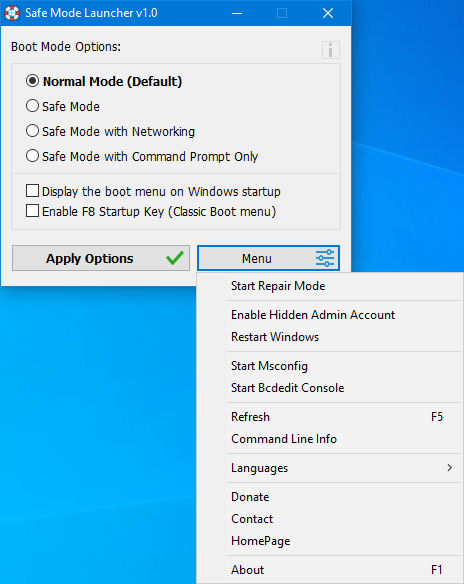
To Start your PC in safe mode , select one of the options in the interface and Use Apply Options Button. If it doesn’t ask to start in safe mode use “Restart Windows” Option under the Menu button. Safe Mode Launcher has a few usefull feature ; If you enter the Safe mode through the software and restart the System,Windows switches to normal mode automatically. This option will save you from getting stuck in safe mode. Additionally You can activate the hidden Administrator account with one click (Under the Menu).You can switch between Graphical Boot Menu and Classic Boot menu Options with Choosing “Enable F8 Startup key (Classic Boot Menu)” Option.

Safe Mode Launcher Menu

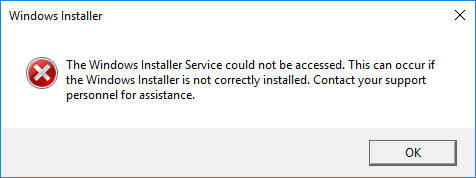
Windows Installer (MSI) service doesn’t work by default in Windows Safe Mode. This can be very annoying because you may have installed an app in normal mode which later prevents the OS from starting and can’t be removed in safe mode. If you try to uninstall an app which was installed from an MSI package in safe mode, you will get the following error:

The Windows Installer Service could not be accessed. This can occur if the Windows Installer is not correctly installed. Contact your support personnel for assistance.

Windows Installer Errror

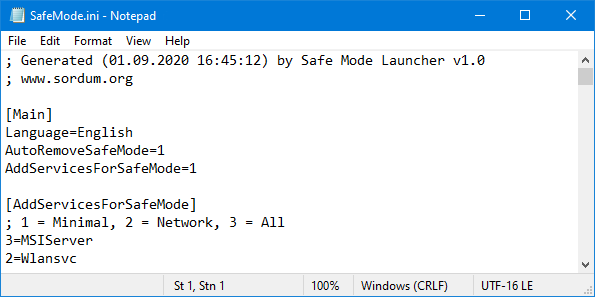
Safe Mode Launcher , solve this Problem and enable Windows Installer in Safe Mode. You can Add other services which you want to start automatically in safe mode to “SafeMode.ini” file

Safe Mode Launcher ini file

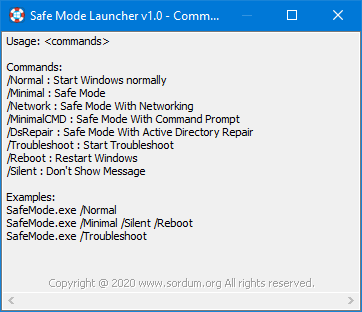
Safe Mode Launcher has Cmd Parameter support , if you want to see all Awailable Parameters click “Command Line Info” under the “Menu” button

Safe Mode Launcher cmd parameters

Microsoft accounts in Windows 10 require a password which without Password may NOT allow login from Safe Mode! . To start windows on Safe mode without any Program , Restart Windows 8 or 10 by holding the Shift key down while you click the “Restart” button.

Supported languages: English, Turkish , German , Hebrew , Korean , French , Greek , Japanese , Russian , Persian , Portuguese (Brasil) , Polish

Supported Operating Systems: Windows 10 , Windows 8.1 , Windows 8 , Windows 7 , Windows Vista (32 and 64-bit).

Eula license for our freware

File: SafeMode_x64.exeVirustotal
MD5: c9f08dae620aa65f9924f2564a5899de
SHA1: 17902613ed3fd56abb523154d58573c8bb2895a3

File: SafeMode.exeVirustotal
MD5: 62c75567491ad0b80ccfba6e61869db0
SHA1: 971fe7d26803198584be59f47b090fe1a092e3b5
Download Safe Mode Launcher


Source link


Disable Mouse wheel zooming


All browsers have zoom feature and it lets you enlarge or reduce the view of a webpage. Unlike changing font size, zoom enlarges or reduces everything on the page, including text and images. To use the zoom feature, hold down the CTRL key, and then scroll the Mouse wheel to zoom in or out. This is a very usefull function but sometimes can Annoy people if they accidentally triggering ctrl-wheel or touchpad-two-finger far more often than do intentionally. This behavior can be extremely irritating if it’s happening constantly. All modern Browsers like Microsoft EDGE , Firefox, Google Chrome, Opera , safari … have Zoom funciton.

Even if there are several add-ons to overcome this problem, it will not work for those who use multiple browsers or those who want to turn off the zoom feature in Microsoft Ofis (exel, word …) or Notepad ++ etc. For this reason we have coded a small portable freeware utility “No Mouse wheel Zoom”

Avoid triggering undesired zooming with “No Mose Wheel Zoom”

1. Download and unzip “No Mose Wheel Zoom” , it is a portable freeware utility, then use Appropriate version (x64 or x86). It has no GUI.

2. It will quietly start running in the background. To access its settings right click on the icon next to the operating system clock.

No mouse wheel zoom icon

No Mose Wheel Zoom has a few simple features ;

1. Pause No Mouse Wheel Zoom (MWNoZoom)
2. Block in all windows
3. Autostart on windows startup

If you add the class name to the “MWNoZoom.ini” file, the Ctrl + Mouse wheel zoom feature will be blocked for the related software. Block in all Windows feature will help you in cases where the software blocking methode seems not working.

MWNoZoom.ini file

NOTE: From the keyboard you can increase or decrease the zoom value with pressing CTRL+PLUS SIGN (+) or CTRL+MINUS SIGN (-). If you want to reset the zoom level to 100%, press CTRL+0.

Supported languages: English
Supported Operating Systems: Windows 10 , Windows 8.1 , Windows 8 , Windows 7 , Windows Vista , Windows Xp (32 and 64-bit).

Eula license for our freware

File: MWNoZoom_x64.exeVirustotal
MD5: f4209fd5406d313f9aed2dccc08390b4
SHA1: 54120ea6644a65628e3be93f0b256ad2cc512938

File: MWNoZoom.exeVirustotal
MD5: 5a50fe70e84849e0bdc9366814e2f584
SHA1: 79ac16c4664161e44b516411dce4b1d031e12cea

Download


Source link