Tag

tool

Navegando


Defender Exclusion Tool
Regardless of whether you choose Microsoft Defender Antivirus, or a third party antivirus solution you need to be sure these products are not scanning critical File and folders because Occasionally Microsoft Security Essentials or Microsoft Defender cause problems with some Files and folders. Typical issues include slow performance , deleting some necessary files or erratic operation or it may flag a file or folder that you trust as malicious. To work around these problems you can add this kind of files and folders to the list of exceptions.

What is new: (Tuesday, 27 August 2024)

1. [Fixed] – The file on the network drive could not be added.
2. [Added] – Options to add or remove a process, extension and IP address.
3. [Added] – Sorting by columns feature.
4. [Added] – Ability to restore backup list by dragging and dropping.
5. [Added] – Icons on the interface have been enlarged.
6. [Added] – Many code improvements.

In Windows 11 and 10 , there is a new app called Microsoft Defender Security Center . The app, formerly known as “Microsoft Defender Dashboard”, has been created to help the user control his security and privacy settings. You can add any trusted file, file type, folder, or a process to the exclusions list with the following steps ;

1. Open settings Application.
2. Choose Update & security.
3. Open Windows security.
4. Select Virus & threat protection.
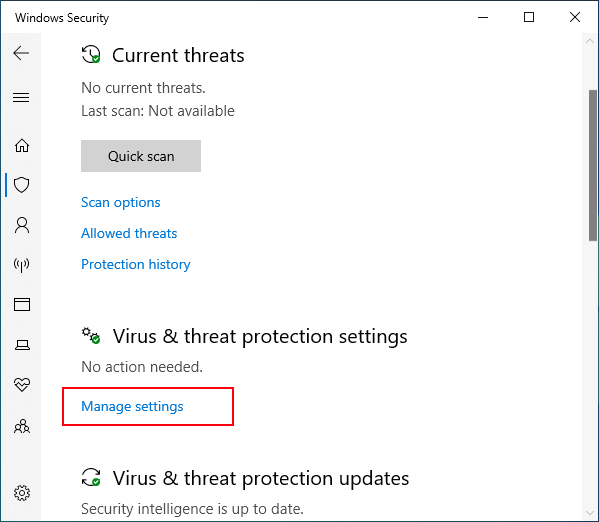
5. Click  Manage settings under the Virus & threat protection settings.


Manage defender Threat settings

6. Click Add or remove exclusions

Add or remove exclusions

7. Under Add an exclusion, select the files, folders, file types, or process.

Add an exclusion

You may need to repeat the instructions to exclude other items you don’t want the antivirus to scan to avoid false positives.

As you see adding exceptions manually through the graphical user interface would be time consuming, tedious and, prone to human error therefore we have coded a portable Freeware to simplify the whole process.

How to use Defender Exclusion Tool

After downloading, extract the zip file to your desired location, then double click the “ExcTool.exe” file . To Add an exclusion to Microsoft Defender list , just drag and drop any file or Folder on the software GUI , you can also use File or folder buttons

Defender exclusion tool main

If you want to add a path, extension, process, or IP address as an exception, click the third button from the left (Enter Exclusion), then type the exception in the blank space in the window that opens.

Defender exclusion tool main

To remove listed file or folder whether you can select the item on the list and use Remove button (Minus button) or you can Right click on it and choose “Delete selected” feature

Defender Exclusion tool delete selected

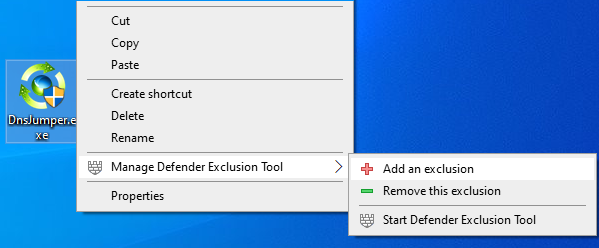
You can also Add defender Exclusion tool to your context menu , to do this use Options – Add to the Contex Menu –  Add to File Context Menu and  Add to Folder Context Menu feature

Defender exclusion tool context menu

after that right click any file or Folder to add it into the Microsoft Defender exclusion list , you can use the same way to remove it from the exclusion list .

Defender exclusion tool right click menu

After exclude files and folders from Microsoft Defender Antivirus scans you can use Export fature to save all your settings (Green Up arrow) , In the future if you want to use these settings again for examle after a system reset, you can use the Import feature (Red Down arrow)

Defender exclusion tool Export import

Note: Please do not add important folders which containing system files to the exclusion list

Supported systems: Windows 11, Windows 10 , Windows 8.1 , Windows 8 , Windows 7

Supported languages: English, Turkish , German

Eula license for our frewareVirus total clean report

File : ExcTool.exe
Size : 836.17 KB
MD5 : 8ad76f7b3b3e29ed36e6fa9aa42d35a1
SHA1 : 43b3b18eb9a84c17c7c90ac436b5cb8607f16bac
SHA-256 : dcdcd777849896493fbd28cefeab6a2ed03973cc9fbfc0417015d046890868b8

Download


Source link


Wi-Fi Filter Tool
Computers with Windows will show you a list of available WiFi networks in your surrounding , If you have a lot of wireless access points within your area, then you could have a lot of SSIDs (network names) in your available wireless networks list, to find the target Wi-Fi network you need to take some time . You may also want to block users from connecting some specific WLAN SSIDs, to ensure that corporate devices within corporate premises are only using the corporate network.

you can remove one or all of them from your list of Network Profiles or available networks. Windows doesn’t allow you to hide Wi-Fi networks Windows via a graphical user interface. You are required to run a few commands on Administrator Command Prompt.

1. Whitelist Only Wi-Fi Connections You Want
netsh wlan add filter permission=allow ssid=”WIFI NAME” networktype=infrastructure

2. Blacklist Nearby Wi-Fi Connections From Your List of Networks
netsh wlan add filter permission=block ssid=”WIFI NAME” networktype=infrastructure

There are many more commands you can use but if you are not an advanced windows user, this method will be complicated for you therefore we have coded a potable freeware to simplify all these processes.

Wi-Fi Filter Tool v1.1(Thursday, February 29th, 2024)

1. [ FIXED ] – Spaces at beginning and end of wireless network name cause error.
2. [ FIXED ] – A small Translation error.
3. [ ADDED ] – Ability to sort the list by pressing on the columns header in the list.
4. [ ADDED ] – Switching to white listed will add the previously used wireless network.
5. [ ADDED ] – The interface has been slightly enlarged.
6. [ ADDED ] – Some code Improvements.

How to use Wi-Fi Filter Tool

Download Wi-Fi Filter Tool , unzip it then double click and run the appropriate version (x64 or x86). The software gives you two options :

You can either Type the name of the Wi-Fi SSID in the space at the top or select it from the drop-down list and use the plus sign button to block it. The drop-down list in the software interface is only active when you are connected to a Wi-Fi network.


Wi-Fi Filter tool GUI

This will remove the blocked SSID from the list.

wifi list

2. If you want to block too many networks in the list, use whitelist mode. When you click to select the Enable white list check box, the last wireless network you connected to is automatically added to the list, so your Internet is not interrupted. By checking the Whitelist box , only the networks listed in the software interface will be visible in the WiFi list.

Wi-Fi Filter tool Whitelist Mode

A clean list with no neighbouring wireless networks is shown in the image below.

Wi-Fi List cleaned

To avoid reorganising the list each time, use “Save your settings” from the File menu. To restore the saved list, you can use the “Restore your settings” function under the “File” menu.

Wi-Fi Filter tool save your settings

Other features such as restarting the Wi-Fi service are also available in the software File menu.

Supported languages : English ,Turkish , German , French , Bulgarian , Polish , Dutch (Nederlands) , Russian , Korean , Português (Brasil) , Spanish , Italian , Lithuaninan , Chinese (Simplified) , Japanese

Supported Operating Systems : Windows 11 , Windows 10 , Windows 8.1 , Windows 8 , Windows 7, Windows Vista (32 64-bit).

Eula license for our freware

File: WifiFilter_x64.exeVirustotal
MD5: 9857f0049796457b4b059d09c4ded371
SHA1: 52426eeab316228517b0200e8789ceb171c7a373

File: WifiFilter.exeVirustotal
MD5: 120838c6a7e0fcbbbbeb77551ea7259a
SHA1: ae715c5259c2ba9614ad64839caf608fcf7dfb06

Download Wi-Fi Filter Tool


Source link


RIOT (Radical Image Optimization Tool) presents a before-and-after image compression view that allows you to reduce file size of an image into JPG, PNG, or GIF format. Includes optional metadata removal, batch operations, compression to a target file size, transparency options, and other common editing functions (flip, rotate, zoom, pan). Notable versus similar software in the ability to gradually reduce the available colors one-by-one (7, 8, 9, 10…), not just milestones of 16, 32, 64 etc.

The program is also available as a plugin for XnView, GIMP, or Irfanview (see website).

Functional in Linux using Wine. Many of the official entries here on PortableFreeware have used RIOT for compression. Note that the installer version of this program is considered adware.


Source link


Wi-Fi Filter Tool
Computers with Windows will show you a list of available WiFi networks in your surrounding , If you have a lot of wireless access points within your area, then you could have a lot of SSIDs (network names) in your available wireless networks list, to find the target Wi-Fi network you need to take some time . You may also want to block users from connecting some specific WLAN SSIDs, to ensure that corporate devices within corporate premises are only using the corporate network.

you can remove one or all of them from your list of Network Profiles or available networks. Windows doesn’t allow you to hide Wi-Fi networks Windows via a graphical user interface. You are required to run a few commands on Administrator Command Prompt.

1. Whitelist Only Wi-Fi Connections You Want
netsh wlan add filter permission=allow ssid=”WIFI NAME” networktype=infrastructure

2. Blacklist Nearby Wi-Fi Connections From Your List of Networks
netsh wlan add filter permission=block ssid=”WIFI NAME” networktype=infrastructure

There are many more commands you can use but if you are not an advanced windows user, this method will be complicated for you therefore we have coded a potable freeware to simplify all these processes.

How to use Wi-Fi Filter Tool

Download Wi-Fi Filter Tool , unzip it then double click and run the appropriate version (x64 or x86). The software gives you two options :

You can either Type the name of the Wi-Fi SSID in the space at the top or select it from the drop-down list and use the plus sign button to block it. The drop-down list in the software interface is only active when you are connected to a Wi-Fi network.


Wi-Fi Filter tool GUI

This will remove the blocked SSID from the list.

wifi list

2. If you check the White List box at the bottom left, only the SSID name allowed in the list will appear.

Wi-Fi Filter tool Whitelist Mode

A clean list with no neighbouring wireless networks is shown in the image below.

Wi-Fi List cleaned

To avoid reorganising the list each time, use “Save your settings” from the File menu.

Wi-Fi Filter tool save your settings

Other features such as restarting the Wi-Fi service are also available in the software File menu.

Supported languages: English ,Turkish , German

Supported Operating Systems: Windows 11 , Windows 10 , Windows 8.1 , Windows 8 , Windows 7, Windows Vista , Windows Xp (32 64-bit)

Eula license for our freware

File: WifiFilter_x64.exeVirustotal
MD5: a2e5df4054d26cf80e828678d5e8e4c2
SHA1: 6506a1e021d73a0c0775239d756f7ed06b24a520

File: WifiFilter.exeVirustotal
MD5: cea305b874a261115d7c82643527862a
SHA1: 6ddc21b931a17850885ce063049d865e7dec31b5

Download Wi-Fi Filter Tool


Source link


Add store Apps to the context menu
The Microsoft Store app comes built into Windows and allows you to download and install dozens of apps and games. It’s possible to open any Microsoft Store app from Command Prompt , Run dialog box or PowerShell. You can also easily add any Microsoft Store application to the Windows Right Click (Context) Menu. But, to be able to do that, you need to know the app’s Package Family Name and App ID. A Package Family Name is an opaque string derived from only two parts of a package identity – name and publisher:
< Name >_< PublisherId >
For example, the Package Family Name of the Windows Photos app is :
Microsoft.Windows.Photos_8wekyb3d8bbwe

Name :  Microsoft.Windows.Photos
Publisher ID : 8wekyb3d8bbwe

There are many ways to find your app’s unique Package Family Name and App User Model ID :

1. You can use a powershell script.

2. You can find the AUMID by using File Explorer.

3. You can use the registry to find out the AUMID of an application that is installed for the current user.

See the related microsoft article for details on the above topics. But none of the above methods will give you the direct code for the execution of a store application. For this reason, we have coded a simple application called: Commands for Store Apps. thats all.

How to use Store Apps Tool

1. Download the software from the link at the end of the page and run the exe file that matches the architecture of your operating system.

2. For example, let’s run the Windows Alarm & Clock application with the command, right click on the “Alarm & Clock” in the software interface and click on “Copy Command“, that’s all.


Store Apps tool copy command feature

Where to use the execution codes of the Microsoft Store

You can use the following code, which has been copied to your clipboard , in different ways.
Explorer.exe “Shell:AppsfolderMicrosoft.WindowsAlarms_8wekyb3d8bbwe!App”

1. You can use this code in the Run dialog box or in the Cmd and Powershell console to launch the appropriate Store application.

2. You can use this code to create a shortcut that automatically launches the Microsoft Store application when the system starts.

3. The code can also be used to add the app to your right click (context) menu.

4. With the help of scheduled tasks, related code can be executed at specific times of the day.

5. You can use the code inside a script too.

Run store Apps from Cmd or Powershell console

How to add a Store app to your desktop context menu

There are two different ways to do this ;

1. To make multiple selections from the list in the software interface, press Ctrl on your keyboard and select the Store apps you want to add to your desktop context menu, then right click on one of them and choose Add to desktop Context menu.

Add Store Apps to your desktop context menu

2. You can use the Desktop Context Menu Options button (3rd) at the top of the software.

a) Select Item Name in the context menu and click Install button.

b) You can change Main or Sub context menu Icon.

In the Options menu, you can click on “Save your settings“. This will save all the settings you have made.

Store Apps tool save settings feature

You can restore your saved settings by selecting “Load your settings” from the same menu.

Store Apps in the context menu

Functions of the software interface buttons

The first button on the interface opens the “Applications” folder, which is the folder containing the Microsoft store applications. The second button will open the Microsoft Store app and the third button  Opens the “Desktop Context Menu Options” Window. fourth button will refresh the list. The last button is the “Info” button.

Please , make sure that the “Add explorer.exe to command” option in the Options menu is selected so that the copied code will work properly in the cmd and powershell consoles.

Add Explorer to commands

If you right click on any store app in the list, you can create an application shortcut using the “Create Shortcut” menu, or you can choose to create a bat or vbscript file .

Run store Apps with script

Store Apps Tool is a Portable Freeware Application. To uninstall the software, simply right click and choose delete.

Supported operating systems: Windows 11 , Windows 10, Windows 8.1 and Windows 8

Supported languages: English , Turkish , German

Eula license for our freware

File: CmdSApps_x64.exeVirustotal
MD5: de6d02004a86a7ebc9e0b4ceb7e6a379
SHA1: a218ee492d71c37564d88c74f1fa5bebf800bd65

File: CmdSApps.exeVirustotal
MD5: c590869f0f147af69600b204b6c6f4c3
SHA1: b233dc29d94a74960af7fa8f54b80676953e4923

Download Store Apps Tool


Source link


Add store Apps to the context menu
The Microsoft Store app comes built into Windows and allows you to download and install dozens of apps and games. It’s possible to open any Microsoft Store app from Command Prompt , Run dialog box or PowerShell. You can also easily add any Microsoft Store application to the Windows Right Click (Context) Menu. But, to be able to do that, you need to know the app’s Package Family Name and App ID. A Package Family Name is an opaque string derived from only two parts of a package identity – name and publisher:
< Name >_< PublisherId >
For example, the Package Family Name of the Windows Photos app is :
Microsoft.Windows.Photos_8wekyb3d8bbwe

Name :  Microsoft.Windows.Photos
Publisher ID : 8wekyb3d8bbwe

There are many ways to find your app’s unique Package Family Name and App User Model ID :

1. You can use a powershell script.

2. You can find the AUMID by using File Explorer.

3. You can use the registry to find out the AUMID of an application that is installed for the current user.

See the related microsoft article for details on the above topics. But none of the above methods will give you the direct code for the execution of a store application. For this reason, we have coded a simple application called: Store Apps Tool.

What is New (Monday, September 11 2023)

1. [Fixed] – A small bug in the About screen
2. [Fixed] – The clipboard is not cleared if there is no location in the listed items
3. [Fixed] – When add a listed Item to the context menu, The settings window jumps to 2. Item
4. [Added] – Store Apps icons have been added

How to use Store Apps Tool

1. Download the software from the link at the end of the page and run the exe file that matches the architecture of your operating system.

2. For example, let’s run the Windows Alarm & Clock application with the command, right click on the “Alarm & Clock” in the software interface and click on “Copy Command“, that’s all.


Store Apps tool copy command feature

Where to use the execution codes of the Microsoft Store

You can use the following code, which has been copied to your clipboard , in different ways.
Explorer.exe “Shell:AppsfolderMicrosoft.WindowsAlarms_8wekyb3d8bbwe!App”

1. You can use this code in the Run dialog box or in the Cmd and Powershell console to launch the appropriate Store application.

2. You can use this code to create a shortcut that automatically launches the Microsoft Store application when the system starts.

3. The code can also be used to add the app to your right click (context) menu.

4. With the help of scheduled tasks, related code can be executed at specific times of the day.

5. You can use the code inside a script too.

Run store Apps from Cmd or Powershell console

How to add a Store app to your desktop context menu

There are two different ways to do this ;

1. To make multiple selections from the list in the software interface, press Ctrl on your keyboard and select the Store apps you want to add to your desktop context menu, then right click on one of them and choose Add to desktop Context menu.

Add Store Apps to your desktop context menu

2. You can use the Desktop Context Menu Options button (3rd) at the top of the software.

a) Select Item Name in the context menu and click Install button.

b) You can change Main or Sub context menu Icon.

In the Options menu, you can click on “Save your settings“. This will save all the settings you have made.

Store Apps tool save settings feature

You can restore your saved settings by selecting “Load your settings” from the same menu.

Store Apps in the context menu

Functions of the software interface buttons

The first button on the interface opens the “Applications” folder, which is the folder containing the Microsoft store applications. The second button will open the Microsoft Store app and the third button  Opens the “Desktop Context Menu Options” Window. fourth button will refresh the list. The last button is the “Info” button.

Please , make sure that the “Add explorer.exe to command” option in the Options menu is selected so that the copied code will work properly in the cmd and powershell consoles.

Add Explorer to commands

If you right click on any store app in the list, you can create an application shortcut using the “Create Shortcut” menu, or you can choose to create a bat or vbscript file .

Run store Apps with script

Store Apps Tool is a Portable Freeware Application. To uninstall the software, simply right click and choose delete.

Supported operating systems: Windows 11 , Windows 10, Windows 8.1 and Windows 8

Supported languages: English , Turkish , German , Portuguese (Brazil) , Korean , French , Russian , Persian

Eula license for our freware

File: StoreAT_x64.exeVirustotal
MD5: 81e3e5c0adf99f88ba829afbbb0e0ed7
SHA1: 80b5a5a1c39c21c14dd0b84aed1cb0dcf43aeacb

File: StoreAT.exeVirustotal
MD5: 35f53460e57313bab00136208553baac
SHA1: c48aba9189e75de2a42cbc64a3b8b7e0c5afe9cf

Download Store Apps Tool


Source link


Defender Exclusion Tool
Regardless of whether you choose Microsoft Defender Antivirus, or a third party antivirus solution you need to be sure these products are not scanning critical File and folders because Occasionally Microsoft Security Essentials or Microsoft Defender cause problems with some Files and folders. Typical issues include slow performance , deleting some necessary files or erratic operation or it may flag a file or folder that you trust as malicious. To work around these problems you can add this kind of files and folders to the list of exceptions.

What is new: (Thursday, 09. September 2021)

1. [Fixed] – Defender Exclusion Tool Doesn’t work on Windows 11
2. [Added] – Some code improvements

In Windows 10 , there is a new app called Microsoft Defender Security Center . The app, formerly known as “Microsoft Defender Dashboard”, has been created to help the user control his security and privacy settings. You can add any trusted file, file type, folder, or a process to the exclusions list with the following steps ;

1. Open settings Application
2. Choose Update & security
3. Open Windows security
4. Select Virus & threat protection
5. Click  Manage settings under the Virus & threat protection settings


Manage defender Threat settings

6. Click Add or remove exclusions

Add or remove exclusions

7. Under Add an exclusion, select the files, folders, file types, or process.

Add an exclusion

You may need to repeat the instructions to exclude other items you don’t want the antivirus to scan to avoid false positives

As you see adding exceptions manually through the graphical user interface would be time consuming, tedious and, prone to human error therefore we have coded a portable Freeware to simplify the whole process.

How to use Defender Exclusion Tool

After downloading, extract the zip file to your desired location, then double click the “ExcTool.exe” file . To Add an exclusion to Microsoft Defender list , just drag and drop any file or Folder on the software GUI , you can also use File or folder buttons

Defender exclusion tool main

To remove listed file or folder whether you can select the item on the list and use Remove button (Minus button) or you can Right click on it and choose “Delete selected” feature

Defender Exclusion tool delete selected

You can also Add defender Exclusion tool to your context menu , to do this use Options – Add to the Contex Menu –  Add to File Context Menu and  Add to Folder Context Menu feature

Defender exclusion tool context menu

after that right click any file or Folder to add it into the Microsoft Defender exclusion list , you can use the same way to remove it from the exclusion list .

Defender exclusion tool right click menu

After exclude files and folders from Microsoft Defender Antivirus scans you can use Export fature to save all your settings (Green Up arrow) , In the future if you want to use these settings again for examle after a system reset, you can use the Import feature (Red Down arrow)

Defender exclusion tool Export import

Note: Please do not add important folders which containing system files to the exclusion list

Supported systems: Windows 11, Windows 10 , Windows 8.1 , Windows 8 , Windows 7

Supported languages: English, Turkish , German , French , Bulgarian , Hungarian , Spanish , Korean , Chinese (Traditional) , Chinese (Simplified) , Russian , Swedish , Dutch , Greek , Hebrew , Slovenian , Japanese , Italian , Persian , Arabic , Vietnamese , Portuguese

Eula license for our frewareVirus total clean report

File : ExcTool.exe
Size : 752 KB
MD5 : 77ffa8c7af0df18f0285f11b490d726f
SHA1 : d2b13b47eeab95a98ba93fa2bd86419029f2c5b1
SHA-256 : 7d8f35945c17c54056d4aaca05c14bd45640a8c9d1d38f646ae06a8b9cb0c117

Download


Source link


Defender Exclusion Tool
Regardless of whether you choose Microsoft Defender Antivirus, or a third party antivirus solution you need to be sure these products are not scanning critical File and folders because Occasionally Microsoft Security Essentials or Microsoft Defender cause problems with some Files and folders. Typical issues include slow performance , deleting some necessary files or erratic operation or it may flag a file or folder that you trust as malicious. To work around these problems you can add this kind of files and folders to the list of exceptions.

What is new: (Thursday, 09. September 2021)

1. [Fixed] – Defender Exclusion Tool Doesn’t work on Windows 11
2. [Added] – Some code improvements

In Windows 10 , there is a new app called Microsoft Defender Security Center . The app, formerly known as “Microsoft Defender Dashboard”, has been created to help the user control his security and privacy settings. You can add any trusted file, file type, folder, or a process to the exclusions list with the following steps ;

1. Open settings Application
2. Choose Update & security
3. Open Windows security
4. Select Virus & threat protection
5. Click  Manage settings under the Virus & threat protection settings


Manage defender Threat settings

6. Click Add or remove exclusions

Add or remove exclusions

7. Under Add an exclusion, select the files, folders, file types, or process.

Add an exclusion

You may need to repeat the instructions to exclude other items you don’t want the antivirus to scan to avoid false positives

As you see adding exceptions manually through the graphical user interface would be time consuming, tedious and, prone to human error therefore we have coded a portable Freeware to simplify the whole process.

How to use Defender Exclusion Tool

After downloading, extract the zip file to your desired location, then double click the “ExcTool.exe” file . To Add an exclusion to Microsoft Defender list , just drag and drop any file or Folder on the software GUI , you can also use File or folder buttons

Defender exclusion tool main

To remove listed file or folder whether you can select the item on the list and use Remove button (Minus button) or you can Right click on it and choose “Delete selected” feature

Defender Exclusion tool delete selected

You can also Add defender Exclusion tool to your context menu , to do this use Options – Add to the Contex Menu –  Add to File Context Menu and  Add to Folder Context Menu feature

Defender exclusion tool context menu

after that right click any file or Folder to add it into the Microsoft Defender exclusion list , you can use the same way to remove it from the exclusion list .

Defender exclusion tool right click menu

After exclude files and folders from Microsoft Defender Antivirus scans you can use Export fature to save all your settings (Green Up arrow) , In the future if you want to use these settings again for examle after a system reset, you can use the Import feature (Red Down arrow)

Defender exclusion tool Export import

Note: Please do not add important folders which containing system files to the exclusion list

Supported systems: Windows 11, Windows 10 , Windows 8.1 , Windows 8 , Windows 7

Supported languages: English, Turkish , German , French , Bulgarian , Hungarian , Spanish , Korean , Chinese (Traditional) , Chinese (Simplified) , Russian , Swedish , Dutch , Greek , Hebrew , Slovenian , Japanese , Italian , Persian , Arabic , Vietnamese , Portuguese , Romanian , Polish

Eula license for our frewareVirus total clean report

File : ExcTool.exe
Size : 752 KB
MD5 : 77ffa8c7af0df18f0285f11b490d726f
SHA1 : d2b13b47eeab95a98ba93fa2bd86419029f2c5b1
SHA-256 : 7d8f35945c17c54056d4aaca05c14bd45640a8c9d1d38f646ae06a8b9cb0c117

Download


Source link


Defender Exclusion Tool
Regardless of whether you choose Windows Defender Antivirus, or a third party antivirus solution you need to be sure these products are not scanning critical File and folders because Occasionally Microsoft Security Essentials or Windows Defender cause problems with some Files and folders. Typical issues include slow performance , deleting some necessary files or erratic operation or it may flag a file or folder that you trust as malicious. To work around these problems you can add this kind of files and folders to the list of exceptions.

What is new: (Friday, June 4, 2021)

1. [Added] – Language support
2. [Added] – Expor/Import feature
3. [Added] – Option to show all windows defender exclusions (include group policy)
4. [Added] – Some minor improvements
5. [Fixed] – Defender Injector sounds like the program is doing something malicious (Name changed)
6. [Removed] – CMD Parameter support (For security reason)

In Windows 10 , there is a new app called Windows Defender Security Center . The app, formerly known as “Windows Defender Dashboard”, has been created to help the user control his security and privacy settings. You can add any trusted file, file type, folder, or a process to the exclusions list with the following steps ;

1. Open settings Application
2. Choose Update & security
3. Open Windows security
4. Select Virus & threat protection
5. Click  Manage settings under the Virus & threat protection settings


Manage defender Threat settings

6. Click Add or remove exclusions

Add or remove exclusions

7. Under Add an exclusion, select the files, folders, file types, or process.

Add an exclusion

You may need to repeat the instructions to exclude other items you don’t want the antivirus to scan to avoid false positives

As you see adding exceptions manually through the graphical user interface would be time consuming, tedious and, prone to human error therefore we have coded a portable Freeware to simplify the whole process.

How to use Defender Exclusion Tool

After downloading, extract the zip file to your desired location, then double click the “ExcTool.exe” file . To Add an exclusion to Windows Defender list , just drag and drop any file or Folder on the software GUI , you can also use File or folder buttons

Defender exclusion tool main

To remove listed file or folder whether you can select the item on the list and use Remove button (Minus button) or you can Right click on it and choose “Delete selected” feature

Defender Exclusion tool delete selected

You can also Add defender Exclusion tool to your context menu , to do this use Options – Add to the Contex Menu –  Add to File Context Menu and  Add to Folder Context Menu feature

Defender exclusion tool context menu

after that right click any file or Folder to add it into the Windows Defender exclusion list , you can use the same way to remove it from the exclusion list .

Defender exclusion tool right click menu

After exclude files and folders from Windows Defender Antivirus scans you can use Export fature to save all your settings (Green Up arrow) , In the future if you want to use these settings again for examle after a system reset, you can use the Import feature (Red Down arrow)

Defender exclusion tool Export import

Note: Please do not add important folders which containing system files to the exclusion list

Supported systems: Windows 10 , Windows 8.1 , Windows 8 , Windows 7

Supported languages: English, Turkish , German

Eula license for our frewareVirus total clean report

MD5: b4b80d4eb4cea72a064a135751a601b2
SHA1: aacc088dfbb8a5b97bf0fe1666dd974d6c578383
SHA-256: 3cbbd45d2acc6fe5dbb71faa7febc910329d1b032aaaede54036b203a6563367

Download


Source link