Tag

Menu

Navegando


Windows 11 Classic Context menu
The context (Right Click) menu in Windows 11 is redesigned and kept with limited entries when compared to old windows . It includes a row of icons for basic actions like copy, paste, and delete, but hides some functionality you might want behind a ‘Show More Options’ button this mean Every time we need to press an extra option to see all the context menu options. We will make a brief assessment of the cost to the world of the “show more” option that Microsoft added to the Windows 11 desktop context menu. Ergonomics is important because, Implementing ergonomic solutions can help trim operating expenses by reducing costs and improving productivity. Imagine a workplace where 10 people work, each computer user clicks on the desktop 100 times a day, each click wastes an extra 1 second.

10 x 100 = 1000 seconds (16,67 Minutes) a day Lost.
30 x 1000 = 30000 seconds ( 500 Minutes = 8,33 Hours) a Month Lost.

Even in a workplace with only 10 employees, it causes loss of 8.33 hours per month. Consider the waste of time in the workplace where 100 people work.

Windows 11 Classic Context Menu v1.2 – (Thursday, 27 July 2023)

[Removed] – Move the Taskbar to the Top (Under menu) option
[Added] – Coding improvements have been made

How to Get the Classic (old) Context Menu on Windows 11
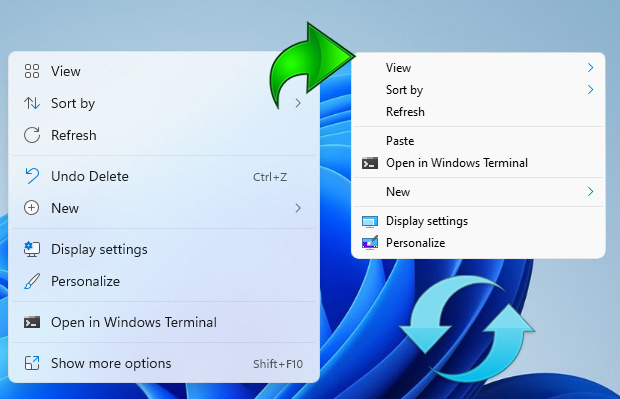


Windows 11 new and Old (Classic) context menu

If you want to remove the “Show More Options” entry from Windows 11 Context Menu and restore classic Right Click menus in Windows 11 you can use following registry entries.

Restore full right click context menu in Windows 11 via Registry

Windows Registry Editor Version 5.00

[HKEY_CURRENT_USERSoftwareClassesCLSID{86ca1aa0-34aa-4e8b-a509-50c905bae2a2}InprocServer32]
@=””

Get the default Windows 11 Context Menu back via Registry

Windows Registry Editor Version 5.00

[-HKEY_CURRENT_USERSoftwareClassesCLSID{86ca1aa0-34aa-4e8b-a509-50c905bae2a2}]

After applying the above registry entries, you need to restart File explorer for the settings to take effect. Alternatively you can use Command Prompt to do the same task.

Restore Classic Context Menu on Windows 11 with Cmd

1. Open Cmd with Administrator privileges
2. Copy and paste the below Code and press enter

reg.exe add “HKCUSoftwareClassesCLSID{86ca1aa0-34aa-4e8b-a509-50c905bae2a2}InprocServer32” /f 

Restore Default Context Menu on Windows 11 with Cmd

1. Open Cmd with Administrator privileges
2. Copy and paste the below Code and press enter

reg.exe delete “HKCUSoftwareClassesCLSID{86ca1aa0-34aa-4e8b-a509-50c905bae2a2}” /f

NOTE: Restart the file explorer after the above steps.

If you are looking for a one click solution to Disable or Enable the New Context Menu in Windows 11 instead of dealing with registry entries you can use Win 11 Classic Context Menu v 1.0 Portable freeware Application. It has minimalistic interface Use first Button “Enable Win 11 Classic Context Menu Style” button to disable “Show More Options” from the Right Click Menu in Windows 11

Get the Classic (old) Context Menu on Windows 11

To disable the classic Context Menu in Windows 11 use second button “Enable Win 11 default Context Menu Style”, If you need to restart Windows explorer, software will detect it and warn you
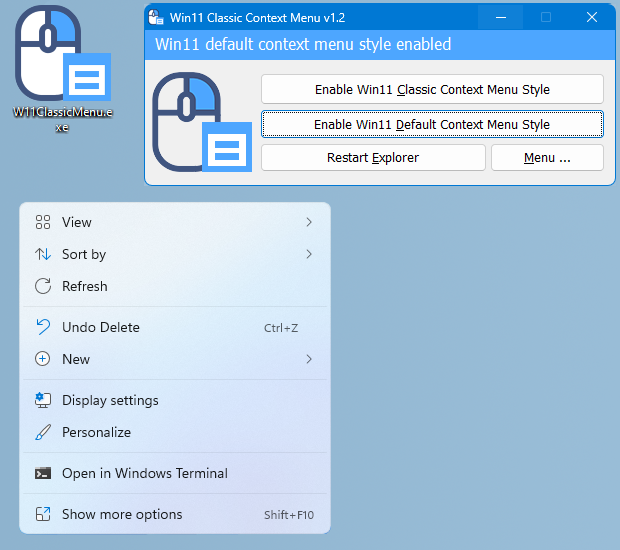
Get the Default Context Menu on Windows 11

Windows 11 Classic Context menu has CMD parameter support. To see all the supported command line parameters , use the Menu – “Command Line Info” Button.
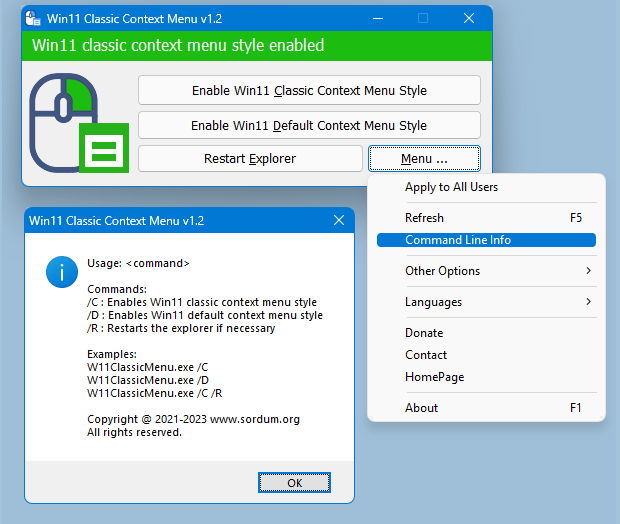
win11 classic context menu cmd parameters

With this Application you can easily toggle between Old Windows 10 Right Click Context Menu and default Windows 11 Context menu.

Supported operating systems: Windows 11

Supported languages: English ,Turkish , German , Russian , French , Spanish , Brazilian Portuguese , Greek , Korean , Chinese , Polish , Swedish , Hungarian , Czech , Bulgarian , Italian , indonesian , Japanese , Romanian , Hebrew , Vietnamese , Arabic , Persian , Dutch

Eula license for our freware

File: W11ClassicMenu.exeVirustotal
MD5: 3ef2c9d09a4e60b146ea2bc21a02308a
SHA1: 63799f0b3b20230366d6202d4471363825001e6e
SHA256: dd51c33c70819723b3dcbbd169e5245b5a1b2014defa8ce9e3b758b143e8a6e8

Download


Source link


Sendto Menu Editor
The Windows ‘Send to’ menu is a handy way of sending a file to a specific folder, application, or other item. You can use it to send, copy, or print an individual file to a specific location, device, application, or other item , If you want to add your own app or folder to the Send to menu or if you want to delete some of the Unnecessary items in it you can tweak the Send to menu to suit your needs. Open File Explorer in Windows Right click on a file and From the pop-up menu, move your mouse to the Send to command , Click on a specific entry. The file you click on is then sent to the entry you select.


Sendto Menu Editor

If you want to add your own app or folder to the Send to menu, it’s very simple: Just open the Run dialog box by pressing Win+R, then paste shell:sendto command into the text box. This will open the folder where all those shortcuts located. Alternatively, you can navigate to following folder location
%UserProfile%AppDataRoamingMicrosoftWindowsSendTo
But you can simplify the whole process with the “Send To Menu Editor” is a portable freeware which helps users manage the shortcuts present in the Windows “Send To” Menu.

What is New (Wednesday, 3 May 2023)

1.[ FIXED ] – Unable to add a folder shortcut to the software interface
2.[ ADDED ] – A Feature for default user to restore files in SendTo folder
3.[ ADDED ] – Some code Improvements

How to use SendTo Menu Editor 

After downloading, extract “SendTo Menu Editor” to your desired location and run Appropriate one (x64 or x86)

sendto menu editor main

On GUI you will see all of the send to Menu items , to add a new one use plus icon or just drag and drop it on main window. If you use Add Button you can edit Shortcut name , you can use a Shortcut Parameter or change the Shortcut Icon.

Add shortcut optipns

To delete a Send To Menu item use delete icon or right click any listed item and choose “Delete From menu” feature.

delete from menu

You can hide the related entry by removing the check mark at the beginning of the items in the list. If you want to remove Send to menu completely use Options – Remove SendTo menu choice , you can also hide all of the Dirves by using “No Drives in SendTo menu” both options require administrator privileges.

Remove sendto menu

If you accidentally delete a component from the Send to menu, or if some components are missing from the corresponding menu, use the File – Restore Default Files command from the top menu to restore the default components in one click.

Restore sendto menu

Note: The program interface does not show removable drives. It only shows shortcuts and files in the Send To folder.

Supported operating systems: Windows 11 , Windows 10, Windows 8.1 , Windows 8 , Windows 7 , Windos Vista ,Windows XP (3264-bit).

Supported languages: English , Turkish , German , Korean , French , Russian , Arabic , Greek , Slovenian , Spanish , Portuguese Brasil , Vietnamese , Indonesian , Chinese , Polish, Hungarian , Japanese , Italian , Dutch (Nederlands) , Persian , Romanian , Ukrainian , Hebrew

Eula license for our freware

File: SendToEditor_x64.exe │ Virustotal
MD5: 264747660e0cd5677002d9ddaaf7187e
SHA1: 8a107f8fd6790d97c22cd80ecb07930ae3847a14

File: SendToEditor.exe │ Virustotal
MD5: 3caa06cd16726f2b4324dfd23b11ef7d
SHA1: c5d1ba0baf86e737e55c6b804daeaf52cb067021

Download


Source link


Sendto Menu Editor
The Windows ‘Send to’ menu is a handy way of sending a file to a specific folder, application, or other item. You can use it to send, copy, or print an individual file to a specific location, device, application, or other item , If you want to add your own app or folder to the Send to menu or if you want to delete some of the Unnecessary items in it you can tweak the Send to menu to suit your needs. Open File Explorer in Windows Right click on a file and From the pop-up menu, move your mouse to the Send to command , Click on a specific entry. The file you click on is then sent to the entry you select.


Sendto Menu Editor

If you want to add your own app or folder to the Send to menu, it’s very simple: Just open the Run dialog box by pressing Win+R, then paste shell:sendto command into the text box. This will open the folder where all those shortcuts located. Alternatively, you can navigate to following folder location
%UserProfile%AppDataRoamingMicrosoftWindowsSendTo
But you can simplify the whole process with the “Send To Menu Editor” is a portable freeware which helps users manage the shortcuts present in the Windows “Send To” Menu.

What is New (Thursday, April 27, 2023)

1. [ FIXED ] – The program does not work if the “Send to Folder” is moved to different location.
2. [ FIXED ] – Application requires Administrator authorization on limited user
3. [ FIXED ] – The text on the interface is too small.
4. [ ADDED ] – High contrast support.
5. [ ADDED ] – Some code Improvements.

How to use SendTo Menu Editor 

After downloading, extract “SendTo Menu Editor” to your desired location and run Appropriate one (x64 or x86)

sendto menu editor main

On GUI you will see all of the send to Menu items , to add a new one use plus icon or just drag and drop it on main window. If you use Add Button you can edit Shortcut name , you can use a Shortcut Parameter or change the Shortcut Icon.

Add shortcut optipns

To delete a Send To Menu item use delete icon or right click any listed item and choose “Delete From menu” feature

delete from menu

You can hide the related entry by removing the check mark at the beginning of the items in the list. If you want to remove Send to menu completely use Options – Remove SendTo menu choice , you can also hide all of the Dirves by using “No Drives in SendTo menu” both options require administrator privileges.

Remove sendto menu

Note: The program interface does not show removable drives. It only shows shortcuts and files in the Send To folder.

Supported operating systems: Windows 11 , Windows 10, Windows 8.1 , Windows 8 , Windows 7 , Windos Vista ,Windows XP (3264-bit).

Supported languages: English , Turkish , German , Korean , French , Russian , Arabic , Greek , Slovenian , Spanish , Portuguese Brasil , Vietnamese , Indonesian , Chinese , Polish, Hungarian , Japanese , Italian , Dutch (Nederlands) , Persian , Romanian , Ukrainian , Hebrew

Eula license for our freware

File: SendToEditor_x64.exe │ Virustotal
MD5: FDC4DA6CB97E763410CD844977ADDFD2
SHA1: A7505229BD7F172E8BD7070D9279532D0C6AB4FB

File: SendToEditor.exe │ Virustotal
MD5: 6F64392271C73F872CBDFC7B5719A97C
SHA1: 8D1FA4A13A41C7CB90D12DE704541CACBAD4AC05

Download


Source link


Backup Start Menu Layout
The Windows 11 And Windows 10 Start Menus lets you pin apps so that they are easier to access. You can group them together and manage the size of the tiles as well as the width of the Start Menu. Whether you love tiles or not, you can find ways to customize and work them so it’s easier to access your favorite apps. You can resize your tiles, pin and unpin them on the Start menu or Start screen. After devoting so much time arranging tiles on the Start menu, it would be annoying if something were to happen to it , a registry corruption , a new application installation or a bad update can rearrange or delete the tiles on the Start menu. To avoid such a situation you can Back Up And Restore The Start Menu Layout In Windows 10. This can be also handy if you do not want to have to setup your Start menu layout from scratch again. Say after a clean install of Windows 10.

Backup Start Menu Layout v1.6 – (Thursday, September 22, 2022)

[Fixed] – Error: Reg file could not be created
[Added] – Some code Improvements

Windows 11 Start Menu


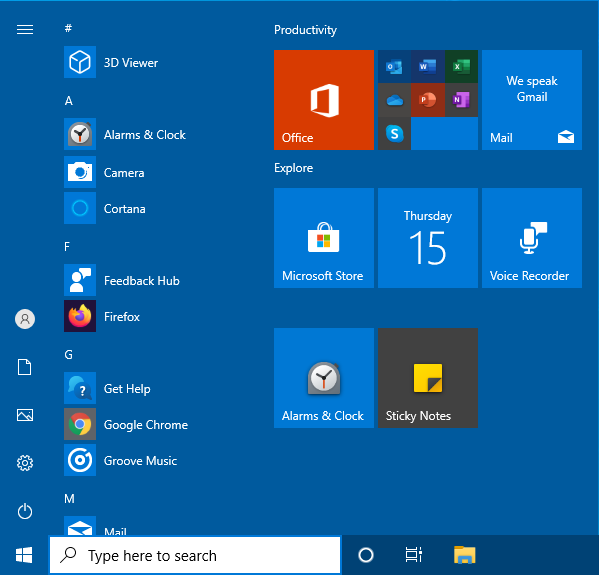
Default windows 11 start menu layout

Windows 10 start Menu

Default Windows 10 start menu layout

Backup and Restore Start Menu Layout in Windows 11 and Windows 10

Backup Start menu layout is a very simple portable freeware Application to backup and restore Windows 10 start menu layout. Extract the downloaded ZIP file and run Appropriate .exe file (x64 or x86)

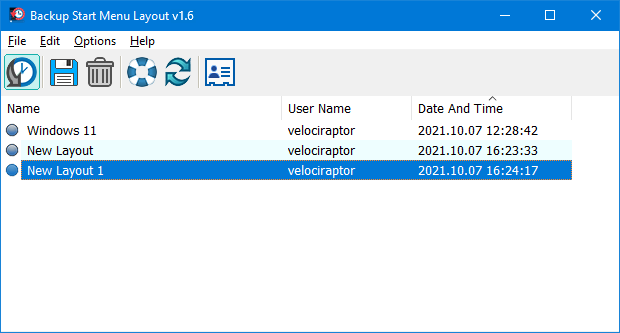
Backup start menu layout

1. To backup Windows 10 start menu layout use the second icon (Diskette Icon) , an input will appear in the Program interface.

2. If you select the backup entry and use the first icon You can restore the saved windows 10 start menu layout. you can also double click on it

Restore start menu layout

How to reset Start Menu Layout in Windows 11 and Windows 10

If your Start Menu has gotten overly cluttered, or want to restore the tiles that you’ve unpinned from Start Menu just use Backup Start menu layout v1.1 Reset start menu layout feture. It will reset your start menu layout back to it’s default configuration. To do that Just click the Lifesaver icon or Use File – Reset Star Menu Layout

How to reset start menu layout

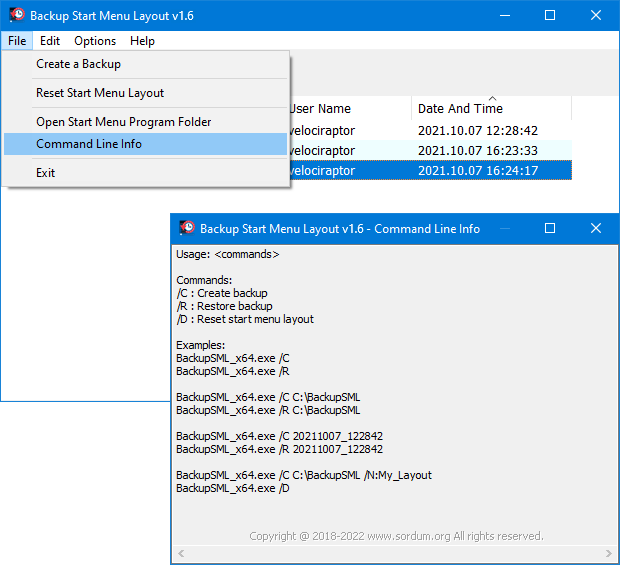
You can delete any backup with Trash can button. To see all the supported command line parameters , use the File – Command Line Info feature

backup start menu layout cmd support

Supported operating systems: Windows 11 and Windows 10 (x64 – x86)

Supported languages: English, Turkish, German, Italian, French , Korean , Portuguese (Brasil) , Chinese (Simplified) , Polish , Spanish , Greek , Dutch (Nederlands), Russian , Hungarian , Swedish , Japanese , Romanian , Vietnamese , Arabic

Eula license for our freware

File: BackupSML_x64.exe │ Virustotal
MD5: 77fa52f4cbad30e4024a0b461a7a9549
SHA1: 1b365f357322802838c26a63c2a7be62a71984be

File: BackupSML.exe │ Virustotal
MD5: 13c037ad27faaadcbd4c89f8df80a23b
SHA1: 92709c07f1158a8625e95290abc23f3da9ae1ce8

Download


Source link


Windows 11 Classic Context menu
The context (Right Click) menu in Windows 11 is redesigned and kept with limited entries when compared to old windows . It includes a row of icons for basic actions like copy, paste, and delete, but hides some functionality you might want behind a ‘Show More Options’ button this mean Every time we need to press an extra option to see all the context menu options. We will make a brief assessment of the cost to the world of the “show more” option that Microsoft added to the Windows 11 desktop context menu. Ergonomics is important because, Implementing ergonomic solutions can help trim operating expenses by reducing costs and improving productivity. Imagine a workplace where 10 people work, each computer user clicks on the desktop 100 times a day, each click wastes an extra 1 second.

10 x 100 = 1000 seconds (16,67 Minutes) a day Lost.
30 x 1000 = 30000 seconds ( 500 Minutes = 8,33 Hours) a Month Lost.

Even in a workplace with only 10 employees, it causes loss of 8.33 hours per month. Consider the waste of time in the workplace where 100 people work.

Windows 11 Classic Context Menu v1.1 – (Thursday, 11 November 2021)

[Added] – All user support (Choose Menu – Apply to all users)
[Added] – Language support
[Added] – Move the Taskbar to the Top (Under menu)
[Added] – Some code improvements

How to Get the Classic (old) Context Menu on Windows 11


Windows 11 new and Old (Classic) context menu

If you want to remove the “Show More Options” entry from Windows 11 Context Menu and restore classic Right Click menus in Windows 11 you can use following registry entries.

Restore full right click context menu in Windows 11 via Registry

Windows Registry Editor Version 5.00

[HKEY_CURRENT_USERSoftwareClassesCLSID{86ca1aa0-34aa-4e8b-a509-50c905bae2a2}InprocServer32]
@=””

Get the default Windows 11 Context Menu back via Registry

Windows Registry Editor Version 5.00

[-HKEY_CURRENT_USERSoftwareClassesCLSID{86ca1aa0-34aa-4e8b-a509-50c905bae2a2}]

After applying the above registry entries, you need to restart File explorer for the settings to take effect. Alternatively you can use Command Prompt to do the same task.

Restore Classic Context Menu on Windows 11 with Cmd

1. Open Cmd with Administrator privileges
2. Copy and paste the below Code and press enter

reg.exe add “HKCUSoftwareClassesCLSID{86ca1aa0-34aa-4e8b-a509-50c905bae2a2}InprocServer32” /f 

Restore Default Context Menu on Windows 11 with Cmd

1. Open Cmd with Administrator privileges
2. Copy and paste the below Code and press enter

reg.exe delete “HKCUSoftwareClassesCLSID{86ca1aa0-34aa-4e8b-a509-50c905bae2a2}” /f

NOTE: Restart the file explorer after the above steps.

If you are looking for a one click solution to Disable or Enable the New Context Menu in Windows 11 instead of dealing with registry entries you can use Win 11 Classic Context Menu v 1.0 Portable freeware Application. It has minimalistic interface Use first Button “Enable Win 11 Classic Context Menu Style” button to disable “Show More Options” from the Right Click Menu in Windows 11

Get the Classic (old) Context Menu on Windows 11

To disable the classic Context Menu in Windows 11 use second button “Enable Win 11 default Context Menu Style”, If you need to restart Windows explorer, software will detect it and warn you

Get the Default Context Menu on Windows 11

Windows 11 Classic Context menu has CMD parameter support. To see all the supported command line parameters , use the Menu – “Command Line Info” Button.

win11 classic context menu cmd parameters

With this Application you can easily toggle between Old Windows 10 Right Click Context Menu and default Windows 11 Context menu.

Supported operating systems: Windows 11

Supported languages: English ,Turkish , German , Russian , French

Eula license for our freware

File: W11ClassicMenu.exeVirustotal
MD5: a1acc40475a972122688e430ace3089c
SHA1: fed53ff8c3b7139b9efc5d039482f69f9490efd3
SHA256: ee6f84e10e025416cd32b8d2eb7182c2ac475ca4b03fc4bb8f57046fe41b9c31

Download


Source link


Windows 11 Classic Context menu
The context (Right Click) menu in Windows 11 is redesigned and kept with limited entries when compared to old windows . It includes a row of icons for basic actions like copy, paste, and delete, but hides some functionality you might want behind a ‘Show More Options’ button this mean Every time we need to press an extra option to see all the context menu options. We will make a brief assessment of the cost to the world of the “show more” option that Microsoft added to the Windows 11 desktop context menu. Ergonomics is important because, Implementing ergonomic solutions can help trim operating expenses by reducing costs and improving productivity. Imagine a workplace where 10 people work, each computer user clicks on the desktop 100 times a day, each click wastes an extra 1 second.

10 x 100 = 1000 seconds (16,67 Minutes) a day Lost.
30 x 1000 = 30000 seconds ( 500 Minutes = 8,33 Hours) a Month Lost.

Even in a workplace with only 10 employees, it causes loss of 8.33 hours per month. Consider the waste of time in the workplace where 100 people work.

How to Get the Classic (old) Context Menu on Windows 11


Windows 11 new and Old (Classic) context menu

If you want to remove the “Show More Options” entry from Windows 11 Context Menu and restore classic Right Click menus in Windows 11 you can use following registry entries.

Restore full right click context menu in Windows 11

Windows Registry Editor Version 5.00

[HKEY_CURRENT_USERSoftwareClassesCLSID{86ca1aa0-34aa-4e8b-a509-50c905bae2a2}InprocServer32]
@=””

Get the default Windows 11 Context Menu back

Windows Registry Editor Version 5.00

[-HKEY_CURRENT_USERSoftwareClassesCLSID{86ca1aa0-34aa-4e8b-a509-50c905bae2a2}]

After applying the above registry entries, you need to restart File explorer for the settings to take effect. If you are looking for a one click solution to Disable or Enable the New Context Menu in Windows 11 instead of dealing with registry entries you can use Win 11 Classic Context Menu v 1.0 Portable freeware Application. It has minimalistic interface Use first Button “Enable Win 11 Classic Context Menu Style” button to disable “Show More Options” from the Right Click Menu in Windows 11

Get the Classic (old) Context Menu on Windows 11

To disable the classic Context Menu in Windows 11 use second button “Enable Win 11 default Context Menu Style”, If you need to restart Windows explorer, software will detect it and warn you

Get the Default Context Menu on Windows 11

Windows 11 Classic Context menu has CMD parameter support. To see all the supported command line parameters , use the Menu – “Command Line Info” Button.

win11 classic context menu cmd parameters

With this Application you can easily toggle between Old Windows 10 Right Click Context Menu and default Windows 11 Context menu.

Supported operating systems: Windows 11

Eula license for our freware

File: W11ClassicMenu.exeVirustotal
MD5: 6e86b3bf4a01b2c40f9b08cfedf300b1
SHA1: 799969c3d0acf0135178e2aa2224f868316ecd08

Download


Source link


Windows 11 Classic Context menu
The context (Right Click) menu in Windows 11 is redesigned and kept with limited entries when compared to old windows . It includes a row of icons for basic actions like copy, paste, and delete, but hides some functionality you might want behind a ‘Show More Options’ button this mean Every time we need to press an extra option to see all the context menu options. We will make a brief assessment of the cost to the world of the “show more” option that Microsoft added to the Windows 11 desktop context menu. Ergonomics is important because, Implementing ergonomic solutions can help trim operating expenses by reducing costs and improving productivity. Imagine a workplace where 10 people work, each computer user clicks on the desktop 100 times a day, each click wastes an extra 1 second.

10 x 100 = 1000 seconds (16,67 Minutes) a day Lost.
30 x 1000 = 30000 seconds ( 500 Minutes = 8,33 Hours) a Month Lost.

Even in a workplace with only 10 employees, it causes loss of 8.33 hours per month. Consider the waste of time in the workplace where 100 people work.

How to Get the Classic (old) Context Menu on Windows 11


Windows 11 new and Old (Classic) context menu

If you want to remove the “Show More Options” entry from Windows 11 Context Menu and restore classic Right Click menus in Windows 11 you can use following registry entries.

Restore full right click context menu in Windows 11 via Registry

Windows Registry Editor Version 5.00

[HKEY_CURRENT_USERSoftwareClassesCLSID{86ca1aa0-34aa-4e8b-a509-50c905bae2a2}InprocServer32]
@=””

Get the default Windows 11 Context Menu back via Registry

Windows Registry Editor Version 5.00

[-HKEY_CURRENT_USERSoftwareClassesCLSID{86ca1aa0-34aa-4e8b-a509-50c905bae2a2}]

After applying the above registry entries, you need to restart File explorer for the settings to take effect. Alternatively you can use Command Prompt to do the same task.

Restore Classic Context Menu on Windows 11 with Cmd

1. Open Cmd with Administrator privileges
2. Copy and paste the below Code and press enter

reg.exe add “HKCUSoftwareClassesCLSID{86ca1aa0-34aa-4e8b-a509-50c905bae2a2}InprocServer32” /f 

Restore Default Context Menu on Windows 11 with Cmd

1. Open Cmd with Administrator privileges
2. Copy and paste the below Code and press enter

reg.exe delete “HKCUSoftwareClassesCLSID{86ca1aa0-34aa-4e8b-a509-50c905bae2a2}” /f

NOTE: Restart the file explorer after the above steps.

If you are looking for a one click solution to Disable or Enable the New Context Menu in Windows 11 instead of dealing with registry entries you can use Win 11 Classic Context Menu v 1.0 Portable freeware Application. It has minimalistic interface Use first Button “Enable Win 11 Classic Context Menu Style” button to disable “Show More Options” from the Right Click Menu in Windows 11

Get the Classic (old) Context Menu on Windows 11

To disable the classic Context Menu in Windows 11 use second button “Enable Win 11 default Context Menu Style”, If you need to restart Windows explorer, software will detect it and warn you

Get the Default Context Menu on Windows 11

Windows 11 Classic Context menu has CMD parameter support. To see all the supported command line parameters , use the Menu – “Command Line Info” Button.

win11 classic context menu cmd parameters

With this Application you can easily toggle between Old Windows 10 Right Click Context Menu and default Windows 11 Context menu.

Supported operating systems: Windows 11

Eula license for our freware

File: W11ClassicMenu.exeVirustotal
MD5: 6e86b3bf4a01b2c40f9b08cfedf300b1
SHA1: 799969c3d0acf0135178e2aa2224f868316ecd08

Download


Source link


Backup Start Menu Layout
The Windows 11 And Windows 10 Start Menus lets you pin apps so that they are easier to access. You can group them together and manage the size of the tiles as well as the width of the Start Menu. Whether you love tiles or not, you can find ways to customize and work them so it’s easier to access your favorite apps. You can resize your tiles, pin and unpin them on the Start menu or Start screen. After devoting so much time arranging tiles on the Start menu, it would be annoying if something were to happen to it , a registry corruption , a new application installation or a bad update can rearrange or delete the tiles on the Start menu. To avoid such a situation you can Back Up And Restore The Start Menu Layout In Windows 10. This can be also handy if you do not want to have to setup your Start menu layout from scratch again. Say after a clean install of Windows 10.

Backup Start Menu Layout v1.5 – (Thursday, 07 October 2021)

[Added] – Windows 11 Support
[Added] – Confirmation message to Reset Start Menu option
[Added] – Some code Improvements
[Fixed] – Some Minor BUGS

Windows 11 Start Menu


Default windows 11 start menu layout

Windows 10 start Menu

Default Windows 10 start menu layout

Backup and Restore Start Menu Layout in Windows 11 and Windows 10

Backup Start menu layout is a very simple portable freeware Application to backup and restore Windows 10 start menu layout. Extract the downloaded ZIP file and run Appropriate .exe file (x64 or x86)

Backup start menu layout

1. To backup Windows 10 start menu layout use the second icon (Diskette Icon) , an input will appear in the Program interface.

2. If you select the backup entry and use the first icon You can restore the saved windows 10 start menu layout. you can also double click on it

Restore start menu layout

How to reset Start Menu Layout in Windows 11 and Windows 10

If your Start Menu has gotten overly cluttered, or want to restore the tiles that you’ve unpinned from Start Menu just use Backup Start menu layout v1.1 Reset start menu layout feture. It will reset your start menu layout back to it’s default configuration. To do that Just click the Lifesaver icon or Use File – Reset Star Menu Layout

How to reset start menu layout

You can delete any backup with Trash can button. To see all the supported command line parameters , use the File – Command Line Info feature

backup start menu layout cmd support

Supported operating systems: Windows 11 and Windows 10 (x64 – x86)

Supported languages: English, Turkish, German, Italian, French , Korean , Portuguese (Brasil) , Chinese (Simplified) , Polish , Spanish , Greek , Dutch (Nederlands), Russian , Hungarian , Swedish

Eula license for our freware

File: BackupSML_x64.exe │ Virustotal
MD5: f64b66d943f915a2746efb4f093d5b39
SHA1: 7a635aca8b5520f256eb1866e0133b3c5512fe9f

File: BackupSML.exe │ Virustotal
MD5: a350315317d22e968f0a5fbf13689216
SHA1: e13f1b1be304d3f7736172601be2cff2ebc6e0b9

Download


Source link