File Attribute Changer is a utility to easily rename multiple files and folders, change timestamps and system attributes. The program can use regular expression for an extremely flexible search-and-replace capability.
File Attribute Changer is a utility to easily rename multiple files and folders, change timestamps and system attributes. The program can use regular expression for an extremely flexible search-and-replace capability.

In Windows, mouse settings are controlled by using the Mouse Properties dialog box. There are different ways to open mouse settings , for example go to Start button- Control Panel, In the search tab type mouse and select the mouse you are using,you can also use Run dialog box to change mouse setting.
Mouse Settings Changer v1.2 (Friday, October 6, 2023)
1.[FIXED] – The mouse speed is not saved
Hold down the Windows Key and Press R on your keyboard. Once you’ve got the Run command box open, type one of the Following codes and press Enter.
main.cpl
control.exe main.cpl,,2
Mouse Properties dialog box will open
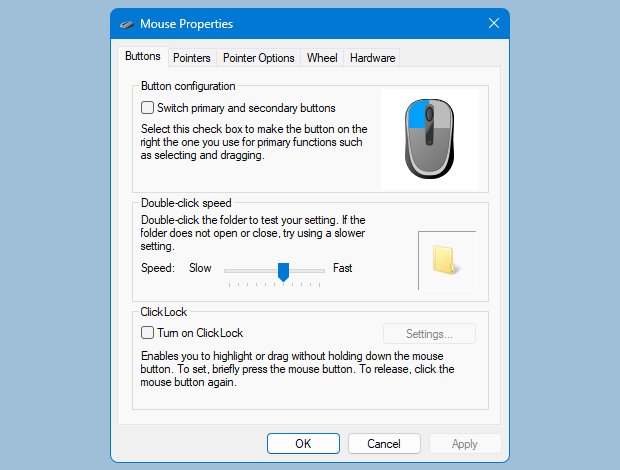
In addition , you can use Settings app to change the mouse settings so that you can adjust your mouse according to your comfort and make it work just the way you want it.
1. Launch the Settings app (Win+I keyboard shortcut).
2. Click the “Devices” category.
3. Click the “Mouse” page in the left menu of the Settings category.
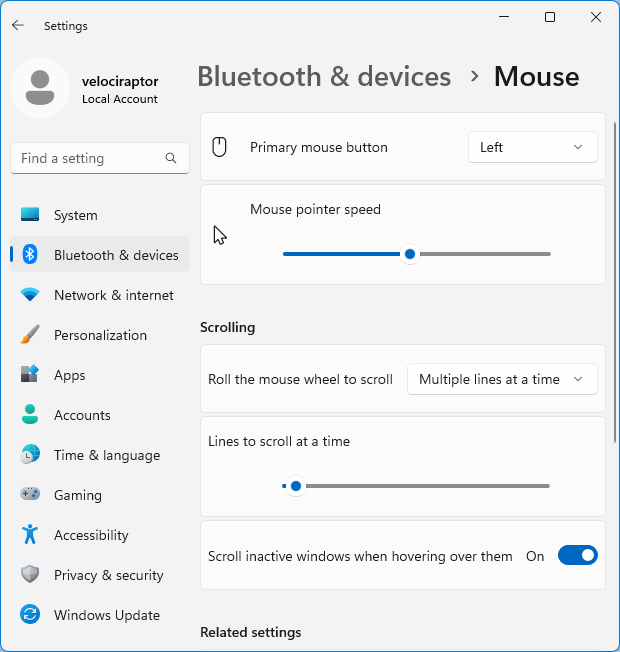
You can customise common mouse functions here but there is no way to change mouse settings in batch , vbscript or Command prompt, there are many Advantages of using scripting language for example , Allows complex tasks to be performed in relatively few steps. Mouse settings changer is a Portable freeware Application to help you change mouse settings without open Mouse Properties dialog box , it has no GUI.
How to use Mouse settings changer
Download and run the MouseSC_Info.bat file to see the whole Cmd parameters support list.
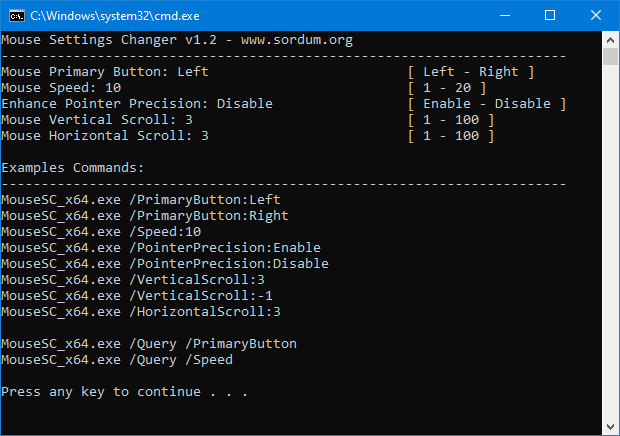
For example , “MouseSC_x64.exe /PrimaryButton:Left” command will change your Primary Mouse button to left or “MouseSC_x64.exe /Speed:10” command will set the Mouse pointer speed

You will find some example batch scripts in the downloaded file , MouseSC_Example.bat and MouseSC_Example2.bat , you can edit them according to your needs.
NOTE: If Mouse Properties window is open, Changing mouse settings may not reflect in the “Mouse properties window” therefore Please close the “Mouse properties” screen before using the program.
Supported Operating Systems: Windows 11 , Windows 10 , Windows 8.1 , Windows 8 , Windows 7, Windows Vista , Windows Xp (32 64-bit)
File: MouseSC_x64.exe │ Virustotal
MD5: 6014fddabdd7b6e2f31c085a25b01c3d
SHA1: 8f5a49aecdfa0227f0ee3012ed24af808b6f0321
File: MouseSC.exe │ Virustotal
MD5: 4e9134b252b9641e8182de97902310a0
SHA1: 5877b14f2be649dd4d305f7f8f541f5ee7338ffc

When you connect to a Ethernet or wired network for the first time, Windows automatically creates a network profile and assigns generic names like Network 1, Network 2, etc. finally stores it on your computer as a known network. A wireless network profile will use the SSID of the wireless network (ex: router) . Some users and administrators may dislike the non-descriptive network connections names and want to rename , delete or clear redundant network profiles (names). After Windows 7 , Microsoft removed Netork Profile rename option therefore you will not find any option whatsoever in the Settings app or Control Panel to change the network name. It is still possible to edit network profile names to make them more descriptive but the only effective way to Rename or remove the connections in Windows 11, Windows 10 and Windows 8 is by using the registry editor. (valid in all Windows versions)
What is New (Thursday, September 28, 2023)
1.[FIXED] – Deleted network profile leaves leftover in a registry key
2.[FIXED] – Can’t upper/lower letter in renaming
3.[ADDED] – Multiple selection feature in the List with Ctrl key
4.[ADDED] – x64 version
5.[ADDED] – High contrast support
6.[ADDED] – Manage Known Networks has been added (Under the menu button)
7.[ADDED] – Some code Improvements
How to Change the Active Network Profile Name
You can check the current name in the Network and Sharing Center on Windows , press the Windows + R keys to open the Run dialog, type one of the following commands and press Enter.
control.exe /name Microsoft.NetworkAndSharingCenter
explorer.exe shell:::{8E908FC9-BECC-40f6-915B-F4CA0E70D03D}
The name of the network is displayed at the very top of the page.

Windows Users have three main options to change a network name ;
1. Using Local Security Policy (It is only available in professional versions of Windows)
2. Using the Windows Registry
3. Using Network Profile Name Changer which is a Portable freeware
Delete / Rename Network Connections In Windows by using Registry
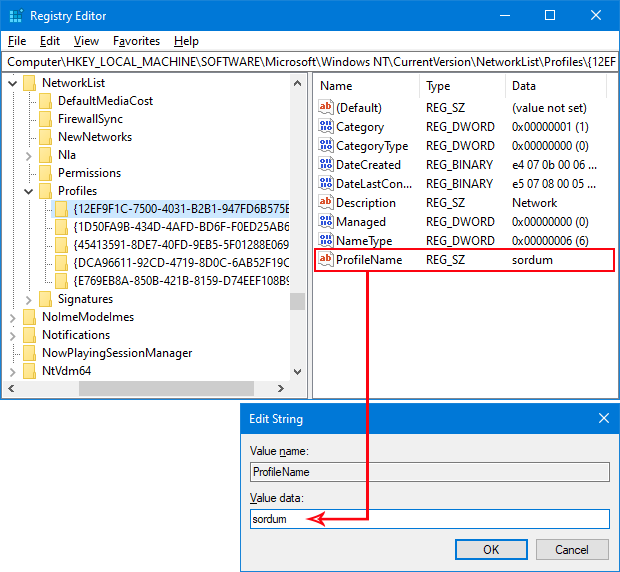
Go to the following key
HKEY_LOCAL_MACHINESOFTWAREMicrosoftWindows NTCurrentVersionNetworkListProfiles
The Profiles folder will provide a list of all the network connections with a unique ID , Each network location is represented by a subfolder therefore you need to click on each to check the ProfileName until you find the network name that you want to change. To rename a network location, click on the corresponding subfolder and edit the key named ProfileName. Input the new name for the network location. You can also delete individual subfolders to remove Network connections.
Using Network Profile Name Changer to Delete / Rename Network Connections
Registry way is not Straightforward for Novice Windows users , to simplify the whole Process you can use Network Profile Name Changer.
1. After download and unzipping , run the program , It will list all you Network Profiles
2. Choose one of the Network Profile then use Rename or Delete button

You can also right click any network profile and perform the same action from the context menu or double click any of the listed Item to rename it.

With the context menu, you can rename any network Profile, change a Network Profile from Public to Private or vice versa, open a network Profile registry key or delete a network Profile easily.
Note: If you delete all Network profiles or if the profile you have edited, cannot be recognized by the system, turn off the adapter you connect to the internet and turn it on again, or disconnect and reconnect to the internet, the problem will be solved.
Supported languages: English ,Turkish , German , Hungarian , Polish , Bulgarian , French , Korean , Brazilian (Portuguese) , Russian , Japanese , Italian , Arabic , Chinese (Simplified) , Swedish , Romanian , Greek , Spanish , Danish
Supported operating systems: Windows 11 , Windows 10 , Windows 8.1 , Windows 8 , Windows 7 (x86 & x64) , Vista
File: NetPnc_x64.exe │ Virustotal
MD5: db0f223584c85edd6f0f12cfd0375fcb
SHA1: f72832558afd4de2437ed88d43ee901dbe8c765b
File: NetPnc.exe │ Virustotal
MD5: 90b5d3a5daadade73a2922ff3fa428de
SHA1: 29343856c961fbae2a2148efa92ae0e0094ed1b2

When you connect to a Ethernet or wired network for the first time, Windows automatically creates a network profile and assigns generic names like Network 1, Network 2, etc. finally stores it on your computer as a known network. A wireless network profile will use the SSID of the wireless network (ex: router) . Some users and administrators may dislike the non-descriptive network connections names and want to rename , delete or clear redundant network profiles (names). After Windows 7 , Microsoft removed Netork Profile rename option therefore you will not find any option whatsoever in the Settings app or Control Panel to change the network name. It is still possible to edit network profile names to make them more descriptive but the only effective way to Rename or remove the connections in Windows 11, Windows 10 and Windows 8 is by using the registry editor. (valid in all Windows versions)
What is New (Tuesday, March 22, 2022)
1.[FIXED] – After a Network Profile has been deleted, some Values leaves in a registry key
2.[ADDED] – Language support
3.[ADDED] – Windows Vista support
4.[ADDED] – Some Improvements in coding
How to Change the Active Network Profile Name
You can check the current name in the Network and Sharing Center on Windows , press the Windows + R keys to open the Run dialog, type one of the following commands and press Enter.
control.exe /name Microsoft.NetworkAndSharingCenter
explorer.exe shell:::{8E908FC9-BECC-40f6-915B-F4CA0E70D03D}
The name of the network is displayed at the very top of the page.

Windows Users have three main options to change a network name ;
1. Using Local Security Policy (It is only available in professional versions of Windows)
2. Using the Windows Registry
3. Using Network Profile Name Changer which is a Portable freeware
Delete / Rename Network Connections In Windows by using Registry
Go to the following key
HKEY_LOCAL_MACHINESOFTWAREMicrosoftWindows NTCurrentVersionNetworkListProfiles
The Profiles folder will provide a list of all the network connections with a unique ID , Each network location is represented by a subfolder therefore you need to click on each to check the ProfileName until you find the network name that you want to change. To rename a network location, click on the corresponding subfolder and edit the key named ProfileName. Input the new name for the network location. You can also delete individual subfolders to remove Network connections.

Using Network Profile Name Changer to Delete / Rename Network Connections
Registry way is not Straightforward for Novice Windows users , to simplify the whole Process you can use Network Profile Name Changer.
1. After download and unzipping , run the program , It will list all you Network Profiles
2. Choose one of the Network Profile then use Rename or Delete button
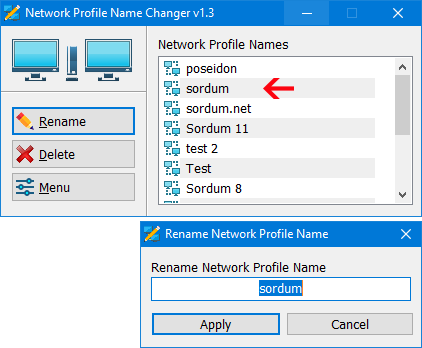
You can also right click any network profile and perform the same action from the context menu or double click any of the listed Item to rename it.

With the context menu, you can rename any network Profile, change a Network Profile from Public to Private or vice versa, open a network Profile registry key or delete a network Profile easily.
Note: If you delete all Network profiles or if the profile you have edited, cannot be recognized by the system, turn off the adapter you connect to the internet and turn it on again, or disconnect and reconnect to the internet, the problem will be solved.
Supported languages: English ,Turkish , German
Supported operating systems: Windows 11 , Windows 10 , Windows 8.1 , Windows 8 , Windows 7 (x86 & x64) , Vista
File: NetPnc.exe │ Virustotal
MD5: 177aa667b9c7be766ae53888b3c3fd73
SHA1: 541084c57d0cd96f8e23326e304e9faf3d77cff2

When you connect to a Ethernet or wired network for the first time, Windows automatically creates a network profile and assigns generic names like Network 1, Network 2, etc. finally stores it on your computer as a known network. A wireless network profile will use the SSID of the wireless network (ex: router) . Some users and administrators may dislike the non-descriptive network connections names and want to rename , delete or clear redundant network profiles (names). After Windows 7 , Microsoft removed Netork Profile rename option therefore you will not find any option whatsoever in the Settings app or Control Panel to change the network name. It is still possible to edit network profile names to make them more descriptive but the only effective way to Rename or remove the connections in Windows 11, Windows 10 and Windows 8 is by using the registry editor. (valid in all Windows versions)
What is New (Monday, 20 September 2021)
1.[ADDED] – Delete a Network Profile via Context menu
2.[ADDED] – Changing a Network Profile to Public Or Private via Context menu
3.[ADDED] – Open With Registry Editor Context menu Option
4.[ADDED] – Rename a Network Profile via Context menu
5.[ADDED] – Some code improvements
How to Change the Active Network Profile Name
You can check the current name in the Network and Sharing Center on Windows , press the Windows + R keys to open the Run dialog, type one of the following commands and press Enter.
control.exe /name Microsoft.NetworkAndSharingCenter
explorer.exe shell:::{8E908FC9-BECC-40f6-915B-F4CA0E70D03D}
The name of the network is displayed at the very top of the page.

Windows Users have three main options to change a network name ;
1. Using Local Security Policy (It is only available in professional versions of Windows)
2. Using the Windows Registry
3. Using Network Profile Name Changer which is a Portable freeware
Delete / Rename Network Connections In Windows by using Registry
Go to the following key
HKEY_LOCAL_MACHINESOFTWAREMicrosoftWindows NTCurrentVersionNetworkListProfiles
The Profiles folder will provide a list of all the network connections with a unique ID , Each network location is represented by a subfolder therefore you need to click on each to check the ProfileName until you find the network name that you want to change. To rename a network location, click on the corresponding subfolder and edit the key named ProfileName. Input the new name for the network location. You can also delete individual subfolders to remove Network connections.

Using Network Profile Name Changer to Delete / Rename Network Connections
Registry way is not Straightforward for Novice Windows users , to simplify the whole Process you can use Network Profile Name Changer.
1. After download and unzipping , run the program , It will list all you Network Profiles
2. Choose one of the Network Profile then use Rename or Delete button

You can also right click any network profile and perform the same action from the context menu or double click any of the listed Item to rename it.

With the context menu, you can rename any network Profile, change a Network Profile from Public to Private or vice versa, open a network Profile registry key or delete a network Profile easily.
Note: If you delete all Network profiles or if the profile you have edited, cannot be recognized by the system, turn off the adapter you connect to the internet and turn it on again, or disconnect and reconnect to the internet, the problem will be solved.
Supported operating systems: Windows 11 , Windows 10 , Windows 8.1 , Windows 8 , Windows 7 (x86 & x64)
File: NetPnc.exe │ Virustotal
MD5: 47726fe9c4224524f8799c306ac893d3
SHA1: 22c1f87e51283d711ce622944f71f9302c6121bf

When you connect to a Ethernet or wired network for the first time, Windows automatically creates a network profile and assigns generic names like Network 1, Network 2, etc. finally stores it on your computer as a known network. A wireless network profile will use the SSID of the wireless network (ex: router) . Some users and administrators may dislike the non-descriptive network connections names and want to rename , delete or clear redundant network profiles (names). After Windows 7 , Microsoft removed Netork Profile rename option therefore you will not find any option whatsoever in the Settings app or Control Panel to change the network name. It is still possible to edit network profile names to make them more descriptive but the only effective way to Rename or remove the connections in Windows 11, Windows 10 and Windows 8 is by using the registry editor. (valid in all Windows versions)
What is New (Monday, 20 September 2021)
1.[ADDED] – Delete a Network Profile via Context menu
2.[ADDED] – Changing a Network Profile to Public Or Private via Context menu
3.[ADDED] – Open With Registry Editor Context menu Option
4.[ADDED] – Rename a Network Profile via Context menu
5.[ADDED] – Some code improvements
How to Change the Active Network Profile Name
You can check the current name in the Network and Sharing Center on Windows , press the Windows + R keys to open the Run dialog, type one of the following commands and press Enter.
control.exe /name Microsoft.NetworkAndSharingCenter
explorer.exe shell:::{8E908FC9-BECC-40f6-915B-F4CA0E70D03D}
The name of the network is displayed at the very top of the page.

Windows Users have three main options to change a network name ;
1. Using Local Security Policy (It is only available in professional versions of Windows)
2. Using the Windows Registry
3. Using Network Profile Name Changer which is a Portable freeware
Delete / Rename Network Connections In Windows by using Registry
Go to the following key
HKEY_LOCAL_MACHINESOFTWAREMicrosoftWindows NTCurrentVersionNetworkListProfiles
The Profiles folder will provide a list of all the network connections with a unique ID , Each network location is represented by a subfolder therefore you need to click on each to check the ProfileName until you find the network name that you want to change. To rename a network location, click on the corresponding subfolder and edit the key named ProfileName. Input the new name for the network location. You can also delete individual subfolders to remove Network connections.

Using Network Profile Name Changer to Delete / Rename Network Connections
Registry way is not Straightforward for Novice Windows users , to simplify the whole Process you can use Network Profile Name Changer.
1. After download and unzipping , run the program , It will list all you Network Profiles
2. Choose one of the Network Profile then use Rename or Delete button

You can also right click any network profile and perform the same action from the context menu or double click any of the listed Item to rename it.

With the context menu, you can rename any network Profile, change a Network Profile from Public to Private or vice versa, open a network Profile registry key or delete a network Profile easily.
Note: If you delete all Network profiles or if the profile you have edited, cannot be recognized by the system, turn off the adapter you connect to the internet and turn it on again, or disconnect and reconnect to the internet, the problem will be solved.
Supported operating systems: Windows 11 , Windows 10 , Windows 8.1 , Windows 8 , Windows 7 (x86 & x64)
File: NetPnc.exe │ Virustotal
MD5: 47726fe9c4224524f8799c306ac893d3
SHA1: 22c1f87e51283d711ce622944f71f9302c6121bf

When you connect to a network for the first time, Windows automatically creates a network profile and assigns generic names like Network 1, Network 2, etc. (Ethernet or wired connection) finally stores it on your computer as a known network. A wireless network profile will use the SSID of the wireless network (ex: router) . Some users and administrators may dislike the non-descriptive network connections names and want to rename , delete or clear redundant network profiles (names). After Windows 7 , Microsoft removed Netork Profil rename option therefore you will not find any option whatsoever in the Settings app or Control Panel to change the network name. It is still possible to edit network profile names to make them more descriptive but the only effective way to Rename or remove the connections in Windows 11, Windows 10 and Windows 8 is by using the registry editor. (valid in all Windows versions)
What is New (Friday, 27 August 2021)
1.[ADDED] – Show All Network Profile Names feature
2.[ADDED] – Delete Network Profile Names feature
3.[ADDED] – Double click one of the Network Profile name on the list to rename it
7.[FIXED] – GUI is too small
How to Change the Active Network Profile Name
You can check the current name in the Network and Sharing Center on Windows , press the Windows + R keys to open the Run dialog, type one of the following commands and press Enter.
control.exe /name Microsoft.NetworkAndSharingCenter
explorer.exe shell:::{8E908FC9-BECC-40f6-915B-F4CA0E70D03D}
The name of the network is displayed at the very top of the page.

Windows Users have three main options to change a network name ;
1. Using Local Security Policy (It is only available in professional versions of Windows)
2. Using the Windows Registry
3. Using Network Profile Name Changer which is a Portable freeware
Delete / Rename Network Connections In Windows by using Registry
Go to the following key
HKEY_LOCAL_MACHINESOFTWAREMicrosoftWindows NTCurrentVersionNetworkListProfiles
The Profiles folder will provide a list of all the network connections with a unique ID , Each network location is represented by a subfolder therefore you need to click on each to check the ProfileName until you find the network name that you want to change. To rename a network location, click on the corresponding subfolder and edit the key named ProfileName. Input the new name for the network location. You can also delete individual subfolders to remove Network connections.

Using Network Profile Name Changer to Delete / Rename Network Connections
Registry way is not Straightforward for Novice Windows users , to simplify the whole Process you can use Network Profile Name Changer.
1. After download and unzipping , run the program , It will list all you Network Profiles
2. Choose one of the Network Profile then use Rename or Delete button

You can also double click any of the listed Item to rename it.
Note: If you delete all Network profiles or if the profile you have edited, cannot be recognized by the system, turn off the adapter you connect to the internet and turn it on again, or disconnect and reconnect to the internet, the problem will be solved.
Supported operating systems: Windows 11 , Windows 10 , Windows 8.1 , Windows 8 , Windows 7 (x86 & x64)
File: NetPnc.exe │ Virustotal
MD5: dbaa6ed07dea1c8fb8b09ca211ee7e97
SHA1: bfce568e5f0665f5d55498130cd0d96ffaee5151

In Windows, mouse settings are controlled by using the Mouse Properties dialog box. There are different ways to open mouse settings , for example go to Start button- Control Panel, In the search tab type mouse and select the mouse you are using,you can also use Run dialog box to change mouse setting.
Mouse Settings Changer v1.1 (Monday 19 april 2021)
1.[FIXED] – A small typo
2.[ADDED] – /Query parameter
Hold down the Windows Key and Press R on your keyboard. Once you’ve got the Run command box open, type one of the Following codes and press Enter.
main.cpl
control.exe main.cpl,,2
Mouse Properties dialog box will open

In addition , you can use Settings app to change the mouse settings so that you can adjust your mouse according to your comfort and make it work just the way you want it.
1. Launch the Settings app (Win+I keyboard shortcut).
2. Click the “Devices” category.
3. Click the “Mouse” page in the left menu of the Settings category.

You can customise common mouse functions here but there is no way to change mouse settings in batch , vbscript or Command prompt, there are many Advantages of using scripting language for example , Allows complex tasks to be performed in relatively few steps. Mouse settings changer is a Portable freeware Application to help you change mouse settings without open Mouse Properties dialog box , it has no GUI.
How to use Mouse settings changer
Download and run the MouseSC_Info.bat file to see the whole Cmd parameters support list.

For example , “MouseSC_x64.exe /PrimaryButton:Left” command will change your Primary Mouse button to left or “MouseSC_x64.exe /Speed:10” command will set the Mouse pointer speed

You will find some example batch scripts in the downloaded file , MouseSC_Example.bat and MouseSC_Example2.bat , you can edit them according to your needs.
NOTE: If Mouse Properties window is open, Changing mouse settings may not reflect in the “Mouse properties window” therefore Please close the “Mouse properties” screen before using the program.
Supported Operating Systems: Windows 10 , Windows 8.1 , Windows 8 , Windows 7, Windows Vista , Windows Xp (32 64-bit)
File: MouseSC_x64.exe │ Virustotal
MD5: 0fe4584af5f80c67767c63d435d52d3d
SHA1: 6883adefbbfbeaddf68b006ec8f43952d4f32b84
File: MouseSC.exe │ Virustotal
MD5: ceeef3859049da7727d340bb9a9519b9
SHA1: 4155f0113c31195ce35c128c14fceddae55dfabe

In Windows, mouse settings are controlled by using the Mouse Properties dialog box. There are different ways to open mouse settings , for example go to Start button- Control Panel, In the search tab type mouse and select the mouse you are using,you can also use Run dialog box to change mouse setting. Hold down the Windows Key and Press R on your keyboard. Once you’ve got the Run command box open, type one of the Following codes and press Enter.
main.cpl
control.exe main.cpl,,2
Mouse Properties dialog box will open

In addition , you can use Settings app to change the mouse settings so that you can adjust your mouse according to your comfort and make it work just the way you want it.
1. Launch the Settings app (Win+I keyboard shortcut).
2. Click the “Devices” category.
3. Click the “Mouse” page in the left menu of the Settings category.

You can customise common mouse functions here but there is no way to change mouse settings in batch , vbscript or Command prompt, there are many Advantages of using scripting language for example , Allows complex tasks to be performed in relatively few steps. Mouse settings changer is a Portable freeware Application to help you change mouse settings without open Mouse Properties dialog box , it has no GUI.
How to use Mouse settings changer
Download and run the MouseSC_Info.bat file to see the whole Cmd parameters support list.

For example , “MouseSC_x64.exe /PrimaryButton:Left” command will change your Primary Mouse button to left or “MouseSC_x64.exe /Speed:10” command will set the Mouse pointer speed

You will find some example batch scripts in the downloaded file , MouseSC_Example.bat and MouseSC_Example2.bat , you can edit them according to your needs.
NOTE: If Mouse Properties window is open, Changing mouse settings may not reflect in the “Mouse properties window” therefore Please close the “Mouse properties” screen before using the program.
Supported Operating Systems: Windows 10 , Windows 8.1 , Windows 8 , Windows 7, Windows Vista , Windows Xp (32 64-bit)
File: MouseSC_x64.exe │ Virustotal
MD5: 428c1c3967825ea520feb5140c8be1cb
SHA1: 599baebb9a61da16220b4631c743e7995eb3d6c6
File: MouseSC.exe │ Virustotal
MD5: 779fd97c1c1fa4c6e53fb515b42a5453
SHA1: 99cf35ed28da6228903ef547ca7b70d9eabc2a34