When you connect to a network for the first time, Windows automatically creates a network profile and assigns generic names like Network 1, Network 2, etc. (Ethernet or wired connection) finally stores it on your computer as a known network. A wireless network profile will use the SSID of the wireless network (ex: router) . Some users and administrators may dislike the non-descriptive network connections names and want to rename , delete or clear redundant network profiles (names). After Windows 7 , Microsoft removed Netork Profil rename option therefore you will not find any option whatsoever in the Settings app or Control Panel to change the network name. It is still possible to edit network profile names to make them more descriptive but the only effective way to Rename or remove the connections in Windows 11, Windows 10 and Windows 8 is by using the registry editor. (valid in all Windows versions)
What is New (Friday, 27 August 2021)
1.[ADDED] – Show All Network Profile Names feature
2.[ADDED] – Delete Network Profile Names feature
3.[ADDED] – Double click one of the Network Profile name on the list to rename it
7.[FIXED] – GUI is too small
How to Change the Active Network Profile Name
You can check the current name in the Network and Sharing Center on Windows , press the Windows + R keys to open the Run dialog, type one of the following commands and press Enter.
control.exe /name Microsoft.NetworkAndSharingCenter
explorer.exe shell:::{8E908FC9-BECC-40f6-915B-F4CA0E70D03D}
The name of the network is displayed at the very top of the page.

Windows Users have three main options to change a network name ;
1. Using Local Security Policy (It is only available in professional versions of Windows)
2. Using the Windows Registry
3. Using Network Profile Name Changer which is a Portable freeware
Delete / Rename Network Connections In Windows by using Registry
Go to the following key
HKEY_LOCAL_MACHINESOFTWAREMicrosoftWindows NTCurrentVersionNetworkListProfiles
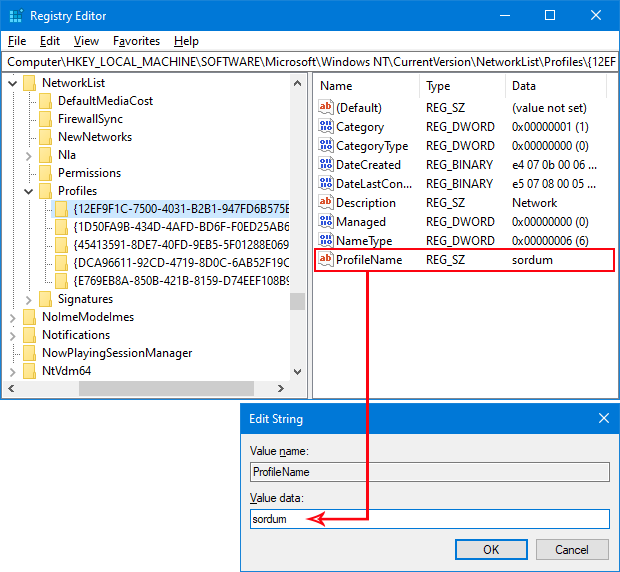
The Profiles folder will provide a list of all the network connections with a unique ID , Each network location is represented by a subfolder therefore you need to click on each to check the ProfileName until you find the network name that you want to change. To rename a network location, click on the corresponding subfolder and edit the key named ProfileName. Input the new name for the network location. You can also delete individual subfolders to remove Network connections.

Using Network Profile Name Changer to Delete / Rename Network Connections
Registry way is not Straightforward for Novice Windows users , to simplify the whole Process you can use Network Profile Name Changer.
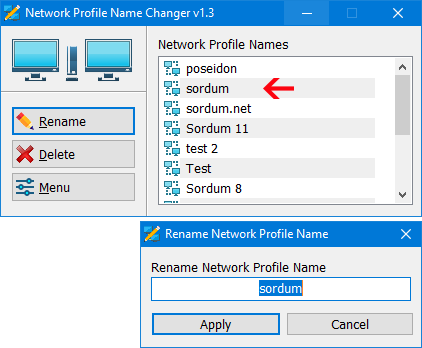
1. After download and unzipping , run the program , It will list all you Network Profiles
2. Choose one of the Network Profile then use Rename or Delete button

You can also double click any of the listed Item to rename it.
Note: If you delete all Network profiles or if the profile you have edited, cannot be recognized by the system, turn off the adapter you connect to the internet and turn it on again, or disconnect and reconnect to the internet, the problem will be solved.
Supported operating systems: Windows 11 , Windows 10 , Windows 8.1 , Windows 8 , Windows 7 (x86 & x64)
File: NetPnc.exe │ Virustotal
MD5: dbaa6ed07dea1c8fb8b09ca211ee7e97
SHA1: bfce568e5f0665f5d55498130cd0d96ffaee5151


